Tag Archives: Qzone

Add Photos to Your Qzone


Last time, we showed you how to open up your Qzone. This time, we’ll show you how to add photos to it. Here we go:

First, open your Qzone.

Qzone photo
Your Qzone. No photos yet.


Hover at the top to bring down the list of icons.

Qzone photo
Hover on third set of symbols from the left and click the second icon.


Click on the second icon to start the album upload process.

Qzone photo
Click the blue box to start the process.


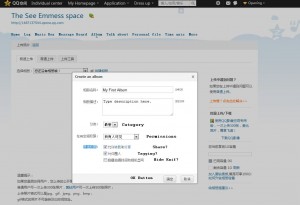
Here’s where you can name your album, describe it and select different permission settings.
Qzone photo
Name, description, etc. It’s all here.


Ignore the next menu. Click the X to close it.

Qzone photo
Ignore this. It’s a quick uploader. You don’t need it.


Clicking the blue button brings up a typical Windows file choice menu.

Qzone photo
Click this blue button to choose the photos.


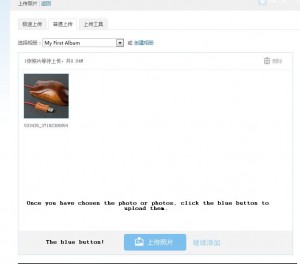
Once you choose the photos and click the OK button in Windows, you get a thumbnail pic of whichever ones you’ve chosen. Click the upload button to finish the process.
Qzone photo
Click the blue ‘upload’ button.


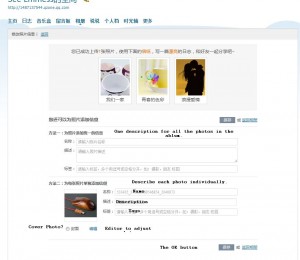
At this point you can describe the photos as a group or, one by one. If you’ve taken a trip, for instance, you can describe them all saying something such as ‘Summer Trip 2012’.
Qzone photo
Now you describe all of the photos at once or one by one.


You’re done! If you use Google Chrome, the whole process is somewhat easier since Chrome will translate most menus for you. For the ones it doesn’t translate, copy and paste the text into Google Translate.

Other than photos, you can add blog posts to your zone, ask questions and interact with your friends in many ways. We’ll show you how to add blog entries in a future post.

Thanks for reading!


Creating Your Qzone


Signing up for a new QQ account is very straightforward. No knowledge of Chinese is needed if you go to the QQ International site. You’ll find it here: http://www.imqq.com/

Once you have your account set up, basically that involves telling QQ who you are, your date of birth, a new password and confirming your email address, you can start looking for new friends. Each QQ account has a Qzone attached to it. A Qzone is where you share photos, stories, logs (blogs) with your friends. They can comment on your material and you can visit their zones to do the same. The Qzone is sort of a mini-Facebook.

Some QQ users spend a lot of time dressing up their zones. You can too but, first, you have to open it up. Once you log-in to QQ, click on the right icon, the one that looks like four mini computer screens, then click on the Qzone icon shown here:

Photo of QQ main chat window
Clock on the Qzone icon.

Once you click on the Qzone icon, you’ll be taken to a page that is completely Chinese. Ah, your adventure begins. While the QQ chat window is in English, everything in your zone is in Chinese. Don’t worry, we’ve been using QQ for years and we’ll show you how to get around. This is what the first page looks like:

Photo of QQ Invitation Page
QQ is inviting you to open your zone.

The English for the blurb under the words “JOIN US” reads like this:

Logging life bit by bit, photo sharing moments
Show their own individual tastes, and friends with idyllic
Independence not as good as the public Lele Lele, so what, just join the QQ space family!  (at least that’s what Google translates it as).

If you click on the big blue box, the one that has QQ followed by two Chinese symbols, this is what you’ll see:

Qzone Confirmation Page
Fill out the information here, some of which is already completed, then click the bar at the bottom.

Basically, you name your zone (you can change it later), confirm your nickname, your sex, what calendar you want to use, your country of origin then a captcha (the BVQX thing). Lastly, signify that you have read the agreement by clicking the bar at the bottom. You’re set!

Next time we will add some photos to create an album. Stay tuned.

Thanks for reading!