Tag Archives: Prvacy

Facebook 101 – Part 5 Facebook’s social plugin glitch


As with almost everything about Facebook, what follows is a cautionary tale about Facebook’s use of social plugins to connect people on the Internet. We see this as a potentially dangerous flaw which opens everyone’s Facebook profile to virtually everyone on the Internet. This glitch is easier to illustrate than it is to explain in words. We’ll run you through it step by step:

1. Sign out of your Facebook account or open the following links in another browser.

2. Head over to each of these sites:

http://www.theepochtimes.com/

http://mashable.com/

3. Look on the right hand side of the page in the column with links and ads in it.

4. You should immediately see a difference between the two pages when you locate the Facebook social plugin box or, as it is sometimes called, the facepile. In the Epoch Times facepile, there are ten Facebook profiles shown, each with a link to that person’s Facebook profile. If you click on one of the faces, you should be taken directly to that person’s Facebook profile, even though you aren’t signed in to Facebook. Depending on that person’s privacy settings, you might be able to scout around their profile, see their photos and find out their activities and interests. Not only have you probably not ‘liked’ that page, you’re not even signed-in to Facebook! 

5. On the Mashable page, you should see only a small blurb that says ‘900,000 (+ or – ) people  like this.’ There is a ‘Like’ button with a thumbs up icon that, if clicked, brings up a Facebook sign-in page.

6. In the same browser you are using for the two sites mentioned above, open another tab and sign-in to Facebook.

7. Head back to the two tabs which show the above links. Refresh each page.

8. Nothing has changed on the Epoch Times page except that now when you click on one of the profile photos, you are taken directly to that person’s full profile page or their timeline, complete with everything that they have decided to share with strangers such as yourself.

9. On the Mashable site, you might see a few photos of your friends, depending on whether any of your friends have liked the Mashable site. This is how the social plugin is supposed to work, as far was we can tell. We are in the process of emailing the webmasters involved to see if they can help us spot the glitch here.

With this quick experiment in Facebook privacy, we hope you can see the danger in all of this. The whole point of the social plugins is to share content between friends, to make the vast Internet a bit smaller. In reality, the social plugin has opened up Facebook user profiles to the whole Internet. As we have shown in the above example, you don’t even have to use Facebook to be able to see Facebook profiles. Seeing a profile is as simple as clicking on a profile photo on a website.

We know, of course, that you can also search Google for someone’s Facebook profile. The difference here is that searching on Google takes a few steps. It’s not as simple as clicking on a photo. You could theoretically search for everyone named Bob, for example, and click your way through the profiles until you came to an interesting one. With this particular glitch, stalking someone is as easy as clicking on a photo of someone who looks interesting.

Lastly, if you think that this doesn’t work to anyone’s advantage, consider the fact that we’ve added people to our friend list simply by clicking on their profile photo on a site and then clicking ‘Add Friend’. Of course Facebook asks us if we know the person, and we don’t, but they accepted our invitation anyway. We hope you can see how this carries many inherent dangers, especially where young Facebook users are concerned.

We are working on a way to change our privacy settings to eliminate this glitch but, until then, check out what pages your young children might have clicked ‘like’ on. Remind them not to accept friendship invitations from strangers.

Thanks for reading. If you have any inside knowledge about this, please let us know.


Check Your User Settings in Worpress


This morning I received an email from this site telling me that someone had registered as a user. Needless to say I was surprised. I wasn’t quite sure what damage a new user could do to my site but I logged in, deleted him and changed my settings. When WordPress asked me to confirm the deletion, it also asked me if I wanted to delete any links that the new user had put up here. I said yes, of course, but that made me think about my settings on my other sites. The default WordPress settings make it very easy for anyone to subscribe to your site AND to post links. Here’s how you can protect your site before this happens to you.

Head over to Settings, second last link on the left side of your Dashboard window. Once you are there, you should be on the General Settings page but make sure that this is where you are.

Halfway down you’ll see ‘Membership’ with a box that is, probably, checked. If it is checked then ‘Anyone can register’ which isn’t what you want. You want to un-check that box to prevent people from adding themselves as users. You can still add users but you have to be logged in as admin in order to do that.

The second thing you want to do, now that we are on this subject, is to limit comments on your posts. Yes, you want comments but you don’t want spam. There are two ways to prevent this. The first is to go to Settings then to Discussion Settings. What you are looking for there is ‘Email me whenever’ and ‘Before a comment appears’. In the second one, make sure that the box is checked beside ‘An administrator must always approve the comment’. Then, in the section above, make sure that you get an email when someone makes a comment and when one is held for approval.

If you have your WordPress installation set up this way, you won’t get surprised by someone adding themselves to your user list AND you won’t get spam comments showing up unannounced, either. Sure, you will get spam but you can check the comments and delete them. How can you prevent spam completely? You can’t. But you can add a plugin that will put check all comments and automatically put the ones that are spam into the proper folder. Here’s how.

Akismet is a standard plugin that you get with WordPress. To get it working, you need to activate it. To activate Akismet, you have to register and then get what they call an ‘API Key’. Don’t worry, it’s free. All of the links are there on your WordPress Plugins page. The key is the only thing you need before Akismet roots out spam for you. It won’t send an email but it will hold all the comments that it thinks are spam, and it is never wrong, until you show up to delete them.

There are other ways to secure your WordPress installation, these are only two. WordPress is probably the most documented bit of brilliance on the ‘net. Keep learning and keep safe, people.

Thanks for reading!

Facebook Timeline Privacy Settings – Part 1


On January 31st, 2012, you’ll be forced to accept Facebook’s new timeline profile. There are some new privacy settings that you might want to adjust. In the change from the standard Facebook interface to the new timeline interface, your previous settings won’t survive the transition. You’ll have to adjust them again.

Why is this important? For me, it’s not. For you, if you are a teenager or a single woman, for example, there are dangers to having all of your activities past and present open to the world. Ex-partners, teachers, prospective employers can now access all of your past information very easily. There isn’t much danger of me being stalked but for many people, that is a very distinct possibility.

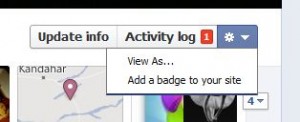
TIP: The best thing about the new timeline interface is that you can see immediately how your profile looks to strangers or to any of your friends. See the little arrow just to the right of the gear icon on your profile page? Here it is:

The View As menu on the timeline
Click on the View As line.

Once you click on the ‘View As’ line, your profile will change to show how strangers will see it. You can then change the view to show how your friends will see it, depending on your settings for each of them. You may want to hide things from some friends. In that case they will not see the same profile as everyone else.

Step 1 – Hide Your Past from Strangers: Follow these steps to ‘Limit the Audience for Past Posts: https://brianmahoney.ca/2011/09/facebook-control-your-old-post-privacy/ You must do this again, even though you may have done this in the past. Once you have done this, take a look at your profile as I have described just above this to ensure that your past is hidden from strangers/people who aren’t your friend.

Step 2 – Hide Your Friend List From Everyone: If you have family members on your friend list, it might be a good idea to hide your list from them. If you have your privacy settings wide open, everyone can see your list, allowing them to troll through it for ways to contact you. Whatever the reason, I think it’s a great idea to hide your list of friends from everyone. Here’s how you do that:

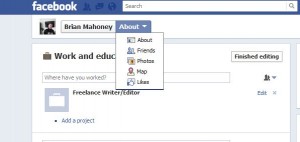
1. See the photo up above this? Click on the ‘Update info’ section. This will bring you to a page that allows you to edit virtually any part of your personal information. It also provides a link to your other personal settings. Click on the arrow beside the word ‘About’ and you’ll see this:

Settings Menu
This has links to all of your personal settings, including your friend list.

When you click on ‘Friends’, you’ll see a complete list of your friends, of course. What you are looking for now is the Edit button up on the top right. Click it and you’ll see this little menu:

Menu for your friend list
See the padlock on the right? Click it.

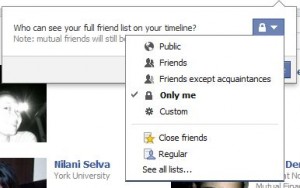
Once you click on the padlock you will see this menu next:

Locking your friend list
I would choose 'Only me' here but it's up to you.

As you can see, I have chosen ‘Only me’ for my friend list. Any friend who has a mutual friend will be able to see a list of mutual friends but that’s it. See the tip below but for now, no one can see your whole list except you.

TIP: The new timeline will not allow you to hide mutual friends from anyone on your list. Keep that in mind.

Everyone has different levels of security that make them feel safe online. I’m pretty open about most things but I don’t see why my friends have to see who I am friends with. I can further adjust these settings by grouping my friends into smaller groups. More on that in a future post.

Thanks for reading! Comments are welcome.

Facebook Data Download


Yesterday I downloaded all of my data from Facebook. It’s a relatively new feature and it’s very easy to do. Head over to General Account Settings, then click on ‘Download a copy of your Facebook data’. You will have to re-enter your password at that point, just in case you’re not the owner of the profile. Facebook will then collect some of your data, zip it up and email you when the download is ready.

My 576 megabytes of data took about half an hour or so to collect. When I got the email, I dutifully went back to my account and downloaded the data that Facebook had collected. I was, needless to say, disappointed when I discovered that the data was far from complete.

As far as I can see, all of my photo albums are there, even the ones I have deleted in the past. My notes are all there, too. What’s missing? Well, my wall is missing two years of status updates. My messages are very incomplete. The string of messages that I wanted most is totally missing. I tried to archive that set of messages to see what the effect of that would be, thinking that maybe I could download them after archiving. No luck.  The only thing I can do is to forward the messages one by one to my email address. Frustrating, to say the least.

It seems that Facebook has tried to allay some people’s fears about privacy. From the looks of the data collection system that they use, Facebook hasn’t really made me feel any better at all. Sure, I’ve got my photos, videos and notes but what happened to hundreds and hundreds of my messages? Where did the missing two years of my status updates go? Lost in a server change?

TIP: Depending on where you live, this feature may not be available to you. I’m in Canada and our government has taken Facebook to court a couple of times on issues of privacy. I know that this data download is available in Europe also but I can’t guarantee that this post applies to everyone who might read it.

I will wait another month or two before I try again. Maybe the next data download will be more complete. I am not the only one that this problem has affected. Other users have discovered the same thing as I have. What was your experience? Did you manage to get all of your data?

Thanks for reading. I’d love to read your comments.

Secure WordPress Login


Since the default WordPress username is ‘admin’, did you ever think that maybe it’s time to change it to something a bit more secure? Any hacker worth her or his salt can probably gain access to your WordPress installation quite easily. The only thing they need is a password generator of some type if you have left the default WordPress username as admin.

Besides changing the default setting, you should also do something else. If you are a single owner/poster, you should change your posting name to something other than your username. If you want to post as “Jane”, for instance, you can login in as kentucky or anything else that suits you. Why should you do this? It seems obvious but in case you missed it, if you post as “Jane” and your username for logging in is “jane”, maybe a hacker could easily guess your username. Simple, right?

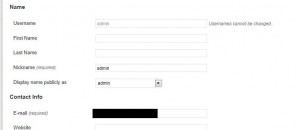
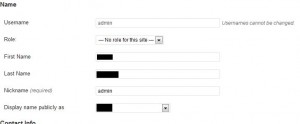
Head over to ‘Users’ on the left side of your WordPress Dashboard. For the default installation, there will only be one Username, by default it is ‘admin’. Here’s what the default setting looks like:

Admin user settings
Admin is the default user. No 'Role' is listed as there is only one user.

The default username can’t be changed but what you want to do is to add another user then switch the Role of Admin to ‘no role’. In other words you can’t get rid of the admin user but you can take the administrative power away from them in order to secure your WordPress site. You’ll notice from the photo above that there is no place to choose the Role of this user.

Update: I forgot to mention that you can’t change the default username’s role  until you set up a new user as admin, log out and logo back in again. Set up new user, make that user admin, log out then log in again and change the default admin’s role to ‘no role’.

Tip: You can’t change the role of the current administrator until you have another administrator lined up. Create another user, use whatever name and nickname you want, then make the Role of that new user ‘Administrator’. Once you do that, go back to the original admin user and define its Role as ‘None’. This screen shows you what to look for:

New User Menu for WordPress
This is where you can choose the Role for the new user.

In this window, make note of two things. First, the Role menu is visible since you are adding a new user. Any new user must have a role, even if it is no role at all. Next, make sure the username and the display name are totally different. The Username is the name you use to login to the site. The Display name is the name that shows on each of your posts. Make sure they are different. Anyone can try to login with your display name and guess your password but if your username is different, your site is more secure.

TIP: Whatever your role is on any WordPress site, make sure that your username for logging in isn’t the same as your posting name. If you’re an administrator, make sure of this small but very important detail for every user of your WordPress installation.

Once you have a second administrator set up, go back and remove the administrator role from the default admin username. Once you do that, your WordPress site is a lot more secure than it used to be.

Thanks for reading!