Encrypting Your Stuff – Part 1

This week, it’s all about encryption. First, let’s encrypt a zip file. If you are putting things like financial information, passwords, or personal data up to the Cloud, it should be encrypted. This post will be a tutorial for doing just that.

1. Download and install 7-Zip. Here’s the link:  http://www.7-zip.org/download.html

The program is free, don’t worry about it. It’s also trustworthy and does not add toolbars or additional software.

2. Create a folder that contains the various files that you want to zip and encrypt. You can encrypt one file, or a whole folder. We feel that a folder is best for uploading to the Cloud but you can just as easily do this to one file. Zipping, if you didn’t know, takes a folder and all of the files in it, makes them smaller by taking out the empty space within the file, then creates a new ‘zipped’ file. Windows itself can do this but it won’t encrypt that file. Encryption here means ‘lock it up with a password’. Once you get the folder set up, move it to somewhere that’s easy to find. We put ours inside of our Dropbox folder.

3. Open 7-Zip then navigate to the folder you just created. That’s easier said than done but, if you put the folder in your Dropbox folder, it will be very easy to find.
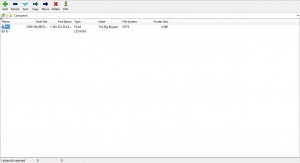
Photo of 7Zip   1
This is probably what you’ll see when 7Zip starts up.

4. See the green + sign up on the top left? Just under that is an icon of a file folder with a green arrow pointing up. Keep pressing that icon until you get to the root directory of your computer, most likely that will be C:. When you get there, double click on the C:  You’ll see something like this:
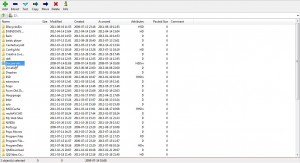
Photo of 7Zip   2
This is something like what you’ll see next. Look for the Dropbox folder.


5. When you see the folder you want to zip and lock with a password, highlight it (click on it once), then go up to the top and click on File. This is what you will see:
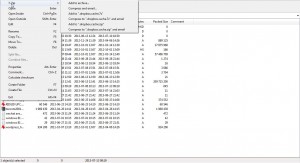
Photo of 7Zip   3
7-Zip then Add to Archive.

6. Now 7-Zip knows that you want to create an archive. The menu that pops up gives you several options to choose before 7-Zip creates that archive. Here’s the menu:
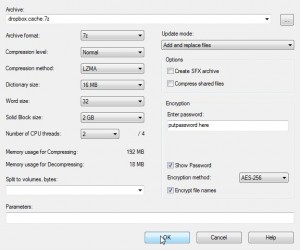
Photo of 7Zip   5
Don’t get nervous, we’ll walk you through this.


7. For now, there are two sections of this menu for you to fill out. The first is the Archive Format. The choices there are shown in this menu:
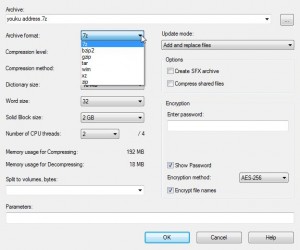
Photo of 7Zip   6
It’s probably best to choose ‘zip’ here.


There are several different kinds of ‘zip’ files (zip is the generic term just as kleenex is generic for tissue). 7-Zip has its own kind and there are ‘tar’ files, etc. If you are always going to be accessing the file from the same computer, choosing 7z is fine. You must use 7-Zip to open 7z files, right? That’s why ‘zip’ might be better. With that archive format, you can use just about any zip program to unlock it, including Windows.

8. Next we have to choose a password. That’s easy but, and this is vitally important, make sure you remember the password. If you lock a file or folder with this system and forget the password, there is no way you can unlock it easily. Whatever is in that file is lost, for all intents and purposes. Read that again, we’ll wait.


9. Once you choose OK, 7-Zip works its magic and the file or folder is zipped up tight. We chose the 7z format and this is what we see when we look in the file’s original location:

Photo of 7Zip   7
There it is. You can double click on it now.


10. Double click on the zip file and this is what you’ll see:
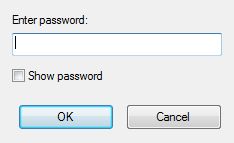
Photo of 7Zip   8
Enter the password. That sucker is locked up for good!


11. Enter the password and the file opens. Enter the wrong password and it won’t. It’s locked up tight.


That’s the basics of locking up a file or folder. You can secure a single file or a whole folder with this. The larger the file or folder, the longer it takes but 7-Zip is fast, don’t worry. Now you can take that archive and email it, put it on a flash drive, send it up to your Dropbox, whatever. It’s quite secure.

TIP: You might be asking yourself, how secure is this system? As you know, governments have all the toys to open this kind of file. They have computers and programs specifically set up for this. They can open it. Can your tech friend Raoul open it? Probably not. It would take him years to find the right combination of letters, symbols and numbers…your password, in other words. That’s why you have to make a good one!

Thanks for reading!

Like us on Facebook and we’ll like you, too. Here’s the link: Computers Made Simple on Facebook


Save Vevo Videos…sort of.

Vevo is a fantastic site, chock full of music videos. Most, if not all of them are in HD, too. What’s the difference between Vevo and Youtube? Well, we can download Youtube videos but we can’t download Vevo videos. That’s the bad news. The good news is that we’ve figured out a roundabout way to ‘download’ Vevo videos. Here’s how we did it:

1. You need several bits of software to accomplish this trick. Here’s the list:

A. Irfanview – It’s available here. Irfanview is free and we use it every day for basic image handling.

B. Windows Movie Maker – If you don’t already have this, download it here.

C. The music track for the video that you want to save. We use Offliberty for that. Use Youtube as the source, paste the url of the Youtube video into the Offliberty slot and save the MP3.

D. You’ll need lots of hard disk space and a fairly fast computer, as well.

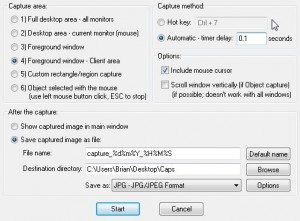
2. We have to set up Irfanview for automatic timed screen captures. Here is our post on how to do that: Multiple Screen Captures using Irfanview   In that post we tell you that 1 second is the minimum timing interval. We were wrong. In order to save a Vevo video, you have to set the timing to a maximum of 0.10 seconds. You might try quicker caps, maybe down do 0.01, something like that. The more caps you have, the smoother the video will be.

3. Get the Vevo video set up, ready to play, then Pause it. Go to Irfanview and set up the capture, making sure you save the caps to a new folder on your desktop. This makes it easier to access them later. There will be many caps, probably thousands, so make sure you have enough room for them, a few gigabytes should be fine.

Photo of Save Vevo Videos    2
Auto capture set up for 0.10 seconds.


4. Turn your sound off because Irfanview beeps for every cap it makes and the beeping will drive you bonkers.

5. Start the capture and immediately open the Vevo tab in your browser and press Play.

6. Watch the video till the end, then open Irfanview and close it down.

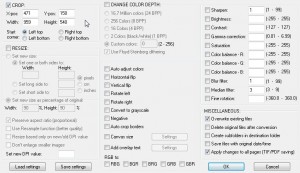
7. Check the cap folder to make sure the screen captures are there and see if they need to be cropped. If they do need to be cropped, you’re not going to do them one by one so head over here: Batch Conversion in Irfanview What you’re going to do is mark the starting point on the top left corner of the area you want to crop (it has an X and a Y coordinate), then draw a box with your cursor over the area you want to crop (all you need for this is the pixel size of the box, the number of pixels wide by the number of pixels high.) We’ll do a full post on batch cropping later.

Photo of Save Vevo Videos    1
Choose ‘Crop’ and set the parameters.

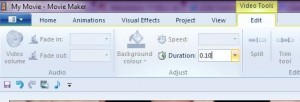
8. Once the thousands of images have been cropped, open Windows Movie Maker and import all of the screen caps into it. There is nothing complicated about this part of it but you have to set the duration of the slide to match the timing of the screen capture. In other words, if you set Irfanview to take a cap at 0.10 seconds, you have to set the onscreen duration of each slide to the same 0.10 time limit.

Photo of Save Vevo Videos    3
Import the caps then set the duration.

TIP: The duration setting is not available until after you import the caps. Contrary to other sites out there, you can’t set the duration before you import the images.

9. Once you get the timing set up in WMM, save the project.

10. Import the MP3 of the song and separate the audio and the video tracks. Play around with the audio track until it is about the same length as the video. Allow for some overlapping, if you can.

11. Save the project and then have WMM create the video. We used the Save to Computer rendering and ended up with a pretty decent video. Sure, there was a bit of choppiness but the particular video we chose was not available anywhere else on the Internet. Besides the choppiness, the audio didn’t match up perfectly with the video but we’re quite sure we can work on that, maybe with a better, more fully-functioned editor. Overall, it was a fun experiment. Give it a shot and see what you can come up with. Share your videos with us!

Thanks for reading! Why not Like our Facebook page:  Computers Made Simple on Facebook


HP’s Bait and Switch Tactics

We don’t often get into the nuts and bolts of ad campaigns here on Computers Made Simple but this time we’re making an exception. Here’s how you can avoid this kind of misleading advertising when you’re looking to pick up some new piece of technology. Better yet, stop buying from the companies who use these techniques. Speak with your wallet.

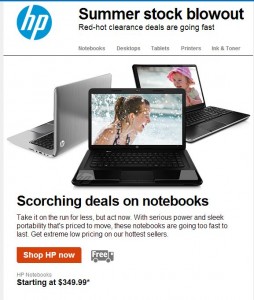
1. We subscribe to an email flyer from HP (Hewlett Packard), vendors of everything from laptops to printers and everything in between. We’ve got quite a few bits and pieces of their technology, including at least three laptops. Here’s the email flyer we received yesterday morning:

Photo of HP Bait and Switch   1
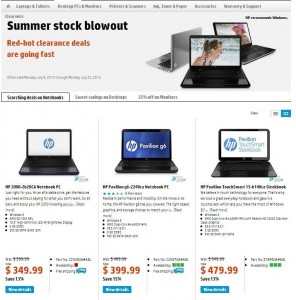
What do you notice first? $349? We did.


The first thing we noticed was the price, $349.99. HP Notebooks starting at $349.99. Notice the asterisk? Here’s the fine print for it:

* Offer good while supplies last, and subject to change or cancellation at any time. See product page for details. Prices shown may include applicable instant savings. Restrictions apply to sale items and are subject to change without notice. Offer valid on HP clearance notebooks and desktops July 8, 2013 through July 22, 2013.

Please note the dates of the sale, July 8th to July 22nd. That’s quite a period of time, isn’t it? 14 days, two weeks, lots of time for this sale, that’s for sure.

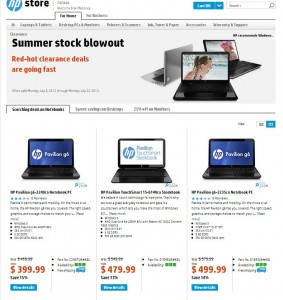
2. Here’s what we saw when we click on the ad:

Photo of HP Bait and Switch  2
Where’s the $349.99 notebook?


Where is the laptop selling for $349.99? Unfortunately, it doesn’t seem to exist. Next cheapest is $399.99, fifty bucks more than the advertised price. What’s going on here?

3. We Tweeted HP Support on this:

Photo of HP Bait and Switch  3
HP Canada does not have a Twitter account so we tweeted to HP Support.


4. After some back and forth with HPSupport on Twitter, we decided to engage the HP Live Chat feature on the HP site. Here’s the conversation (a long read but useful if you’re ever thinking of using Live Chat with a product rep):

Start: __________

Welcome to the HP Shopping Canada Chat Service.

You are connected with HP Shopping Canada Chat Service. My name is ‘Peter’. How may I help you today?

Peter: Hi!
you: I received the Summer Stock Blowout email. It mentions notebooks starting at $349
you: I click on the email and see nothing at $349, cheapest on the page is $399
you: what’s up with that?
Peter: I appreciate your interest in HP!!
Peter: let me check on that, just a moment please..
you: ok
Peter: Thanks for being online.
Peter: Please have a look at HP Pavilion Chromebook 14-c010us Notebook PC – D1A48UA. It cost around $ 329.99
Peter: HP Pavilion Chromebook 14-c010us Notebook PC – Click here
you: I know, I found some at $299 but I am not looking for a Chromebook. The email said ‘notebook’ and $349 with a link to a page. That page did not have anything at $349, cheapest was $399. Something’s not right about that, in my opinion.
you: If it is a Chromebook, you should specify that.
you: Chromebooks are very limited, your notebooks aren’t.
Peter: One moment please..
Peter: Thanks for being online.
Peter: I have double checked on this, HP 2000-2c20ca Notebook PC is cheapest(cost) notebook model cost around $ 399
Peter: HP 2000-2c20ca Notebook PC – Click here
you: the one show on the linked page is the same price and it has 6GB of ram and a better processor.
you: http://h20386.www2.hp.com/CanadaStore/Merch/Product.aspx?sel=PCNB&id=C2N57UA&opt=ABL&p=clearance-sale
you: but it is 399 not 349 as the email suggested
Peter: Do you received any promo code in that e-mail?
you: and it’s on clearance, the one you described is regular price
you: there is no promo code in the email. “Scorching deals on notebooks’
you: it’s titled Summer stock blowout
you: I can’t copy and paste into this, can I?
Peter: No, you can’t..
you: should I email it back to you?
you: (Hewlett-Packard@canada.newsgram.hp.com
you: that’s who it’s from
you: that’s you, isn’t it?
you: there is a monitor code but I don’t need a monitor
you: MONITOR25 is that code
Peter: Please hold on..
Peter: Scorching deals on Notebooks for HP Pavilion g6-2240ca Notebook PC is $ 399 only not $349. It’s original cost is $ 469.99 and 15% discount for the product.
Peter: http://h20386.www2.hp.com/CanadaStore/Merch/Show.aspx?p=clearance-sale&jumpid=re_r11391_ca/en/hpshopping/clearance_sale_banner/20130708
you: I know that. I have already told you that.
you: There is NO notebook for $349, that’s what I’m trying to tell you.
you: the email says $349 but there is nothing at that price. The cheapest on the linked page is $399
you: maybe I’m not making myself clear here.
Peter: One moment please..
Peter: For that, let me help you with the direct contact information of our dedicated experts who can confirm you on your mail discount details.
Peter: Our dedicated sales team experts can be reached at 1-877-231-4351.
you: So you are saying that you don’t believe the price in the email? You are suggesting that I am not being honest?
Peter: No, I can able to assist you with the online details only..

End ________________________

Ummmm, weren’t we asking about the online details? Hello! You’ll note that Peter dodged the question completely, offering a Chromebook that was not on sale and, in our opinion, is not a ‘notebook’. Chromebooks are locked into Google, have very small SSD drives and only work when you are online, making them useless when you travel. They are no better than a tablet or a smartphone, for us anyway.

5. At this point we decided to call the number that we were given. After a short wait, Ken came on and reported that the $349.99 computers had been sold out, there were none left. We asked if there would be any consideration on the $399.99 laptop that was now the least expensive on there. Ken explained that the price was fixed and there would be no further reduction.

6. The point of all of this is that the sale runs for two weeks. We clicked on the ad very early in the morning of July 8th. How is it possible that the highlighted laptop could be sold out in a matter of minutes. Honestly, $349.99 is not an earth-shattering price. We’ve seen perfectly good laptops for $249.99 at other online retail sites. To us, this is an obvious ‘bait and switch’ attempt by HP, advertising a low price but switching us to a more expensive model. In most countries this type of advertising is illegal. Other retailers that we use keep the sold out items on their sites, simply to avoid this kind of situation.

Update: 

This morning, July 9th, HP has updated their site. Instead of offering a replacement for the $349.99 laptop, they put the sold out one back on the list. Check the red availability icon:

Photo of HP Bait and Switch 4
Wow! Oh right…it’s sold out. Ouch!

Now, the question we have is this: Did HP put the cheap laptop back because of the storm that we raised or did other consumers ask the same questions?

HP is a Fortune 500 company. They make decent laptops, desktops, printers and scanners plus a host of other technology. As far as running online ads, however, they seem no better than a Ma and Pa one store shop, putting up ads to get sales using an obvious, and illegal, bait and switch technique. Truly, this is a caveat emptor case if we’ve ever seen one.

Thanks for reading! Think very carefully about doing business with HP in the future. Their technology is decent but their online store isn’t. If you decide to support HP by buying one of their products, buy it somewhere else. In Canada, we highly recommend Future Shop.


WeChat Moments – Post words in photos

WeChat Moments is great, isn’t it? Everyone can share photos and words at the same time. What if you just want to post your thoughts instead of a photo? Here’s how to do that on an Apple product, iPhone or iPod Touch.

1. First, you have to learn how to do a screen capture. That’s the easy part. This can be done from any screen that happens to be showing, anything at all. Press the shut off button and the home button at the same time. On an iPod Touch, for instance, push the button on the top of the device at the same time as you press the button at the bottom of the screen, the one that takes you Home. The screen will go white for a second then go back to normal. If your screen turns white, then you’ve successfully done the screen capture.

2. It doesn’t matter what app you use but we used Notes. Go the the app and type out your thoughts. Once you’re done, press Off and Home to capture the screen that shows the note you just typed.

Photo of WeChat Post Words 1
Our subliminal message as seen in Notes.

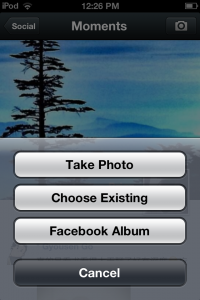
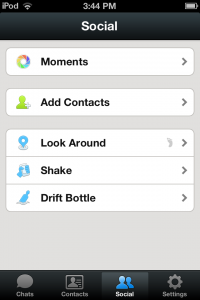
3. Go to Moments and press on the camera up on the top right.

Photo of WeChat Post Words 2
Press the camera icon.

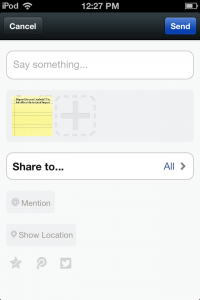
4. Choose the screen capture you just took, it will be in your Camera Roll, and use it. You can add a comment above it or just post the pic, it’s up to you.

Photo of WeChat Post Words 3
Choose Existing is what we need here.
Photo of WeChat Post Words 4
Choose Camera Roll.
Photo of WeChat Post Words 5
Our note in WeChat where we choose the style.
Photo of WeChat Post Words 6
Here it is, ready to post.

OK, so now you know how to do screen caps, at least on Apple products, why not post caps of games, videos, whatever else you can find. It makes WeChat a bit more interesting for your friends, we think. Malls, trees and beaches are good but let’s mix things up a bit, right?

Thanks for reading!

Here the link to Like us on Facebook: Computers Made Simple on Facebook


WeChat FAQ

WeChat (or Weixin) is the hottest new chat app out there. We’ve written about it a few times before. Today we want to get Moments straightened out. There seems to be some confusion as to who can see the photos that you show in your Moments’ albums. Here is the pathway to the FAQ (Frequently Asked Questions):

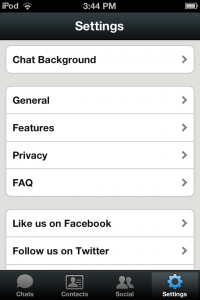
1. In any area of WeChat, look for the gear icon on the lower right. Press it:

Photo of WeChat FAQ  1
Settings. Look for the gear icon.

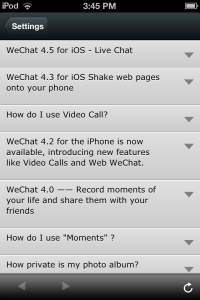
2. Next, scroll down to the word FAQ:

Photo of WeChat FAQ  2
Scroll down a bit, look for FAQ.

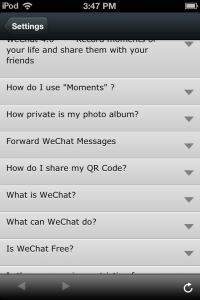
3. Press on the word FAQ and then look for Moments:

Photo of WeChat FAQ  3
There are several sections for Moments.

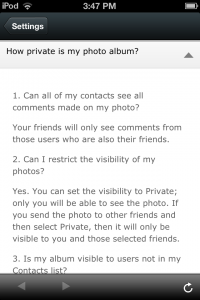
4. We would suggest that you read all about Moments before you start using WeChat. We love the app but we can see that some users are having problems with privacy. Look for the FAQ that reads ‘How private is my photo album?’ :


Photo of WeChat FAQ  5
Look for the FAQ on your photo album.

5. Read over this section and make sure you understand it. If you need help, just ask us. We’ll do our best to explain it:

Photo of WeChat FAQ  6


TIP: If you want to send a photo to someone, then it’s completely private. Use the attachment button (the + icon on the lower right) to attach a photo. That way, only you and the person you send it to can see it. Make sure you choose the right person!

Thanks for reading! If you have questions or comments, please feel free to use the form at the bottom of this page. Better yet, why not Like us on Facebook? Here’s the link: Computers Made Simple on Facebook. 


a little bit of hi-tech, a little bit of common sense and a lot of fun