Category Archives: Windows

Five Must-Have Pieces of Free Software


Everyone loves free stuff, right? I’m writing this post just after Christmas and free software is about the only thing that I can afford! I’ve mentioned all of this software in other posts. In this one I will simply highlight the best of the best of the best.

1. VLC Media Player VLC is amazing, really. Not only is it the fastest player out there, it’s a wizard when it comes to repairing video files. If you’ve got an AVI that is somewhat corrupted, VLC will repair it. Save the repaired version and you’re done. As far as playback is concerned, VLC lets you slow down the action or speed it up with a simple keystroke for each. I don’t use VLC for music playback but it does that, too.

2. Irfanview – Once you have tried Irfanview, I defy you to live without in the future. I’ve been using it for years, putting it on every computer in the house. Irfanview is quick, efficient and offers a feature list that boggles the mind. Screen capture, batch processing…it’s got it all. Make sure you download the plugins and make sure you download it from Tucows. CNET is reportedly putting malware in its downloads.

3. Google Chrome – Why is a browser on this list? Aren’t they all free? Sure, they’re all free but other browsers pale in comparison to Chrome. I can safely say that Chrome has opened up a whole new world for me, simply because it translates every website that I visit. The Internet is more than the boring English sites that you’re used to surfing. Check out what people around the world are doing on the web, visit and investigate your next international vacation spot, or just see what cool things are for sale in, say, China or Japan.

TIP: One of the best things about the Internet is that most sites are designed in English, even if they use another language for navigation. If you’re stuck on a site and can’t figure out what some of the buttons do, simply hover your cursor over a link and look down to the left of your window. Nine times out of ten you’ll find out what the button leads to, written in plain English.

4. Dropbox – Dropbox is both software and a service. With 1 gigabyte of free storage, Dropbox allows you to share documents from one computer to another around the world. Even if you are on someone’s computer in India, you can access your files via the Internet. There is no need to have the Dropbox application installed. Additionally, you can share files of any type with friends and relatives by giving them guest access to your online folder. Need more than a gig of storage? Open up a few free accounts. You can’t go wrong.

5. Burnaware Free – Burnware is a free, fast and dog-simple burning app. DVDs/CDs/ISOs, Burnaware takes care of it all. Roxio makes a fine product from what I hear but I have only used Burnaware for the past ten years or so. In my opinion, you don’t need any more than this for your daily burning chores. I back-up my computer religiously and you should too. DVDs are cheap and losing lifetime photo memories is expensive. Don’t let a crashed hard drive ruin your life. Get Burnaware and some DVDs for 20 bucks and relax. Your kids will thank you!

All of these applications have full sets of options and features that will make your computer experience much more fulfilling than any piece of retail software would. For that reason, if you’re a bit flush with cash, consider making a donation to the creators. Good karma will follow.

Thanks for reading!


Windirstat – What is taking up all the room on my hard drive?


With today’s huge hard drives it’s sometimes tough to know where all that room has gone. You buy a one or two terabyte drive, use it for a while and then you’re suddenly running out of storage space. Here’s a solution for you!

Windirstat (available here for free: http://windirstat.info/) gives you a real picture of what your hard drive looks like, in terms of which files are taking up all the room. Download the program and install it. I’ll wait. When you’re done, come back to see how to use the program.

Back? Ok. Here’s what you do:

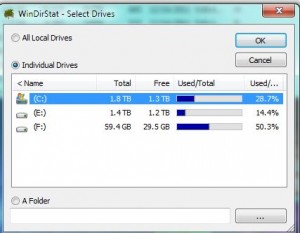
1. Start Windirstat. This is the menu you will see:

Choose the Drive
Select the drive.

Select the drive that you want to take a look at. Usually that is your C: drive. In my case I have three to choose from but most computers have only one or two drives.

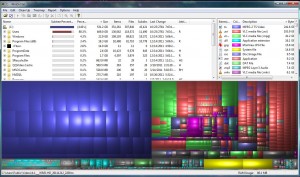
2. WinDirStat will nibble away at your drive, setting up an image for you. As it does this you’ll see little PacMans zipping back and forth. It’s kind of cute, actually. Once all of the stats have been collected, here is what you’ll see:

A graphic of a hard drive's files and folders.
This is a graphical representation of my hard drive.

3. Once WinDirStat has collected the information it needs, it shows you this graphic of your hard drive. It may look confusing at first but it’s really pretty cool. On the top right you’ll have a legend which tells you what color represents each type of file. On mine, the blue represents MPEG-2 files from my DVR. Each little section of that blue area is an individual file while the whole blue area on the left is a folder. Each color group represents a folder, each smaller highlighted area is an individual file.

4. Looking at this graphic, you’ll be able to see what files and folders are taking up the most room. If you click on each file, WinDirStat immediately shows you what file it is up on the top left section. If there is one particularly huge file, you can then decide if it’s something you want to save or archive or delete.

5. Some areas that WindDirStat will show you are obviously off limits for deletion. Any of the Windows files, for instance, must be left alone. There are two yellow files on the lower right, as an example, which represent two important Windows files; the pagefil.sys and the hiberfil.sys. These are your ‘scratch pad’ files and are about the same size as the amount of RAM in your system. Don’t touch them.

6. Once you’ve spent some time finding the files and folders that are taking up extra space, delete them or archive them to a DVD. Then you can reload WinDirStat and see what the big picture looks like. I keep pretty good track of what’s on my drives but there are always some files that seem to crop up that I could delete. See what you can find on your drive.

Thanks for reading!


Enable Your Microphone


If you have disabled your internal microphone on on your netbook or notebook, here’s how you can get it back. This post also shows the value of  Window’s right click menu system. Sometimes we forget how powerful it is.

I was making a video today and tried to use an external microphone instead of the internal one on my netbook. Well, the external one didn’t work but I had disabled the internal one, thinking it was causing some interference. Once I decided to use the internal one again, I had to search for a way to enable it again. Here’s how you do it:

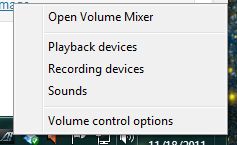
1. Right click the little speaker icon on the lower right of your taskbar. Choose ‘Recording devices’ as you see here:

Choose Recording Devices
Right click the speaker and choose Recording devices.

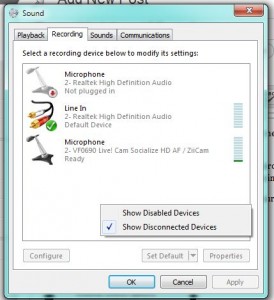
2. Once the recording device dialogue is up, right click anywhere in the blank space to get this menu:

Right click dialogue showing disconnected devices.
Right click in the open space and you'll see how to enable disconnected devices.

3. Once you get to this point, click ‘Show Disabled Devices’ and you will see a list of things that you may have disabled. Simply click ‘enable’ to get them back again.


This is a simple solution but it’s also something to keep in mind when you get lost in Windows. If what you want to see isn’t there in front of you or if you can’t seem to find something, try the right click menu to see what comes up. In this case, a simple right click solved what seemed to be a difficult problem.

Thanks for reading!


Three Fingered Salute

Control/Alt/Delete. Remember that?  It’s the old three fingered salute. It still works, it brings up the Task Manager, if you don’t already know but there’s a new kid on the block, a new three finger trick that will bring up another very handy menu.

The following trick will work in any version of Windows 7. It will probably work in other versions but I can’t test them. It will also work anywhere in Windows, on the desktop or in Windows Explorer.  Try it on your desktop first.

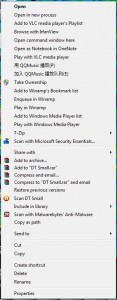
Click once anywhere on your desktop, on a folder or a blank space. Then, holding down the SHIFT key and the CONTROL key, right click your mouse. Depending on what programs you have installed on your computer, you’ll see a menu quite similar to this:

The New 3 Finger Salute Menu
Shift/Control and right click brings this menu up.

The important option for me in this menu is the ‘open command window here’. Using this menu, I can rename hundreds of files in one step as described here: Batch renaming of files.

This simple trick will save you some time if you use the command window frequently. I hope it helps!

Thanks for reading.


Ipconfig


Ipconfig seems like a strange title for a post, right? Once you see how ipconfig can help you, it might lose it’s strangeness.

I’ve written about the command prompt in previous posts. Here is one https://brianmahoney.ca/?s=command+prompt  The command prompt takes you back to the days of DOS but it’s more like a window into the soul of your computer. Consider Windows/OS X the dining room of a restaurant while the command prompt is the kitchen, where the actual works gets done.

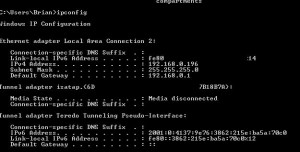
If you start a command prompt (start/programs/accessories/command prompt) then type ipconfig , you’ll see something like this:

The Command Prompt Showing Ipconfig Results
The result of typing 'ipconfig' at the command prompt.

What does all of this mean? Well, a lot of it means nothing, quite frankly, but some of it is valuable if you get stuck and have to access your router. The IPv4 number is the IP address of your current computer. The Default Gateway number is the IP address of your computer. Ignore the other numbers.

I’m assuming that almost everyone who reads this is using a router to access the Internet. If your Internet goes down or your computer seems sluggish, there are a couple of things that ipconfig can help you with. One of them is the IP address of your router. This isn’t the same as the IP address that connects  you to the Internet, it’s the one that you use to connect your computer to the router. Basically there are three IP addresses that you would encounter every day. One is the IP address that your router feeds to your computer. The other is the one that you use to access your router. The third one, which doesn’t really matter unless you want to hide it from someone, is the one that your Internet provider sends to your router to allow it to connect to the Internet. Lots of numbers!

If you have to access your router, you would type an address something like this: 192.168.0.1 into your browser.  This number is the IP address of a D-Link router. Your router probably has a different number but many are quite similar. Some use the 192.168.1.1 combination instead. Assuming that you are connected to the router, typing in the router’s IP address and a password (default is admin), you can gain access to the router’s menu. This would allow you to change different settings or simply reset your Internet connection (instead of getting up and walking over to it and powering off the powering on again).

If your computer seems to be running slowly on the Internet, typing ipconfig  /renew will refresh the IP address of your current computer. Typing ipconfig  /? displays the full menu of commands for ipconfig.

Most of us use ipconfig to renew the IP address but, as you can see, there are many more things that this command can do.

Thanks for reading!