Category Archives: Hidden Windows Tricks

Faster Downloads from Sharing Sites


When you’re using sites such as Rapidshare, Hotfile and others, you probably don’t want to pay for a pro account. The free accounts are limited in many ways. Usually the download speed is throttled, almost always simultaneous downloads are forbidden and you always have to wait a varying length of time between downloads. Well, there is a way to help with one of those limitations.

After you download one section of a file, let’s say a .rar. file, most of the sites make you wait hours or a full day before you can download another portion. How do they know that you have already downloaded one file? Well, they either track your IP address or they set a cookie in your browser.

By logging into your router, disconnecting and reconnecting your Internet connection, you can easily get a new IP address. Then you can go back to the site and download another section or a new file. That’s easy unless you have a static IP address. Most of us have dynamic IPs, we get a new one every time we connect to our ISP. If you have a static IP, you’re on your own here. Can’t help you there.

If you have reset your Internet connection and you still can’t download a file, the server has set a cookie in your browser’s cache. This cookie is what is stopping you from downloading another file until the time limit is up. So, easy peasy, you clear your cache and cookies, right? Well, if you have all of your preferences set in your browser, clearing your cache and cookies is a royal pain in the ass. What do you do?

Simple. Install another browser. I use Google Chrome as my main browser. It’s fast, translates pages for me and it’s secure, too. But I also have other browsers. For my next suggestion, I would recommend Firefox from Mozilla.com. Until Chrome came out, I used Firefox all the time. Chrome is much faster, in my opinion, so I switched to it. Firefox, however, has a great little tool that makes clearing your cache much simpler. Even if you use Firefox as your main browser, this trick is perfect for faster downloading from file sharing sites without upsetting all of your current settings.

Download the first tile from the site using Firefox. Next, reset your Internet connection. Then, click on the word Tools up on the top left of the Firefox window. Look for the words ‘Clear Recent History’. The following menu will pop up:
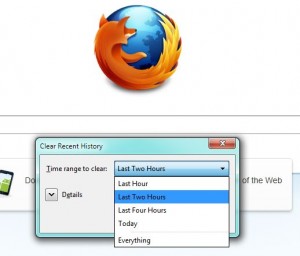
Choose the amount of recent history to clear.
Choose the amount of history that you want to clear.

Depending on how long it took to download the file, sometimes it takes an hour or more, you can clear the cache and cookies for varying amounts of time. Two hours usually works for me. Once you clear your history like this, the serving site won’t know it’s you, that you’ve come back long before their onerous time limit. Once you clear your cache and cookies, you’re back in business.

My trick won’t help you with the slow download speeds nor that simultaneous downloads but it will help with repetitive downloading. This makes the whole download happen much quicker, right?

Thanks for reading!


Undo Mistakes


We all make mistakes. We all wish we could turn back time. Here’s a quick, two-fingered way to do just that.

If you’ve used Photoshop or G.I.M.P. or just about any other photo editing program, you’ll know that you can undo any action that you’re performed  by clicking edit/undo. Those of you who use macros or keyboard shortcuts know that you can do the same thing by hitting the Control key and the Z key at the same time. Did you know that the Ctl/z combination works just as well in Windows and virtually every program, including browsers, that you use? Well it does.

Even if you delete a file and send it to the Recycle Bin, hitting Ctl/z will bring that file back again. If you accidentally hit the wrong keys in Word and your document disappears for some reason, make sure you hit Ctl/Z before you do anything else.

Tip: If you delete a file while holding down the Shift key, the file is gone forever. That’s a good thing and a bad thing sometimes. Unless you are sure that you won’t need the file again, send it to the Recycle Bin and think about it for a while.

Try getting used to this key combination using different programs in Windows. Once you get used to it, you’ll find it a life saver, I think. It’s saved my bacon a few times, I can tell you that!

Thanks for reading.


Three Fingered Salute

Control/Alt/Delete. Remember that?  It’s the old three fingered salute. It still works, it brings up the Task Manager, if you don’t already know but there’s a new kid on the block, a new three finger trick that will bring up another very handy menu.

The following trick will work in any version of Windows 7. It will probably work in other versions but I can’t test them. It will also work anywhere in Windows, on the desktop or in Windows Explorer.  Try it on your desktop first.

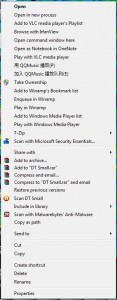
Click once anywhere on your desktop, on a folder or a blank space. Then, holding down the SHIFT key and the CONTROL key, right click your mouse. Depending on what programs you have installed on your computer, you’ll see a menu quite similar to this:

The New 3 Finger Salute Menu
Shift/Control and right click brings this menu up.

The important option for me in this menu is the ‘open command window here’. Using this menu, I can rename hundreds of files in one step as described here: Batch renaming of files.

This simple trick will save you some time if you use the command window frequently. I hope it helps!

Thanks for reading.


Ipconfig


Ipconfig seems like a strange title for a post, right? Once you see how ipconfig can help you, it might lose it’s strangeness.

I’ve written about the command prompt in previous posts. Here is one https://brianmahoney.ca/?s=command+prompt  The command prompt takes you back to the days of DOS but it’s more like a window into the soul of your computer. Consider Windows/OS X the dining room of a restaurant while the command prompt is the kitchen, where the actual works gets done.

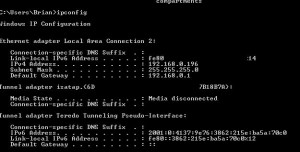
If you start a command prompt (start/programs/accessories/command prompt) then type ipconfig , you’ll see something like this:

The Command Prompt Showing Ipconfig Results
The result of typing 'ipconfig' at the command prompt.

What does all of this mean? Well, a lot of it means nothing, quite frankly, but some of it is valuable if you get stuck and have to access your router. The IPv4 number is the IP address of your current computer. The Default Gateway number is the IP address of your computer. Ignore the other numbers.

I’m assuming that almost everyone who reads this is using a router to access the Internet. If your Internet goes down or your computer seems sluggish, there are a couple of things that ipconfig can help you with. One of them is the IP address of your router. This isn’t the same as the IP address that connects  you to the Internet, it’s the one that you use to connect your computer to the router. Basically there are three IP addresses that you would encounter every day. One is the IP address that your router feeds to your computer. The other is the one that you use to access your router. The third one, which doesn’t really matter unless you want to hide it from someone, is the one that your Internet provider sends to your router to allow it to connect to the Internet. Lots of numbers!

If you have to access your router, you would type an address something like this: 192.168.0.1 into your browser.  This number is the IP address of a D-Link router. Your router probably has a different number but many are quite similar. Some use the 192.168.1.1 combination instead. Assuming that you are connected to the router, typing in the router’s IP address and a password (default is admin), you can gain access to the router’s menu. This would allow you to change different settings or simply reset your Internet connection (instead of getting up and walking over to it and powering off the powering on again).

If your computer seems to be running slowly on the Internet, typing ipconfig  /renew will refresh the IP address of your current computer. Typing ipconfig  /? displays the full menu of commands for ipconfig.

Most of us use ipconfig to renew the IP address but, as you can see, there are many more things that this command can do.

Thanks for reading!


Email Encryption – Part 2


Email encryption is rapidly becoming more of a necessity than a whim. With governments constantly scanning virtually everything you do or say, even the simplest, most innocent email can sometimes lead to problems for the sender or receiver. What is the easiest way to encrypt an email? I described on fairly simple way in this post, and this time, I’ll tell you about something that might even be simpler.

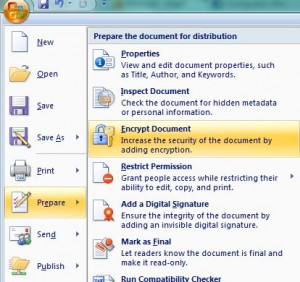
Microsoft Word includes the option to encrypt any document that you create. Here’s the menu where you choose to encrypt your document and lock it with a password:

The Menu for Word Encryption and Password
Choose 'Encrypt Document'

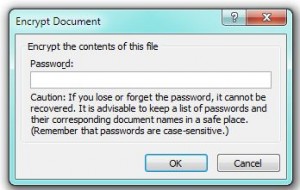
Once you have chosen to ‘Encrypt Document’, this is the menu that pops up:

The Password Entry Menu
This is where you type a strong password.

Make sure you do two things when you get to this point. First, make sure you create a strong password. Don’t use a word or a phrase, make sure it’s either mnemonic (sounds like something you would remember) or long. Always use both letters (caps and small), numbers as well as symbols. A 10-14 digit length is adequate.

Second, make sure you write it down somewhere AND encrypt that, too. If you lose the password, you’re out of luck as far as retrieving your document. Word doesn’t save your password somewhere, it just encrypts the file and encrypts the password too.

Is this a safe way to encrypt something? Well, unless you are a spy, this is about as good as it gets. As long as you choose a password that is at least 10 digits long AND use both upper and lower case letters, numbers and symbols, you’re safe.

OK, so this part is done. Just attach the encrypted document to your email and send it off. But, you ask, how do you send the password? Well, you can send several innocent emails with clues in them which would lead the recipient to the password or you could do that in person, on the phone or via SMS text messages. Whatever you do, make sure that you take as much care with transmitting the password as you do with encrypting the Word document.

If you use Notepad++, you can install the SecurePad plugin to encrypt and lock the whole document or parts of it with a password. Notepad++ is free and tiny to install. This seems like a good, free alternative, specially if your recipient doesn’t use Word.

Sending encrypted documents isn’t illegal…yet. Personally, I don’t like the idea of nameless government/police types reading what I write to my friends. Not only that, a lost laptop opens everything up to a thief (unless you’ve encrypted your whole hard drive), including all of your saved messages. For individuals concerned with privacy, encryption isn’t a luxury, it’s a necessity.

Thanks for reading! Feel free to comment or make suggestions.