Category Archives: Facebook

Link WeChat and Facebook

Even though we don’t recommend doing this, you can link your WeChat account with a Facebook account. If you do, just remember that you can’t do much once the two accounts are linked. This may change but we think that as long as WeChat is based in China, Facebook will prevent it from accessing your friend list. Here’s how you set up the link:

1. From any WeChat page, press Settings on the bottom right. Here is what you see:
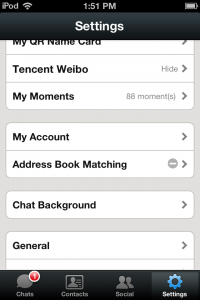
Photo of Link WeChat with Facebook   1
Press My Account

2. Go to My Account. This comes up next:
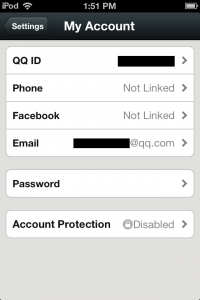
Photo of Link WeChat with Facebook   2
Press Facebook. You can see here that the two are not linked yet.


3. Press on the words ‘ Facebook Not Linked’ :
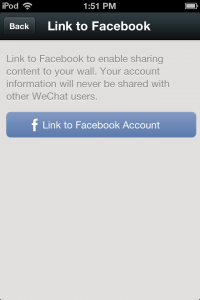
Photo of Link WeChat with Facebook   3
This tells you that WeChat will share content to your Facebook wall. Hmmmm….


4. If you are already signed in to Facebook, this screen will come up. Remember, if you aren’t signed in to Facebook, you will have to sign in from your WeChat screen, complete with email address and password:
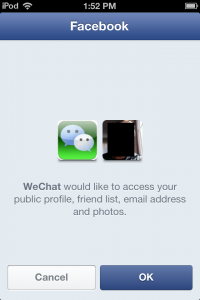
Photo of Link WeChat with Facebook   4
Now WeChat wants to access your profile, friend list, etc. We’re not sure why.


5. If you agree with the menu above, press OK and this screen comes up:

Photo of Link WeChat with Facebook   5
Now WeChat wants to post on your behalf. Really? That’s nice…not.


6. Well, we didn’t want WeChat to post on ‘our behalf’ so we chose to Skip this menu. Here’s what came up next:
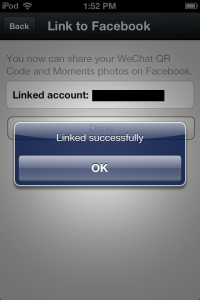
 

Photo of Link WeChat with Facebook   6
There you go! It’s done.


7. Now, about all you can do is share your WeChat QR Code and, remember this, your Moments photos on Facebook.
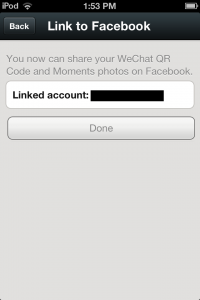
Photo of Link WeChat with Facebook   7
Do you want to post your Moments photos on Facebook?

At this point, there is no way to add your Facebook friends They can add you if they scan your QR code, same as on QQ but that’s about it. Right now, there is no way that we can see to add your Facebook friends to WeChat. If we find out how to do it, you’ll be the first to know.

Facebook is much more personal than WeChat, in our opinion. WeChat is fun, great for meeting people and tends to be more ‘open’ than Facebook. We think you should question whether you want to link the two social networking apps with one another. Once you do, you’re into a completely different privacy level. Facebook is much more invasive as far as your personal details are concerned. We’d advise you to think twice about linking, OK?

Thanks for reading!

Facebook Noise – How to stop it

While the new Facebook look has almost eliminated the newsfeed, many Facebook users are still faced with updates on everything from games to photo likes. If you have friends who are a bit too active for your tastes, here’s how to decrease or eliminate their updates.

1. This process is based on hovering. You don’t have to click until you get to the end and you don’t have to go anywhere else but your Facebook home page. Don’t go to your Timeline, for instance. You could also perform these actions from your friend’s list but it’s not necessary.

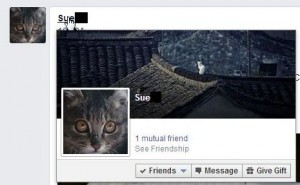
2. When you start to see too many posts from a Facebook friend, find the latest one and hover your cursor over their name. Like this:

Photo of Hide Facebook Noise   1
Hover over the name and a box will pop out.


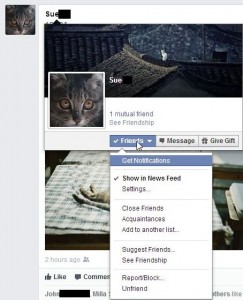
3. Move your mouse down to the word Friends and another menu will pop down:

Photo of Hide Facebook Noise   2
Here are your choices for this particular friend.


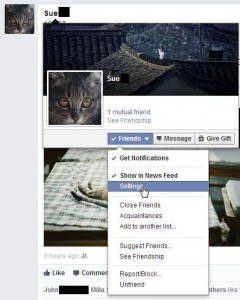
4. You can uncheck the ‘Show in News Feed’ or move down to Settings to choose which updates you want to see:

Photo of Hide Facebook Noise   3
Click on Settings to get yet another menu.


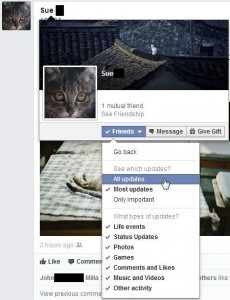
5. Here are all of the updates that you can select or deselect:

Photo of Hide Facebook Noise   4
Check or uncheck these updates, depending on your own preferences.


That’s it! Cut the noise, according to your own level of interest.

Thanks for reading!  Here’s a link to our Facebook page: Computers Made Simple on Facebook 

Facebook – add more sections to your Timeline

By default, there are three sections on every Timeline on Facebook. Those are: About, Photos and Friends. While you can control who can see what in each of those sections, you can’t hide them. The other sections, made up of things like Places, Music, Movies, TV Shows, etc. can be on your Timeline or not, it’s up to you. Beyond that, you can adjust the privacy of each of those sections as well. Here’s how to get the sections to show up on your Facebook Timeline. Once you do that, you can adjust the privacy settings on your own. Let’s get started.

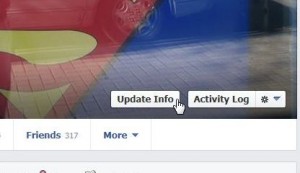
1. Go to your Timeline by clicking on your profile photo. Once you’re there, look for the words ‘Update Info’.

Photo of Add Facebook Sections  1
Click on Update Info.


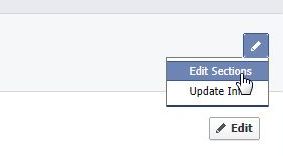
2. On the page that comes up, look for the edit icon, click it then click Edit Sections:

Photo of Add Facebook Sections  2
Edit Sections.


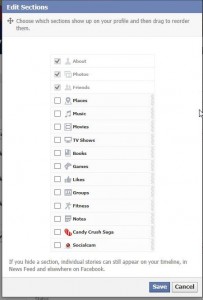
3. A new menu pops down which lists several sections that you can select to show on your Timeline. These may vary, depending on the apps that you’re using at the time:

Photo of Add Facebook Sections  3
There are more here than might be available to you, otherwise it should be similar.


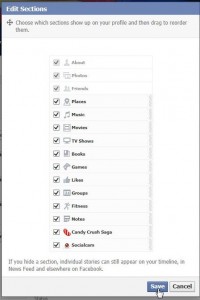
4. Check the ones you want to add, then click Save.

Photo of Add Facebook Sections  4
We selected the whole list.


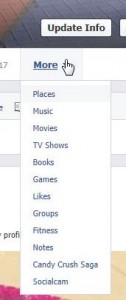
5. Now when you click on the word More, this is what you see:

Photo of Add Facebook Sections  5
Probably more More than you want but that’s how you do it!

Good luck! One of our readers isn’t able to add or click on Places. Does anyone else have that problem? Places may only be available in some parts of the world, we’re not sure. Let us know, OK?

Thanks for reading! If you have time, why not Like us on Facebook? Here’s the link: Computer Made Simple on Facebook. 
 

Facebook – How to delete places

Facebook Places shows where you’ve been in the world, right? Well, no, it doesn’t. Facebook Places shows your friends both the places you’ve been AND the places where your friends have been. How’s that? Let’s say you head to Timbuktu and take a photo of your hotel room. Just for fun, you tag your friend Raoul in that photo. Guess what? The next time Raoul checks his Places map, it will show that he’s been in Timbuktu. Fun huh?

If your Places map shows places that you’ve never been in your life, here’s how to get rid of them. Some of you may want to leave them, which is fine, but for the others, here’s how you do it.

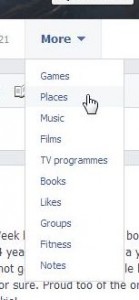
1. Head to your Places.

Photo of Facebook Places   1
Click on More, then Places, depending on how you have your Timeline set up.


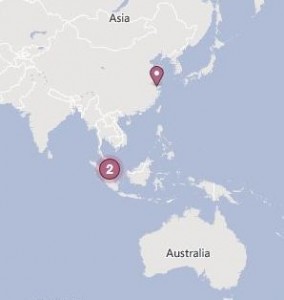
2. Here’s one of our maps:


Photo of Facebook Places   2
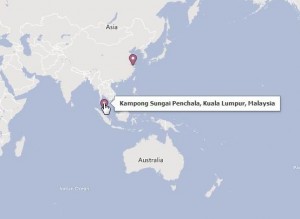
Two times in Malaysia? Really?


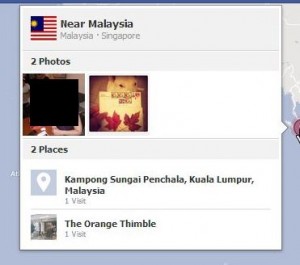
3. Looks like there are a couple of photos from Malaysia that we need to untag. Click on the place in question, something like this comes up:


Photo of Facebook Places 3
Two photos pop up once you click the number 2.


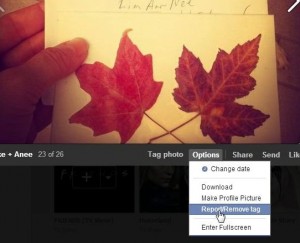
4. Two photos, both with tags. You don’t have to navigate all the way to the photo, just click on the one that you want to untag yourself from (is that good English or what?) Once the photo pops up, click on the word Options:

Photo of Facebook Places 4
Click Options then Report/Remove Tag.


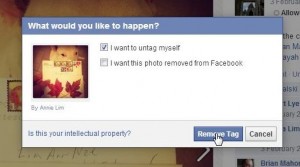
5. You don’t want to report the photo, you just want to untag yourself. Here’s how that looks:

Photo of Facebook Places 5
Choose ‘I want to untag myself’ then click Remove Tag.


6. Done! Let’s check the map again to see if it worker. Don’t forget to refresh the page before you check:

Photo of Facebook Places   6
And then there was one. 


7. This method will remove the places where you’ve been tagged by your friends. If you have added Location to some of your photos or for whole photo albums, those will all show on your map. If you’ve told Facebook that you’ve worked at a brand name company, such as Maximum PC for us, that will show also. You’ll have to remove the Location from your photos and/or delete the work or school history to get rid of those places. Once you know where these ‘places’ come from, you’ll find it much easier to erase them. Good luck! Let us know if you have problems.

Thanks for reading!


Facebook News Ticker – where did it go?

You either like your Facebook news ticker or hate it. There doesn’t seem to be any middle ground. If you like it, and it’s missing, here’s how to get it back.

1. Get busy! Like, share, comment, be active. That’s the prerequisite to getting it back. Facebook only lets you see what everyone else is doing if you’re doing something yourself. It’s that simple!  We’re not sure what the activity parameters are but the ticker was missing on one of our accounts but, after a week or so of simply logging in, we got it back.

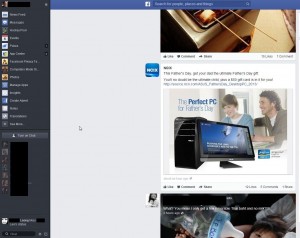
If you read our posts regularly, and you should, you’ll know that the beta edition of the new Facebook look has a very minimal ticker. It’s so minimal that it’s almost non-existent. Only one tick at the bottom of the chat list, that’s it! Here’s how it looks:

Photo of Facebook News Ticker 1
One lone tick down at the bottom of the chat list.


This pic will give you an idea of Facebook’s new look. Almost full photos in the middle, news ticker on the very bottom left, chat in black on the left side below the clickable apps and links. Lots of open space and it takes forever to scroll down.

The old ticker, which you probably have now, looks like this:

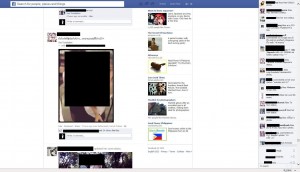
Photo of News Ticker 2
Lots of stuff going on if you want to keep up with what your friends are doing.

In this photo, heavily edited, you’ll see the long list of news that looks like it will become a thing of the past. Ask yourself, how much attention did you actually pay to those instant updates? Maybe that’s why Facebook is shutting it down.

Thanks for reading! Like us on Facebook to keep up with all of our news. Here’s the link: Computers Made Simple on Facebook.