We had an opportunity recently to stage an event where everyone was invited by email. While there are a few online sites that will create a nice looking invitation for you, and yes they are free, these places require access to your contact list. We we troubled by this right away. Once a site has access to your contacts, that leaves the door wide open for identity theft, no matter how secure the site tells you they are. We decided on an alternative.
We use Outlook for some of our email accounts. Outlook is actually two things so let’s sort it all out. Remember Hotmail? Well Outlook is the new Hotmail. Instead of hotmail.com, which still works by the way, MSN wants you to use outlook.com to access your online email. That’s one Outlook. The other Outlook is the email app/software that is part of Windows. If you use your ISP’s email, which we don’t recommend, Outlook is what you need to access it. There are other email clients but most people use Outlook. It’s a standalone app, not linked to a browser. Got it so far?
TIP: Another reason for using Outlook for the invitations is this: They won’t end up in a junk mail folder. Your contacts know you and get your emails in their inbox. If you use an online event invitation service, more than likely the email won’t even be read by the recipient, even if it says that it’s from you. Their email provider may sense that something is amiss and place the email in their junk folder.
Today we are talking about the website email, outlook.com. If you use outlook, hotmail, or ‘live’ for sending and receiving emails to your contacts, you can also create decent looking invitations using it alone, no need to use a website where you have to sell your soul to invite people to a party. Here’s how you do it:
1. Once you’re in your email account, click New to create an email. You can either add contacts now or after you’ve got the invitation designed.
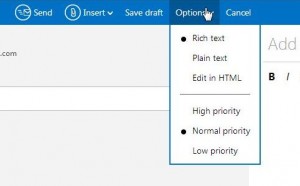
2. Up at the top, left of center, look for the word Options. Click on it and make sure that Rich Text is checked:

3. Once rich text is set up, look to the right and use the icons to choose your font size, typeface, type colour, etc. Here are the icons you can use:

TIP: Set up everything and just start typing. If you look for your cursor, it won’t be there and if you click inside the email, you will lose all of your settings. Remember that.
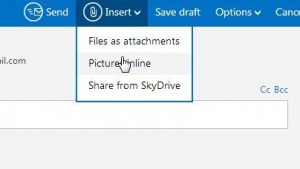
4. Once you have the words, highlighting and colors ready, you can add photos to your invitation. Here’s how:

5. Here’s what our lame but very quick attempt looks like:

6. Once you get it all set up, make sure you save it as a draft so you don’t lose it. Then add your recipients, including yourself, and send it out. Outlook/hotmail usually has restrictions on the number of emails you can send at once so you may have to do this all in more than one step .
TIP: Why send it to yourself? Any important email should also include a copy sent to you, either in the email address slot or as a Cc/Bcc (carbon copy or blind carbon copy). That way you know if the email was sent properly. (Bcc means that no one but you can see that you sent the email to yourself or to anyone you Bcc it to.)
You’re done! We’re quite sure that someone with design talents can come up with something better than our effort.
Thanks for reading! Questions, comments and suggestions are all welcome. Comment below or Like us on our Facebook page and comment there. Here is the link: Computers Made Simple on Facebook
________________________________________________
Here’s a link that might help us if you are interested in hosting your own blog with Fatcow Hosting. We’ve signed up to become an affiliate and we make a bit of money if you sign up for hosting via this link: FatCow Hosting Thanks!
