All posts by Computers Made Simple

Windows 8 and Nexus 5 – Here’s how to make the hookup

It’s frustrating when you plug in your Nexus 5 to a Windows 8.1 PC and nothing happens. Windows doesn’t see your Nexus 5 at all, it seems. Here’s the solution:

1. Put simply, Windows uses the wrong driver for your Nexus 5. For some reason, Windows assumes the phone is an Acer so it uses an Acer driver.  Your Nexus 5 requires an MTP driver in order for Windows to recognize it as a storage device.

2. Make sure your Nexus 5 is set to connect via USB to a computer as a storage device, not a camera. Follow the steps: Settings then Storage then up to the top and press the three dots on the top right and choose: USB connection. Make sure that the top one, Media device, is checked.

3. Connect your Nexus 5 to your PC via the supplied USB cable.

4. If, by chance, your PC sees the Nexus as a storage device, Windows File Explorer will open. If not, and this is normal, it will see your Nexus 5 as a media player only. Open your Control Panel. (Either search for it using the icon on the top right or look for Control Panel on the Windows 8 app screen.)

5. Once your Control Panel is open, click on View devices. Look for your Nexus 5. It will look like this:
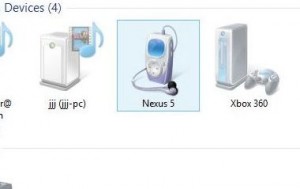
Photo of something
Looks like a simple MP3 player, right?

6. Right click the icon and choose Properties.

7. Click on the Hardware tab at the top and choose Properties again.
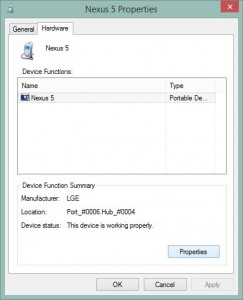
Nexus 5 MTP Connection 2
Get to Hardware then click Properties.

8. Click Change Settings on the next screen.
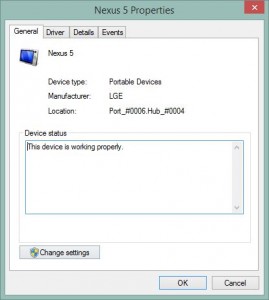
Nexus 5 MTP Connection 3
Change Settings is what you want next.

9. Choose the Driver tab at the top.

10. Choose Update Driver.
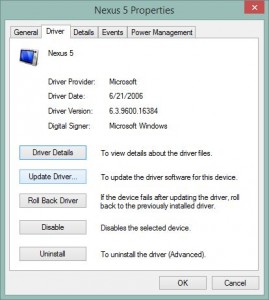
Nexus 5 MTP Connection 4
Update Driver now.

11. Choose ‘Browse my computer for driver software’.
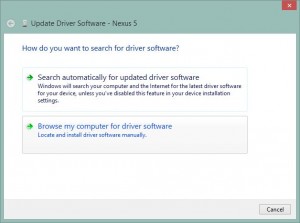
Nexus 5 MTP Connection 5
Browse my computer is next.

12. Choose ‘Let me pick from a list….’.
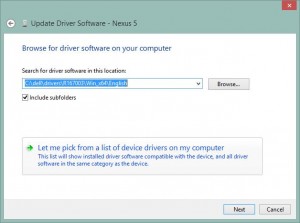
Nexus 5 MTP Connection 6
Let me pick…

13, Choose MTP USB Device and click OK all the way back out.
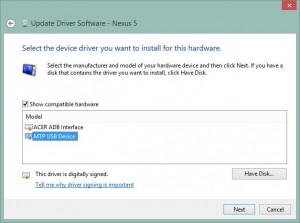
Nexus 5 MTP Connection 7
The MTP driver should already be installed in Windows so choose it.

14, Open Windows File Explorer if a file window doesn’t immediately open and look for your Nexus 5 on the left side.
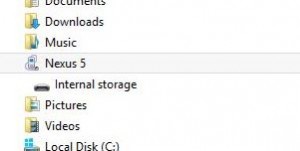
Nexus 5 MTP Connection 8
Your Nexus 5 should show up on the left side of your File Explorer. Double click it to see the files.

15 Double click it to view its files.

You should only have to do this once but the settings may not take the first time. Alternatively, your PC may ask you to reboot. Do that and attach your Nexus 5 after it’s finished booting. You should be able to see the Nexus as a storage device.

That’s it for today, thanks for reading! Comments and questions are welcome but  Likes on our Facebook page get immediate attention.  Here’s the link: Computers Made Simple on Facebook .

Chrome – Save complete sessions

If you want to save your current browsing session in Chrome, here’s how you can do it. Let’s say you have ten tabs open and Windows decides that it wants to restart and update itself. Grrrrr, right? Fear not, here’s how to recover that session after the reboot.

1. On the top of any Chrome tab is your bookmark bar. It’s right above the page that you’re currently on, look for a star and the word Booksmarks on the top left. Here’s where you can save your most popular bookmarks, the ones you use most often.

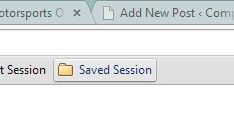
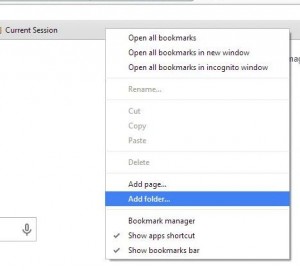
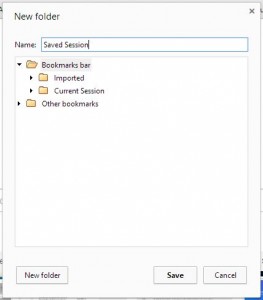
2. We’re going to add a folder to that Bookmark bar. Right click it and choose Add folder. Name that folder something like ‘Current Session’. Click Save.

Photo of bookmark bar.
Right click the bookmark bar and choose New folder.
Photo of Session Folder 2
Type the name you want in the space shown.


3. Your new folder will show up on the Bookmarks bar, ready to save your current sessions. A session is a group of tabs that you have open all at once.

Photo of Session Folder
This is the folder where your session(s) will be stored.

NOTE: If you have two windows open, each with separate tabs, you must make a folder for EACH window. The session folder on one window will NOT save the tabs on the other window.

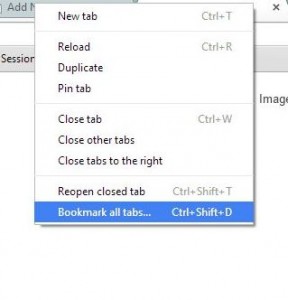
4. When you want to save all of the tabs in your current session, right click any one of the tabs and choose Bookmark all tabs.

Photo of Bookmark All Tabs
Right click on a tab and choose Bookmark all tabs.

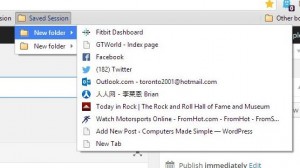
5. There are two ways to do the next step. If you don’t want to keep your sessions organized, simply choose the folder you made in step 2 and click Save. In your session folder, Chrome will save all of your current tabs in a new folder. You can have as many new folders in your session folder as you can handle.

Photo of Bookmark New Folder
Each New folder will contain a session. If you specify a date, it will be easier for you.

6. If you want to organize your sessions by date, change the words New Folder (the ones in blue at the top) to today’s date. Then click Save.

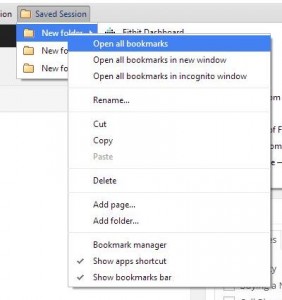
7. Now, if you want to go back to a certain date’s tabs, click the session folder, choose the date you want and then right click it. Choose Open all bookmarks.

Photo of Open All Tabs
Right click the appropriate folder and choose Open all tabs.


If you missed a step, go back and redo the whole thing. If you have questions, make a comment below.

That’s it for today, thanks for reading! Comments and questions are welcome but  Likes on our Facebook page get immediate attention.  Here’s the link: Computers Made Simple on Facebook .
Facebook – Disable video autoplay on mobile devices

If your data plan keeps you on a short leash as far as usage goes, a Facebook video that plays automatically can ruin your day. Here’s how to prevent the video from playing by itself as soon as it shows on your screen.

1. These instructions are for Android devices. They may work for iOS (Apple) devices as well but the steps may not be exactly the same.

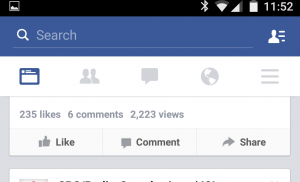
2. Once you’re in Facebook, look for the three horizontal lines at the top of any screen. Touch them. This is what you’re looking for :

Photo of Facebook screen 1
Look for the three lines on the top right. Touch that icon.

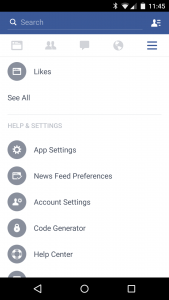
3. On the screen that shows up next, look for App Settings. Touch that :

Photo of Facebook App Settings
App Settings is what you want.

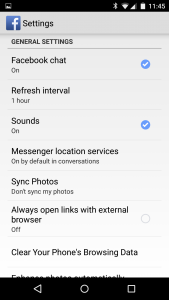
4. Now you’ll have to scroll down from this screen. The setting you want is below this one:

Photo of Facebook Mobile Settings
Scroll down. The one you want is below this screen.

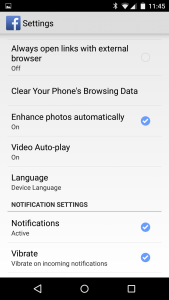
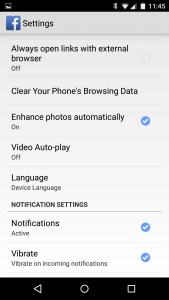
5. At this point, Video Auto-play is on. It’s on by default:

Photo of video auto-play
This is the one you want. Press Video Auto-play.

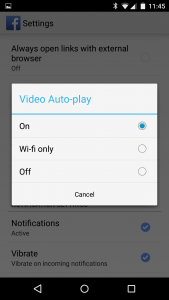
6. Press Video Auto-play to get this screen:

Photo of Video Auto-play off
We’d suggest setting this to Off.

7. There is no reason that we can think of to have auto-play on, no matter if you’re on Wi-fi or not. We think you should set it to Off:

Photo of Video Auto-play in the off position.
Video Auto-play is off. Yay!

That’s it. Now your data usage will be a lot less, depending on how many videos your friends post on Facebook.

TIP: We installed Facebook on our Nexus 5 just for this one post. Please remember that Facebook has access to everything on your phone; your contacts, your text messages…everything. While Facebook tells you that this is all very secure, you have to ask yourself if it really is. We’d suggest that you delete Facebook from your mobile device. Once we did these screen caps, we did just that.

That’s it for today, thanks for reading! Comments and questions are welcome but  Likes on our Facebook page get immediate attention.  Here’s the link: Computers Made Simple on Facebook .
Tablet Tips – A short buying guide

TIP: Before we begin, don’t even think about buying an E-reader. For the same money you can get a full-fledged tablet that will let you read books PLUS just about anything else you can do with a computer. So tablets only, no E-readers.

When tablets first came out, we thought they were a fad, let’s say a flash in the pan. They were cute, small and not very powerful. As time went by, however, tablets grabbed their share of the marketplace. Although a tablet will never replace laptop or desktop computing, we’ve realized that they do have a place in our daily computing world. Here’s why.

1. Instagram looks much better on a tablet than it does on a smart phone. That’s number one for us. For some reason, Instagram looks better on our seven inch Samsung Galaxy tablet than on our slightly smaller Nexus 5. Photos seem to jump out from the screen making the viewing experience much nicer.

2. Reading books is much easier on a tablet than anything else we’ve tried, including the books themselves. First, tablets provide their own light. No min-booklight needed here. Second, a tablet is lighter than a hardcover book and much easier to handle than a paperback since there’s no need to put your thumb in the middle to keep the pages open. Purists hate e-readers but we love them. Sure, we still have thousands of books but we try to read on our tablets whenever possible.

3. There’s no lid. A laptop is great for portability when you need to do some real computing. A tablet, on the other hand, is much easier to start, usually has better battery life and can supply you with news, reading, games and video in a simple, easy to carry device. Almost all tablets come with Bluetooth so there’s no need for a wired earphone set. Laptops don’t usually come with Bluetooth, right? Plus there’s that lid that gets in the way. When you’re on Facebook or Instagram, how often do you use a keyboard anyway? As cell phones move away from keypads, we’re all getting used to tapping out words on a touch screen.

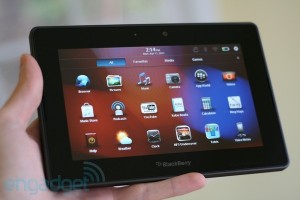
Photo of Playbook
Our first tablet was a Blackberry Playbook. We enjoyed it but found that there weren’t many apps we could use on it.


Before you buy a tablet, here are a few tips:

1. Get a brand name. Samsung, Apple, Dell, HP, they’re all good. Don’t go for a generic device, no matter how good the price is. You won’t get support or updates or much of a warranty, in spite of what the store tells you. If the tablet is made and sold offshore, you’re going to find a warranty useless. Stick with a company that stands behind what they sell.

2. We would suggest getting an Android device. Why? They’re cheaper than Apple’s iOs  models and have just as many apps available. Apple products have what’s known as the ‘Apple Tax’ on them. You’re paying more simply because they’re made by Apple, not because they’re any better. That goes for everything Apple makes.

3. It seems crazy that a tablet wouldn’t come standard with WiFi but we’ve seen some out there that don’t. You have to load the apps through a USB connection. Make sure that the model you’re looking at has WiFi built into it. Don’t simply assume that it does.

4. Make sure you can add extra storage via a flash card of some type. If you’re traveling and want to watch a movie or two or three, you’ll need a few extra gigs of storage. Our Samsung has a slot for a 32 gigabyte card, enough for many movies or a couple of seasons of a TV series. None of Apple’s products come with this feature, just so you know.

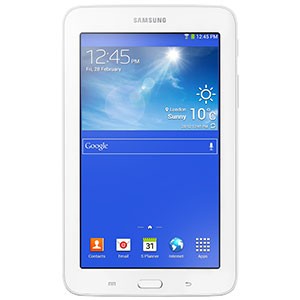
5. You can get a very decent tablet for well under $200.00. We’re not associated with Samsung in any way but we love our Tab 3 Lite. It’s on its way out now but we’ve seen it on several sites for under $130.00. While it has only 8 gigs of storage, you can add up to 32 gigs via it’s micro-SD slot. Here’s how it looks:

Photo of Galaxy Tab
This inexpensive tablet has everything you need for a good price.

That’s it for today, thanks for reading! Comments and questions are welcome but  Likes on our Facebook page get immediate attention.  Here’s the link: Computers Made Simple on Facebook 

Control/Z – Window’s life preserver

We’ve all been there. We’ve all had that oops moment when we delete something by mistake. Maybe it was an email or a few paragraphs of a document or a whole file.

Sometimes it’s not even a deletion that starts the adrenaline flow. An errant cut/copy or a highlight followed by an accidental touch of the backspace button, both will result in a loud, “Oh no!”. Fear not, Control/z is your salvation.

Photo of Control Z
Find the two keys on your keyboard. Don’t hit other keys by accident.

Virtually anything you do in Windows can be undone by hitting your control key and the letter z at the same time, just as long as that’s the next thing you do. Don’t get flustered, take a deep breath and go for it.

While some photo editing and drawing programs have almost endless undo settings, with most Windows programs you only get one shot at undoing an error. Depending on what you’ve done, the first step in fixing your error is to use the control/z keyboard shortcut.

There’s no time limit to all of this, just don’t do anything else with the computer or that action will be the one that Window’s undoes. Make sense? We hope so. Hopefully you’ll remember this the next time bad things happen. Feel free to share our posts if you find them handy.

That’s it for today, thanks for reading! Comments and questions are welcome but  Likes on our Facebook page get immediate attention.  Here’s the link: Computers Made Simple on Facebook