All posts by Computers Made Simple

Stalking Friends on Facebook – a privacy glitch is revealed.

Facebook has had many privacy glitches in the past. We’ve just discovered another one, a fairly significant privacy breach that allows a new user to stalk a friend’s friends. If you want to find out who is friends with one of your friends, even if their friend list is set to be seen by only the user, here’s what you have to do:

1. Sign out of Facebook first, of course, then open a new account. We just did this and found that if we tried to sign up using Firefox, we needed a phone number to register for Facebook. Using Explorer, we didn’t. While we don’t generally recommend using Explorer, it seems that it’s easier for this particular stealth operation.

2. Knowing that you are going to add one particular ‘friend’, try to use a name for your new profile that would seem attractive to that friend. Could be a sports star, could be a movie star, doesn’t matter. The key is to get that friend to accept you as a friend.

3. Once you have the profile set up and have confirmed the registration email, invite your friend to be friends with you. This plan gets confusing if you have more than one friend but it’s up to you how you handle it. You can always add a few friends then delete them but we’re not sure this works.

4. We all know that Facebook is all about adding people as friends, they even suggest names for you. If you are a new user, guess who they use as suggestions? Right, people from your one and only friend. Once your friend confirms you as a friend, Facebook immediately suggests that you add every single friend that this person has, even if their friend list is set to the ‘only me’ privacy lock. 

Sometimes Facebook lists the friend as a ‘mutual friend’ with the person you are already friends with, other times they simply show the friend as a suggestion. The cool or uncool thing is, every one of that group of suggestions is a friend of your real friend. You can see how this would get confusing if you add a few people at once. Right now it works perfectly.

Here’s how Facebook suggests friends:

Photo of Friend Suggestions `
To see the full list, click on See All.

In order to see the full list, click on ‘See All’ to bring up page after page of suggestions, depending on how many friends your single friend has. This is the full list:
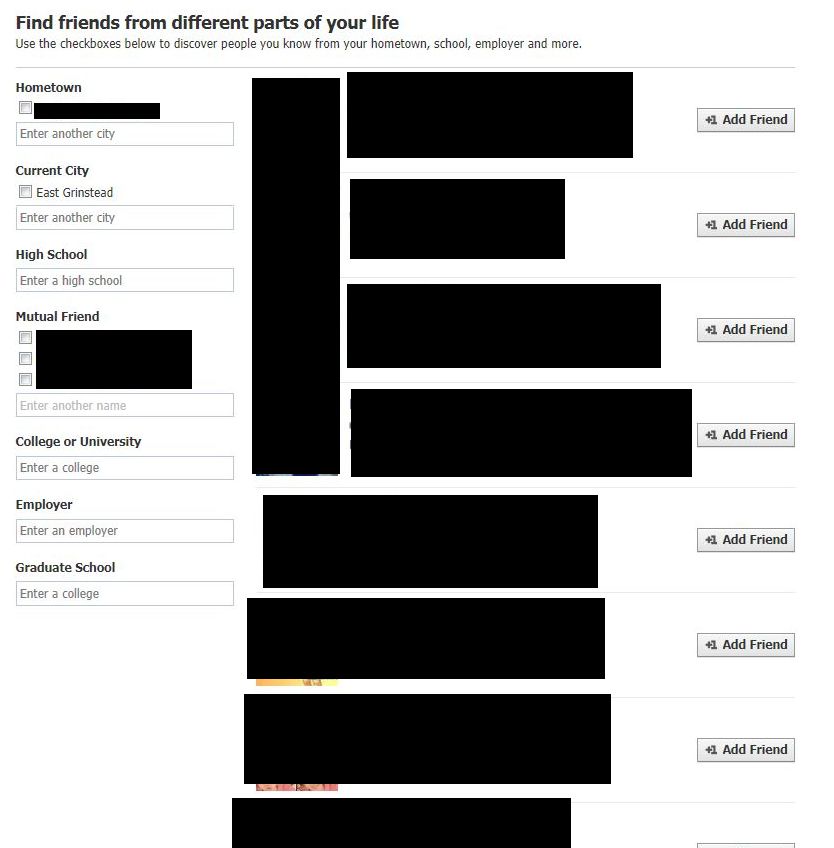
Photo of Friend Suggestion List
Here they are, all of your friend’s friends.


There you have it. Another glitch in Facebook’s privacy settings, all ready to be used and abused by savvy Facebook users. We can’t believe that this simple trick works, but it does. Imagine how this Facebook exploit could be used? Next to facepiles, we see this as the second biggest threat to your privacy on Facebook. We’re outlining it here just in case Facebook hears about it and changes their policy. Who would dream that their locked down friend list could be wide open like this?

Thanks for reading! Comments and questions are welcome. Join us on Facebook by liking our page: https://www.facebook.com/ComputersMadeSimple?ref=hl

Using GIMP – How to clone part of a digital image.

In our last post we taught you how to use the mosaic filter in GIMP to hide part of a digital photo. Today, we’ll have some fun with the clone tool. First, some basics.

Cloning is simply copying parts (pixels) of a photo and putting them somewhere else in the photo or, in some cases, into another photo. If you’ve seen the covers of certain trash magazines, the ones that show one famous person on a date with another famous person, then you’ve seen how cloning works. Fake celeb photos are (mostly) examples of cloning.

In your digital camera, the ‘remove red eye’ feature is another example of cloning. The camera takes pixels from surrounding areas of the photo and replaces the ‘red eye’ with those pixels. You can do the same thing on your own with photos that still contain red eye or, let’s say, photos with someone that you don’t want to see in the photo anymore. You can use the cloning tool to edit out a face, a cloud or a whole person. Have fun with it!

Here we go:

1. Open the photo that you want to work on in GIMP. The tool we want to use is available through the icon of a rubber stamp. Here’s what we want:

Photo of Clone 1
Look for the rubber stamp icon up on the top right side of the tool menu.


2. We’re using the same image as last time, an advertising photo from our favorite (but cancelled) TV show, “Human Target”. In our last post, we put that black spot on the wall using the mosaic filter. Today, we will have some fun replacing Christopher Chance’s (Mark Valley) face with that of Carmine (Simba), the friendly Rottweiler.

Cloning involves careful mouse work so be ready with a steady hand and slow, careful movements. First, we want to place the cursor right where we want to start cloning. In this case, we clicked on the top left of the dog’s face while holding down the CTRL key. In other words, move the cursor to where you want, then press the CTRL key and click the left mouse button once. You know when you’ve done this correctly because GIMP shows a kind of star icon where you clicked.

Next, move the cursor, without clicking any button, to the place where you want to start copying the dog’s face. Again, we moved the cursor up to the top left of Chance’s face. In order to clone a complete face, click the left mouse button and HOLD IT. Don’t let it go. Move the cursor to the right and left over the image that you want to copy to and GIMP will place pixels from the part of the photo that you selected there. Here’s the result of our efforts:

Photo of cloned image.
Guerrero has moved onto the wall and Chance’s face looks like Carmine’s!


There are a few things to remember. One, never let go of the mouse button when you are cloning a complete face or something that can be identified as an object. If you’re cloning over a cloud, for example, you can choose different parts of the sky separately,  then smudge the area to make it look more real. If you cloning a cloud from one area to another, however, don’t lift the mouse button.

Two, the size of the area cloned by the cursor is controlled by the size of the brush you are using. Look down under the tool menu and find the icon of the brush you are using. Click on the icon and you can vary the size and shape of the brush.

As long as you haven’t lifted the mouse button, you can go over the same area again, just in case your hand wasn’t steady. If you happen to make a mistake, remember that you can hit CTRL and z to ‘undo’ what you’ve just done. You can actually hit CTRL/z as many times as you want, going back to the start of the whole process again, if necessary.

The clone tool takes some getting used to but we’ve had a lot of fun with it over the years. We hope you find it useful and fun, too.

Thanks for reading!

Using Gimp – The Mosaic Filter

We’ve recommended GIMP before. GIMP is a free, powerful image editor, full of  the same tools that any Adobe product has. In our opinion, GIMP is faster and much easier to use. Here’s where you can download it:

http://www.gimp.org/

Every now and then, maybe on Facebook, you might want to edit out someone’s face or a part of their body, let’s say something that would upset Facebook’s censors. Here’s how you can do it with GIMP:

1. Once you’ve installed GIMP, right click the photo that you want to work on and choose ‘Edit with GIMP’.

2. When GIMP finally opens, and it might take a few minutes the first time, depending on the speed of your computer, this is what you’ll see:


Photo of GIMP  1
Look for the lasso tool on the Toolbox menu.

Up on the top right, you’ll see a list of icons which represent different tools to use in GIMP. What we want today is the ‘Free Select Tool’ which allows you to draw around an area to select it.


2. We chose to put a mosaic filter in one section of the wall. Here’s what it looks like when that area was selected:

GIMP 3
Choose anything and draw a random shape around it.


3. If you make a mistake, don’t worry. Either press the CTRL key and the z key at the same time, or go up to Edit on the top and choose ‘Undo’. Then try again. Next, we want to use a filter on the spot that we selected. There are a whole range of cool filters to use, don’t feel you have to stick to using mosaic. We’ll show you the basics, you’re free to discover and use whatever the heck you want! Here’s how to find the mosaic filter:

Photo of GIMP 2
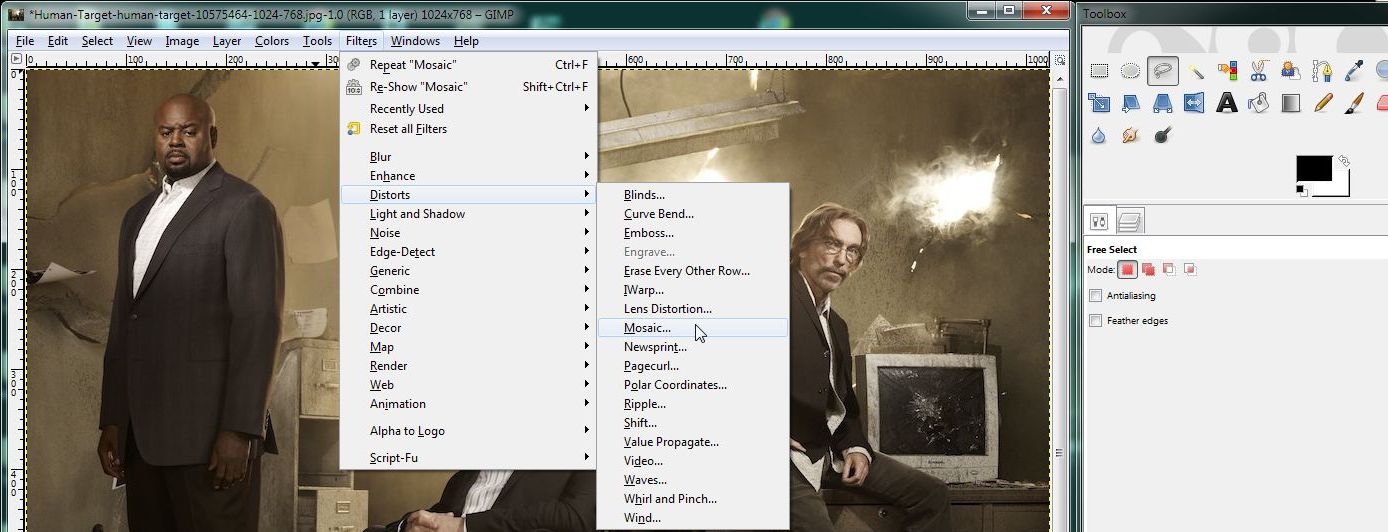
Under Filters, go down to Distorts and then down to Mosaic.


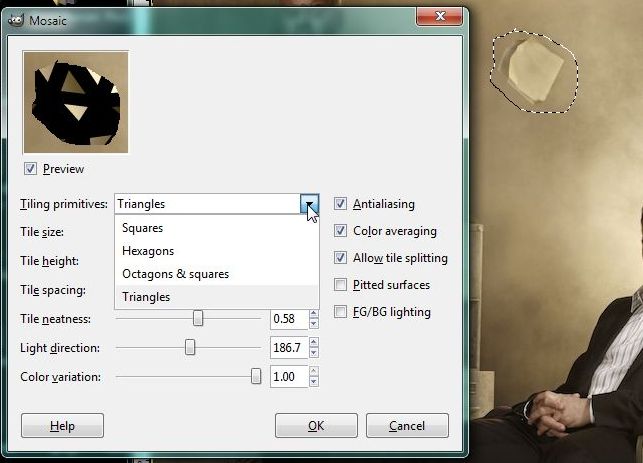
4. After you click on Mosaic, this menu will open. In it, you can change many settings for that one, single mosaic filter. We will show you the types of shapes that you can use to make the mosaic:

GIMP 4
Triangles, Squares, Hexagons, etc.


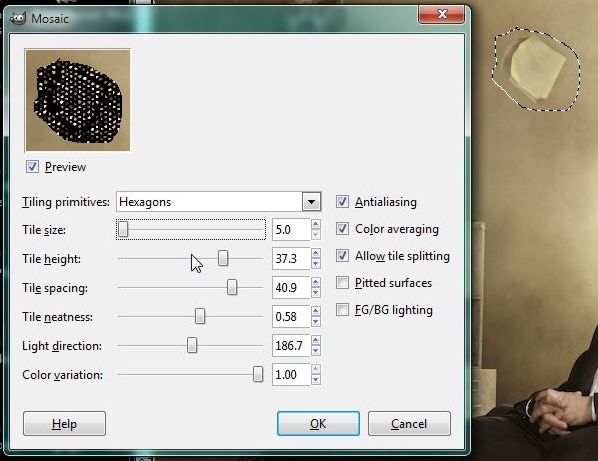
5. Just as you can select the shape that makes up the mosaic, you can also adjust the size, height, spacing etc. of that shape. Use the sliders to adjust these. Notice that the image in the small window changes, not the main image itself. That stays the same until you click OK.


GIMP 5
Use the sliders to adjust the properties of the shape you select.

6. Once you get the tile to look right, click OK and the filter will be applied to your main image. Admittedly, our photo looks kind of nasty but we’re sure that your’s will be much more attractive.

Photo of 6
The area we selected is now ‘mosaic-ed’, if that is a word.


7. Go up to File and choose ‘Save As’ when you are satisfied with your work. Why would you use ‘Save As’? Well, you want to keep the original photo, right? If you choose ‘Save’, you will overwrite the original photo with your new ‘mosaic-ed’ image. It’s up to you but we want to keep both pics. When you choose ‘Save As’, we suggest naming the new image something like ‘***edited’ as we did here:

Photo of GIMP  7
Now we know that this is the edited version.


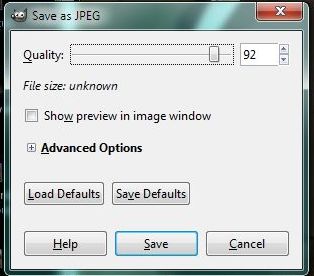
8. After you click OK, the last menu will pop up. This has to do with the quality of the .jpg that you are saving. Anything around 90% is fine.

Photo of GIMP  8
Quality menu in GIMP.


Once you’ve mastered this exercise, you can see how using these filters isn’t as difficult as you might have thought. Remember that there is a whole range of filters here. You can select part of an image or use the filters on the whole image. We’ll do more on GIMP in the next few posts. Let us know if you have questions and don’t be shy to make a comment below.

Thanks for reading!


Check Facebook Privacy Settings

Facebook recently changed the way that you can check who can see what you’re posted or been tagged in. Here’s a run-down of how you can quickly check your settings.

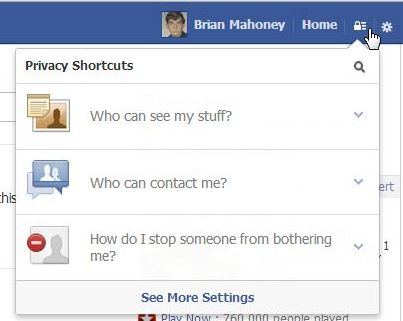
1. Start by clicking on the icon that looks like a padlock, up on the right of any Facebook page.


Photo of Facebook Activity Check  1
Click the padlock.


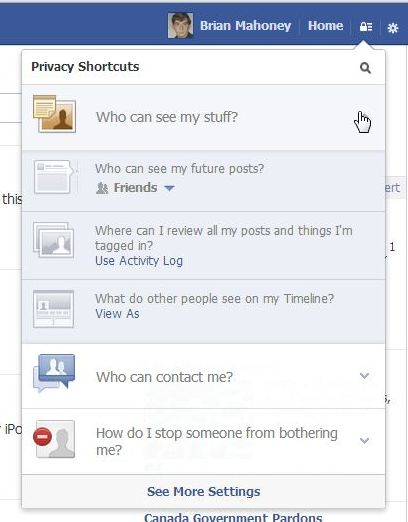
2. On the menu that pops down, click on ‘Who can see my stuff’.

Photo of Facebook Activity Check  2
Click on ‘Who can see my stuff?’


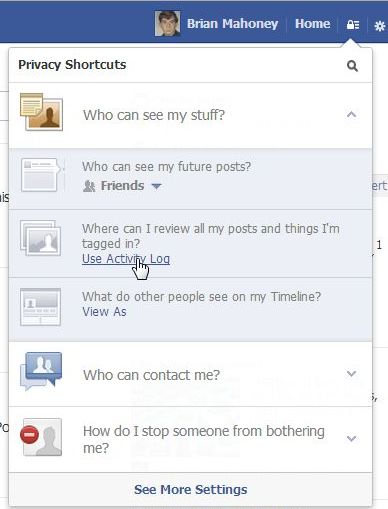
3. As the menu above spreads down a bit, click on ‘Use Activity Log’.

Photo of Facebook Activity Check  3
Click on ‘Use Activity Log’.


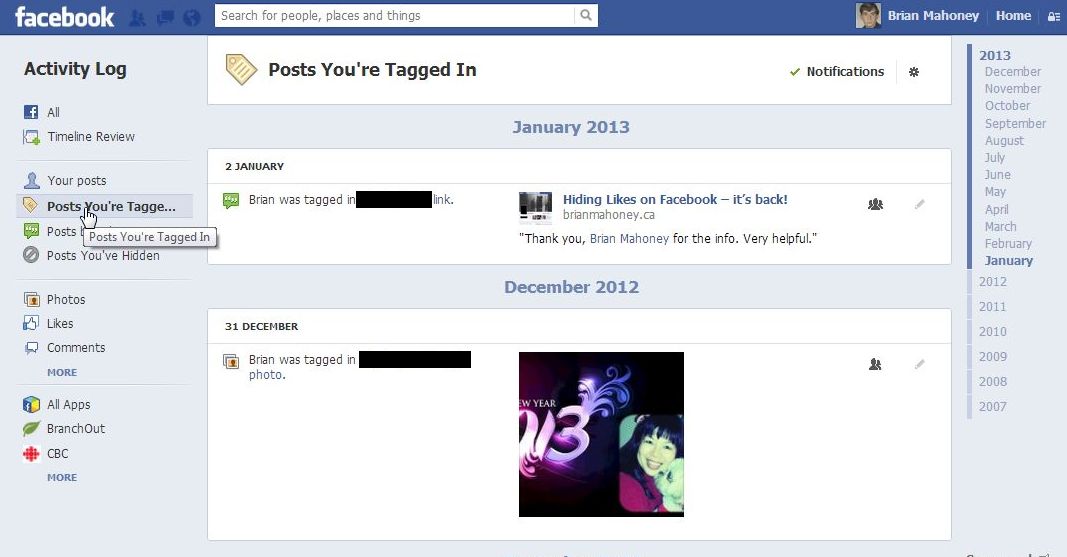
4. On the page that opens, everything that is possible to do on Facebook is on the left, everything that you can control is on the right.

Photo of Facebook Activity Check  4
Sort out your different activities from this single page.


5. The first time you access these areas, Facebook will walk you through the changes. Basically, this is a complete list of everything that you’ve done on Facebook since time began…well, since  you joined Facebook anyway. Depending on how busy you’ve been, the different pages may take a long time to load. Choose an activity on the left side, then look on the right side to see who can see it. You can even choose activities that are set to ‘only me’.

Photo of Facebook Activity Check  5
The default setting doesn’t include ‘Only Me’ activity but you can set it to include it.


6. On this page, you can hide activity from your own Timeline. Remember that any post’s privacy settings are controlled by the original poster’s settings. You control your own posts, of course, but if you are tagged by someone else, you have the option of removing that activity from your timeline or removing the tag completely.

Photo of Facebook Activity Check  6
You can hide posts that you’re been tagged in.


7. Once you get used to finding and using this page, we think you’ll appreciate its power. Each post, each activity has it’s own settings. You can hide things from your Timeline, limit the audience for things you post or share, all kinds of things. Don’t forget that you can set an audience for a post/comment/photo when you do it but you can always backtrack and change the settings here.


Play around with this page. If you find something cool, let us know. We think you’ll feel a bit better about controlling your own privacy now.

Thanks for reading!

Facebook Scams: How to spot them

When any social media ‘comes of age’, there are certain to be scammers who want to take advantage of the people who use it. Facebook has been around for a long time, we all know that, and there are hundreds of scams out there which are set up to trick you out of information and/or your password(s). Here’s how to spot some of them:

1. The most important thing to remember is this: If it’s sounds too good to be true, it probably is. No one is offering anything for free. You can’t get a free iPhone, a free Walmart gift card or any other thing by clicking on a link on Facebook. Use your head! Has Walmart or Apple ever given anything away for free?  Don’t fall for any free gift links, any free vacation links or anything that even resembles this. Nothing is free, certainly not anything that you find on Facebook.

2. If you take a link that leads you outside of Facebook, you’re on your own. While you are in Facebook, certain secure conditions exist. If you click on a link that takes you out of Facebook, specially one that asks you for your Facebook password or your email password, close the browser window and move on.

3. If you get an email that looks like it’s from Facebook, it almost certainly isn’t. First, Facebook knows your name and would use it in any email that they might send you.  Second, your privacy settings can be set so that Facebook can only contact you via your mobile phone or another email account besides the one you log in with. If your account has been hacked, there are ways to know this. Again, use your head. Don’t randomly click on links that you get in emails.

4. There are two sites that you can use to check things out. OK, three, if you count this site.

Snopes.com is where you can check out urban legends, rumors and myths of all kinds. If you’ve seen photos of ‘sick children’ on Facebook, Snopes will tell you how long that particular scam has been around. Bookmark this site and use it to check out things that seem suspicious on Facebook.

Photo of Snopes logo.
Use Snopes to check out scams, myths and rumors.

Thatsnonsense.com (here is their Facebook page: That’sNonsense.com) is something that we discovered when we were checking out a Facebook scam.

Photo of Nonsense logo
Check out Facebook scams here.

You have to wade through many posts but there is lots of info here about all current Facebook spoofs. The latest is this one:

Quoted from a post on Facebook:

Hello, my FB friends: I want to stay PRIVATELY connected with you. I post photos of my family that I don’t want strangers to have access to!!! However, with the recent changes in FB, the “public” can now see activities in ANY wall. This happens when our friend hits “like” or “comment” ~ automatically, their friends would see our posts too. Unfortunately, we can not change this setting by ourselves …because Facebook has configured it this way. PLEASE place your mouse over my name above (DO NOT CLICK), a window will appear, now move the mouse on “FRIENDS” (also without clicking), then down to “Settings”, click here and a list will appear. REMOVE the CHECK on “COMMENTS & LIKE” and also “PHOTOS”. By doing this, my activity among my friends and family will no longer become public. Now, copy and paste this on your wall. Once I see this posted on your page I will do the same. Thanx

End of quote.

This paragraph is being spread all over Facebook. As you know, if you have followed us for a while, this doesn’t work. The only way you can limit posts and comments is to control your privacy settings NOT by adjusting a friend’s news feed. How would you know this? Most likely because your friend, unless they are a computer expert and a pretty good writer, would not be able to write something like this. Second, if you uncheck photos and comments, how would you be able to see those photos and comments anyway? The person who posts this obviously doesn’t know how to set their privacy controls. We do! Follow our posts and we’ll keep you up to date on all everything to do with Facebook, scams, spam and phishing. We try to simplify your life as much as we can.

If you have questions about something that you see on Facebook, let us know. We’ll track down the answer for you.

Thanks for reading!