All posts by Computers Made Simple

Download Facebook Albums

Please Note: Since we wrote this review, ‘Download FB Album mod’ has changed its settings and asks form more permissions than we feel is safe. Here are the permissions it is asking for now: 

Photo of FB Album permissions.
Too many permission for a Facebook downloading app.

There is no reason why this extension has to access ALL of your data on websites, that would include passwords, by the way. Nor is there any reason for it to access your other tabs or browsing activity. It seems that the creators are involved in data mining, selling your information to advertisers, etc. Beware! We’re going back to Fotobounce. 

If you want to download whole photo albums on Facebook, you don’t have too many choices. The old ways, Fotobounce and others, only work sometimes, if at all now. We’ve discovered a brand new system that will download whole albums quickly and easily. Yay us! Here’s the scoop:

1. You have to be using Google Chrome as a browser. We suggest Chrome should be your default browser anyway so go to Google and download it, it you aren’t using it now.

TIP: When you are downloading software, make sure you go to the source. We’ve noticed that fake Chrome sites exist. We can only assume that these sites will install a modified version of Chrome, probably filled with some kind of malware. Go to google.com and take the link from there.

2. Once Chrome is installed, head over to the Google Web Store, everything is free so don’t worry about the word ‘store’. What you’re going to do is install an extension, a little bit of software that is added to Chrome which will download full Facebook photo albums. Here’s the link: Google Web Store

3. What you’re looking for is: Download FB Album Mod. This is an ‘extension’, not an app. Here are a couple of links to the download page for this extension:

https://chrome.google.com/webstore/detail/download-fb-album-mod/cgjnhhjpfcdhbhlcmmjppicjmgfkppok?hl=en

https://chrome.google.com/webstore/search-extensions/Download%20FB%20Album%20mod?hl=en

4. Download and install the mod. You don’t have to reboot your computer or even restart Chrome.

5. Now for the fun part. Head over to Facebook and find an album that you want to save. Here is the process in pictures:

Photo of Facebook Album  1
Up on the top right of your URL bar, look for this symbol. Click it.

TIP: Please note that this icon only appears when you are on a Facebook page.

6. After you click the icon, this menu appears:

Photo of Facebook Album  2
Choose Normal. You can also choose to download the captions with each photo.


7. A new tab opens when you click Normal. The album will load on that page and a message will be shown at  the top. It flashes on and off so be prepared to read it. Here it is:

Photo of Facebook Album  3
Use the CTRL + s keys to save the album to your computer.


8. The save menu comes up next. It will give the name of the album and save it as an htm file, in other words as a complete web page. Click OK to save the file.

Saved as a Web Page, an htm file.

9. Once the file is saved, and for a large album this could take a while, head over to your download folder. The photos will be in a folder, as opposed to a single set of files, so look for the folder icon with the correct name.

Photo of Facebook Album  5
Look for the folder icon with the name of the album you just saved.


10. Double click on the folder. Inside that folder will be all of the photos in the album. You’re done!

Photo of Facebook Album  7
Here are the photos in this album.


As of February 5th, 2013, this system works. None of the others ways that we have written about in previous posts seem to work now. Why? Probably because of new privacy settings that Facebook is using. Fotobounce will still work with some albums but it’s much more difficult to use and it still stops working on large albums. This system, using Download FB Album Mod, works perfectly. Let us know if you have a problem with it.

Thanks for reading

NOTE: For this post we used https://www.facebook.com/Riddlesmessywardrobe  page. Riddle is one of our favorite cosplay stars. Stop by and like her page.


Hide Your Game Updates on Facebook

If you’re worried about spamming your friends with game updates on Facebok, here’s how to hide them:

1. You can do this in at least two places. The easiest way to hide ALL of your game updates is to head to your Timeline first. Click on your name, top right side of any Facebook page. Once your Timeline opens, look for the words Activity Log.

Photo of Hide 1
From your Timeline, click on the words Activity Log.


2. When your Activity Log opens, all of your activities are shown.

Photo of Hide 2
All of your activities are shown here.


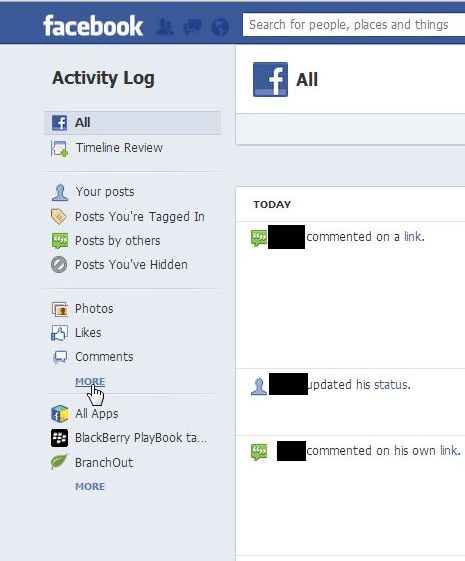
3. While you could scroll down and edit each post, we’re here to hide only your game updates. On the left of your screen, look for the list of activities. Normally, Games will be hidden so look for the word ‘More’ and click it:

Photo of Hide 3
Look for the word More and click it.


4. Once the menu spreads down, look for the word Games. Click on it.

Photo of Hide 4
Click on Games. All updates from all games that you play will show up on the right.


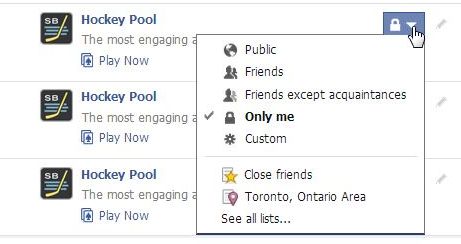
5. On the right side, click on the icon that is second from the right. If could be an icon of a globe, two heads in silhouette or maybe a padlock. Here are your choices:

Photo of Hide 5
Choose who sees each game’s updates. In this case, only the Facebook user can see this game’s updates.


6. Once you have set each game’s updates to Only Me, and that is the setting that we recommend,   the icon on the far right will be greyed out. Why? Because ALL updates will now be hidden. Do your friends a favor by making sure that each game you play will not spam their newsfeed.


Thanks for reading!  Like us on Facebook and we’ll keep you up to date on everything to do with Facebook and computers in General.  Computers Made Simple on Facebook 

The Kiss of Death on Twitter

If you use Twitter, here’s how to lose followers. It’s easy, foolproof and quick. OK, we’re being sarcastic but, believe us, if you do this kind of thing, you’ll lose followers quickly. One of our most trusted ‘followees’ on Twitter has recently started using this technique. Yes, we’ve complained to him but to no avail. We haven’t ‘unfollowed’ this person but we don’t click on his links now. His politics matched our politics too!

If we post a link on Twitter, it’s either to an article that we’ve written or to something that someone else has written or photographed. That’s obvious, right? We don’t post links to anything unless it  takes you directly to whatever it is that we want to share.

The problem comes up when a Twitter user creates an intermediate site. Instead of simply sharing their own posts, they steal a headline from another site, post it on their site and link to the original post. On Twitter, they tweet the link to their site, forcing you to go there first. Of course, they get the benefit of your visit while wasting your time. It’s a cheap, smarmy way to drive up numbers on their site. This is how it works:

Here’s an example of a tweet:

Photo of Cheat 1
You can’t see where the link takes you.


This is a standard tweet, a few words describing the subject, followed by a link. If you don’t know about that link,http://bit.ly,  it’s one that has been shortened by the bit.ly website  in order to take up fewer letters on Twitter.

Now, the problem is that you, the user, can’t see where that link leads. Since the words “New York Times (blog)” is mentioned, you’d assume that the link takes you to the New York Times, wouldn’t you? Sadly, it doesn’t. This link takes you to the user’s site first, then, if you’re not too ticked off at being misled, you can head over to the real, original site, in this case The New York Times. Here’s where the link goes:


Photo of Cheat 2
Does this look like the New York Times?


This is the user’s site, not the New York Times. You’ve been hoodwinked into driving up the user’s numbers by simply following a link that looks like it leads to the New York Times. To us, this is no different than spam. On Twitter, you have to take care of your followers. You should never mislead them, trick them or, in this case, obviously try to deceive them. To us, it’s the kiss of death.

TIP: Twitter uses its own link shortening tool. Unlike bit.ly, Twitter’s link shortener does not mask the name of the site. From the photo above, can you tell where the link leads? No. If this user had used the Twitter tool to shorten the link, you would easily see that it does not lead you to the New York Times. Is this an accident? Again, no. The user knows exactly what he is doing. His intent is to hide the fact that you are going to his site first. He’s wasting your time.

Consider this a rant but also consider how your time is being wasted when this happens to you.  Help us all by not clicking on misleading links like this. Every time you click, you’re helping to perpetuate this kind of activity. We’re going to lobby Twitter to ban users who do this kind of thing. Twitter is very good about enforcing its anti-spam policies. Let’s see if we can get them to ban this stuff, too.

Thanks for reading!


Fix Microsoft Software Problems

Every now and then, Microsoft’s Office or Word Starter simply won’t work. Either they won’t start or they won’t close down, something screws up somewhere. What do you do? You let Windows fix the problem. Here’s how:

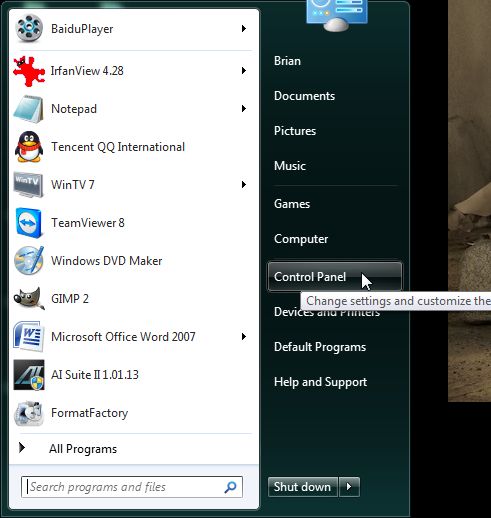
1. Click on Start or the Windows icon down in the lower left corner of your taskbar and look for Control Panel.

Fix   1
Open your Control Panel


2. When the Control Panel opens up, look for Programs:

Fix   2
You want to click on the words ‘Uninstall a program’.


3. You don’t really want to uninstall a program, all you want to do is fix one, but this is how you get to do that. Once the program menu opens, scroll down to the Microsoft program that you want to fix. In this case, we’re going to pretend to fix Microsoft Office:

Fix   3
Click once on the program that you want to fix, to highlight it.


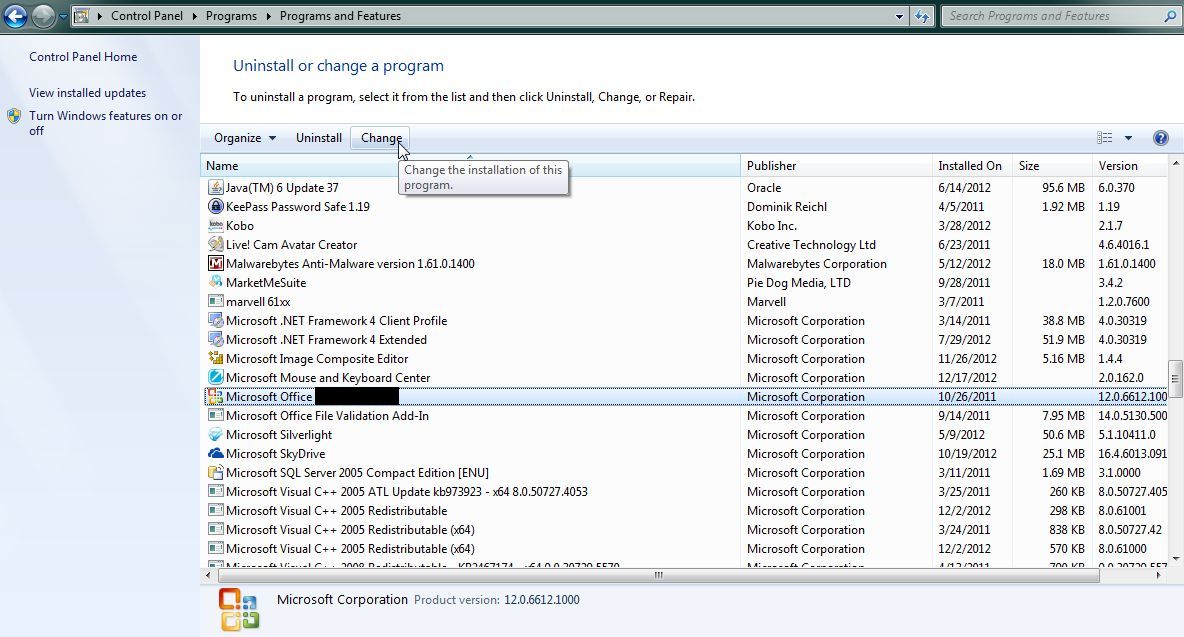
4. Up on the blue bar, part way down from the top, look for the words ‘Organize   Uninstall    Change”.  We want to click on Change.

Fix   4
Change is what you want. Click it.


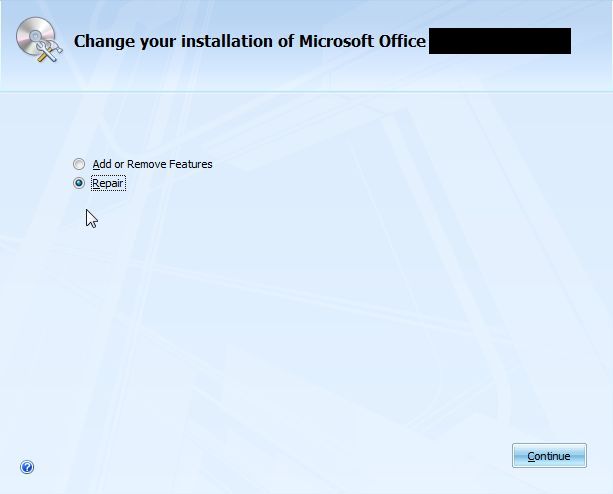
5. Once you click Change, you’ll see a menu that will let you Add or Remove Features (you must have the CD or DVD handy), or Repair the installation. We want Repair.

Fix 5
Choose Repair, then Continue.

Follow the prompts and Windows will repair the software for you. In the case of Office or Word Starter, you should probably delete all the user settings, just in case they are causing the problem. Repair will ask you if you want to do that, we would suggest ‘yes’.

The final two screens may not look the same as ours, depending on which Microsoft program and which version of it you are using. This fix only works with Microsoft software, unfortunately. We used this when the free edition of Word, named Word Starter, wouldn’t…start, that is. This solution fixed everything up quite nicely.

Thanks for reading!  Why not ‘Like’ us on Facebook and keep up with all the latest tech news and tips?   Computers Made Simple on Facebook 

Free Remote Support Software

We recently had to help a friend in another city with their computer. Instead of spending hours on the phone, we searched for free software that would allow us to fix the computer online. There are quite a few professional applications out there but we love free! It didn’t take long until we found Teamviewer. Here’s the scoop on this handy AND FREE software.

Teamviewer, available here: http://www.teamviewer.com , is free for private users. In other words, anyone can use the product for free except businesses or companies that charge to fix computers.
How to use Teamviewer to repair another computer: Teamviewer comes in two parts. If you are the person who is fixing the computer, you download the free software and install it on your computer. Here’s what the link looks like for that:

Photo of Team  1
Click the big green download button then install Teamviewer.


If you are the person who needs help, this is the software to download: (Click on the ‘Join Remote Control Session’)

Photo of Team 2
Have your friend click on ‘Join Remote Control Session’ and open the file that downloads.


The fixer, most likely you, has most of the program on their own computer. The friend with the damaged but working computer, has a mini app running on their computer.

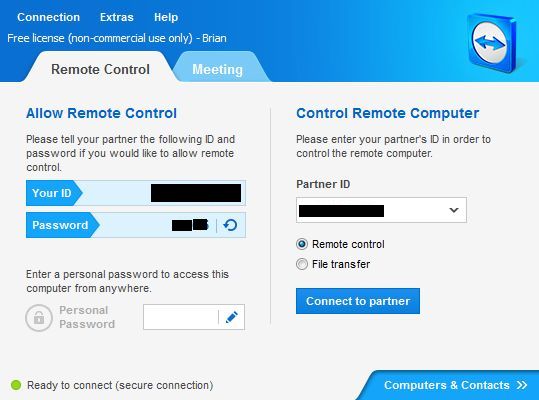
So far so good? Now, each of you has a login number and a password. You, the fixer, don’t have to do anything with your number. On your computer screen, this is what you’ll see:

Photo of Team 3
Have your partner give you their ID number, then their password.


Ignore the left side of this menu, you’re interested in getting your partner’s ID first, then their password. Once you enter those, your friend’s computer screen pops up onto your monitor. You have complete control of it and you use your mouse and your keyboard. If you click outside their window, you can use your computer to find a solution, if necessary. Then, when you want to go back and use their screen, click anywhere in the other computer’s window.

Those are the basics. Teamviewer works perfectly, we have used it and love it! This isn’t all that Teamviewer does, of course. You can have meetings using it, transfer files, all kinds of things. What we’ve given you here is an easy and fast way to fix a computer from across town or in a completely different city or country, all for free.

TIP: Both computers must have Internet access, right? You have to be in contact with the other person, let’s say by phone or text or Skype, for instance, to tell them what to do. That’s common sense but it’s worth mentioning.

Lastly, Teamviewer can be used to control your own computer remotely. Once you know the ID number and password, you can access your own computer from any other computer anywhere else in the world. That’s how amazing this free product is. If you’re in business, make sure you check Teamviewer’s prices compared to other software such as this. To be honest, the corporate prices seem quite high. Then again, there are no monthly fees.

Thanks for reading! Let us know how you made out with Teamviewer. Like us on Facebook and keep up with all the latest tech news and tips:  Computers Made Simple on Facebook