If you have disabled your internal microphone on on your netbook or notebook, here’s how you can get it back. This post also shows the value of Window’s right click menu system. Sometimes we forget how powerful it is.
I was making a video today and tried to use an external microphone instead of the internal one on my netbook. Well, the external one didn’t work but I had disabled the internal one, thinking it was causing some interference. Once I decided to use the internal one again, I had to search for a way to enable it again. Here’s how you do it:
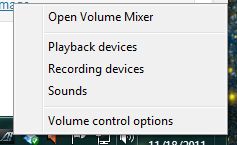
1. Right click the little speaker icon on the lower right of your taskbar. Choose ‘Recording devices’ as you see here:

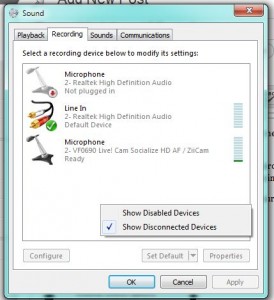
2. Once the recording device dialogue is up, right click anywhere in the blank space to get this menu:

3. Once you get to this point, click ‘Show Disabled Devices’ and you will see a list of things that you may have disabled. Simply click ‘enable’ to get them back again.
This is a simple solution but it’s also something to keep in mind when you get lost in Windows. If what you want to see isn’t there in front of you or if you can’t seem to find something, try the right click menu to see what comes up. In this case, a simple right click solved what seemed to be a difficult problem.
Thanks for reading!
