Tag Archives: Facebook Tricks

Deleting Posts from your Facebook Timeline

There are several ways to hide your page likes from showing up in your Facebook news feed or on your timeline. We’ve shown you how to hide individual likes in previous posts. This time, we want to show you how to hide groups of things from your timeline.

All of this is done from your own Facebook timeline so head there now.  Depending on your settings, you’ll probably see big boxes with titles such as Activity, Friends, Photos, Likes, etc. These big boxes match up with the little boxes with the same names, the ones just below and to the right of your name.

First, lets figure out what boxes we want to share with our friends. Click the small down arrow just to the right of the number of boxes you have in that section. This person has six. This is the box we are looking for:
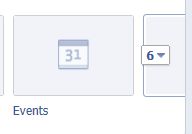
Photo of Cleaning up your Facebook Timeline 1
Click the little box with the number in it. You can’t edit your Favorite boxes until you do.


Once you click on that box, you can edit and shift the various boxes around. Each main box on the second row has an editable icon on the top right, just hover your cursor there. Two boxes do not have edit icons: Friends and Photos. You can hide your full friend list elsewhere but clicking this box will show either your full friend list or mutual friends that you have with whoever is looking at your timeline. Your photo box can’t be hidden or changed but you can, of course, limit your audience to any photo that you post yourself. Any of the other boxes can be swapped with anything else or you can remove that box from your Favorites. (All of these boxes are named Favorites.) Here is a menu of what you can do with the boxes:
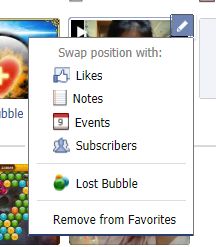
Photo of Cleaning up you Facebook Timeline  2
Arrange your boxes or remove a box completely. You can add it back later.


If you have removed a box from your Favorite boxes, you can add it back. Hover your cursor on the top right of any blank box on the top row and choose which box you want to add back. Here is the menu you see when you click the edit icon:
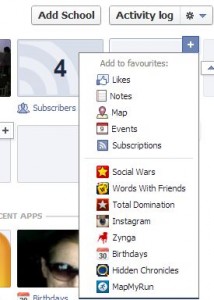
Photo of Cleaning up you Facebook Timeline 3
Pick a box name and add it back.


Just for fun, here is a glitch that we discovered in this section of the timeline. It looks like a menu where you can type in your own name but, unfortunately, it doesn’t work. This is what we saw:
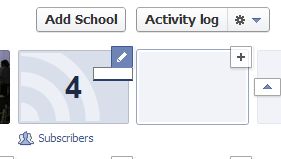
Photo of Cleaning up you Facebook Timeline 4
It would be nice to make up your own name for a Favorite box, wouldn’t it?

Move down the page and find the post that shows that you’ve recently added a friend.  Click on the edit button on the top right of that box and you’ll get to hide that whole activity, not just the one single post.
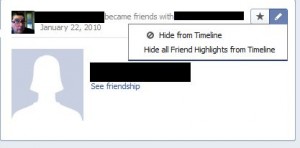
Photo of Cleaning up you Facebook Timeline 5
Hide all friending activity  with the click of a mouse.


Facebook apps love to post every damn thing you do when you’re playing games. You can hide all posts by any game but, unfortunately, you have to do this game by game. Here’s one of the game menus which allows you to stop them from cluttering your timeline:
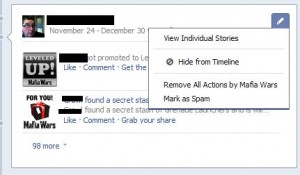
Photo of Cleaning up you Facebook Timeline 6
Remove all actions. Sounds good, doesn’t it?


Work your way down your own timeline and see what you can hide and what you can’t. Each time you do this sort of exercise, you will become more comfortable with maintaining your privacy on Facebook. By nature, Facebook is all about sharing but we think that you should be in control of what you share. We’ll help you all we can to figure it out.


Thanks for reading! Comments, questions, problems are all welcome. Follow us on Facebook to get the latest updates. Here the link:  Computers Made Simple 

Facebook Changes Its Like Privacy – get the details here.

As of November 7, 2012, Facebook has completely changed its privacy settings for pages that you like. Pages include artists pages, tech pages, etc. Here is what we’ve found so far:

1. Your activity log is one place to start. Get to this page by clicking on Activity Log from your Facebook timeline. The first page that comes up is your own posts and posts from whatever apps (games) you have used recently. What’s new here is the Start Tour button. That should clue you in to the fact that something has changed.

Photo of Facebook Likes  1
Click on your Activity Log under your cover photo on your timeline.


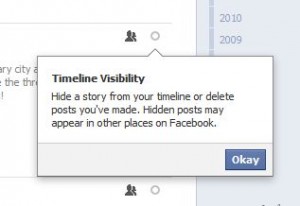
2. Click on the Start Tour button and this pops up. The settings described here affect only the things that you have posted. 

Photo of Facebook Likes   2
This is the ‘friends only’ icon.


3. Once you click Okay, another message pops up. This one is key to the new Facebook privacy…or lack of it. It’s worth emphasizing, we think: Hidden posts may appear in other places on Facebook.  It seems now that there is no privacy on Facebook at all, right?

Photo of Facebook Likes  3
Read these words carefully. ‘Hidden posts may appear in other places on Facebook.’


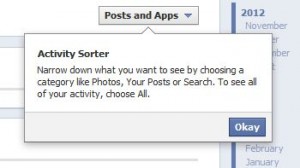
4. Click Okay once this has settled in. The next box says that you can sort out your activities by clicking on the box up at the top.

Photo of Facebook Likes  4
Sort through your activities by clicking on the box near the top.


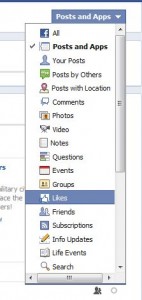
5. Here is the list of your possible activities.  Finally, your Likes appear.

Photo of Facebook Likes  5
Click on Likes.


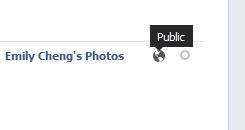
6. The page that comes up when you click Likes isn’t your page likes. These are your photo likes and comment likes. Nothing has changed with these likes. The photo below shows that this user, Emily Cheng, has set her photos to ‘Public’.  Anyone who gets to her profile can see her photos, not a setting we would recommend.

Photo of Facebook Likes  6
Don’t set your photos to Public, that’s our advice.

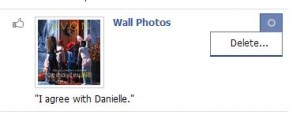
Remember that the settings shown here are completely out of your control. We think that this is shown in order to warn you about who can see that you liked the photo. In this case, it’s possible that everyone on Facebook could potentially see that you liked it, not just this person’s friends.


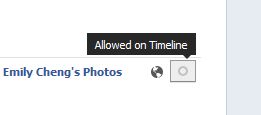
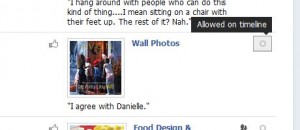
7. Next, we want to show you what your options are when you like someone’s photo. There is only one. The first, shown below, seems to suggest that you can keep this like from your timeline.

Photo of Facebook Likes  7
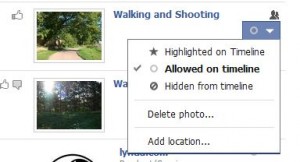
If it’s ‘Allowed on Timeline’, you’d think there was a ‘Not allowed on Timeline’ choice. There isn’t.


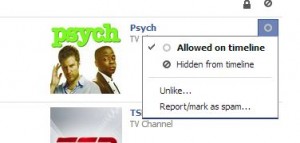
8. The only thing you can do to hide your like from your timeline is to, you guessed it, ‘unlike’ the photo. That is the only choice you have.  When you click the circle to the right, this is what you see:

Photo of Facebook Likes  8
Unlike is the only choice you have to keep this like off of your Timeline.


9. When it comes to liking a page, you have one more option.

Photo of Facebook Likes  14
You can hide this like from your Timeline.

Hiding this like from your timeline may or may not keep it hidden from your friends. Let’s head over to another area of Facebook to see if we can keep this ‘like’ away from your news feed.


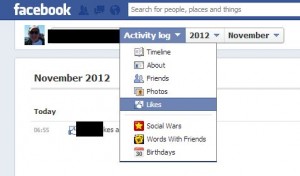
10. On the same page that you are on now, your Activity Log, look up on the top left. You’ll see this:

Photo of Facebook Likes 15
Click on the words Activity log, then on Likes.

11. Once you click the word Likes, this page will pop up. It looks like you can’t do anything here but hover your mouse up on the top right. You’ll see the word Edit appear.

Photo of Facebook Likes 12
Hover your cursor on the top right and Edit will appear. Click it.


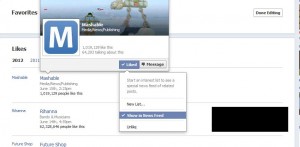
12. This next page is quite empty and it looks as if there is no way to edit anything. Hover your cursor over the name of any like here and this is the menu that pops up:

Photo of Facebook Likes 13
Here are your choices for these Likes.


13. Three choices are available. Show in News Feed, unchecked Show in News Feed meaning ‘not Show in News Feed’, and Unlike. You can also create a new list. More on that next time.

That’s it. Once you have unchecked the ‘Show in News Feed’ box, make sure that you click Done Editing to save your changes.


OK, so far so good right? Well, not really. We suspect that this whole thing is in a state of flux. As you saw before, Facebook is telling you that things you hide may be visible elsewhere on Facebook. That kind of sums up our feelings about all of this hiding from your news feed or timeline. These items may or may not be hidden at all. Yesterday, for example, we played around with hiding the fact that we liked the Mashable site. Even though it was a hidden activity, hidden from our timeline and hidden from our news feed, there it was in plain sight when we checked from another profile on two different browsers, even after we refreshed the page again and again. Nothing was hidden. Today, it isn’t there but yesterday it was. Go figure!

We love to hear from you. Keep your comments and suggestions coming. If you have problems, let us know. We’re here to help.

Thanks for reading!


Facebook Stalking – how to stop it


Even though you may have your Facebook contact info privacy settings for your phone number set to ‘friends only’ or ‘only me’, did you know that anyone can find you on Facebook using that phone number? Read that again. You’re right. It doesn’t make sense. But, that’s Facebook, right? Read on and we’ll tell you how to stop complete strangers from stalking you and finding you on Facebook.

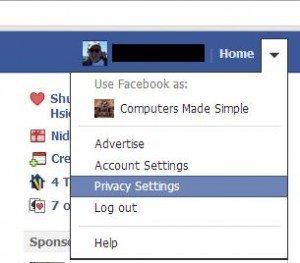
1. Go to your privacy settings page. Here is how you get there:

Photo of Privacy Settings link
Down arrow, then click on Privacy Settings.


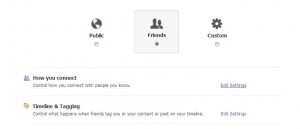
2. On the page that pops up, look for the words ‘How you connect’. This is where you edit the settings for how people search for you. If you don’t change the settings here, anyone can find you using your phone number, the one that you might have given Facebook, or your email address. This is how it looks:

Photo of Facebook Privacy settings page
How you connect, that’s what you’re looking for.


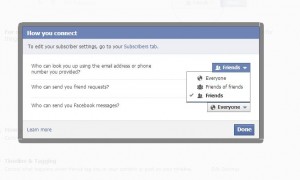
3. This ‘How you connect’ setting is not  overridden by your basic info settings. If you have your phone number listed in your basic info and if you have that set to ‘friends only’ or only me’, anyone can still search for you using that phone number. Sad but very true. Here are the settings that we suggest:

Photo of Facebook search settings.
We suggest that you set this to ‘Friends’.


4. If your friends happen to know your phone number, they can find you on Facebook. If they know your email address, they can find you. Then again, if anyone knows your phone number or email, they can find you on Facebook…unless you change this setting. Sure, anyone can search for your real name and they may or may not find you, depending on how many other people share your name and whether you used your real name or your nickname when you signed up. In other words, people can still find you, old school friends, ex-lovers, whoever, but they won’t be able to link up your phone number to your Facebook account. Change it now!


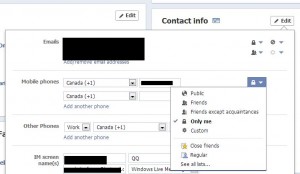
Working backwards here, your friends won’t be able to see your phone number on Facebook if you have this particular privacy setting:

Photo of Phone Number privacy settings
You decide…Only me or Friends or whatever you want.

OK, if your friends already know your phone number, that’s fine. With your phone number privacy set to ‘only me’ , at least they won’t be able to find the number on Facebook. If you set this to ‘friends’, then they can find your number here. Either way, using the privacy settings outlined above, no one will be able to search for you using your phone number.

Are we chock full of paranoia? Not really. Consider this scenario: You apply for a job. Obviously, you have to provide a telephone contact number. If that number is linked to your Facebook account, the person who is hiring you can search for you on Facebook using that number. Like it or not, they can find out quite a bit about you, depending on your privacy settings. If you remove your email and your phone number from your search settings (unfortunately you can’t separate them), then no one can find you that way.

Lastly, should Facebook even have your phone number? Think about that for a while. Sure, they say that they need it in case your account is compromised. Hmmmm, really? Your phone number is a direct link to you and/or your home. Mull that over for a while.

Thanks for reading!


Facebook Likes – The Ultimate Guide – Part Two


Let’s take a look at our Facebook Likes and see what we can do with them. When someone visits you on Facebook, they see your timeline, of course. What we’re going to do is take a look at what they see, not what you see. You can hide things from your friends but you can’t hide things from yourself. (That’s actually quite a pithy statement, isn’t it?)

Tip: To get the most out of our articles, set yourself up with another Facebook account. Do that now. Add yourself as a friend and open the new account in another browser (not the same browser you are using now). Go to your timeline in your new profile where you are a friend and get used to using the refresh button to see what affect the changes you make on your other profile have as your friends see it. You are editing one account in one browser and checking out the results in another account that is open in another browser. Get it? Yes, you can use the ‘view as’ button but that isn’t as fast as using a separate Facebook profile.

Here is a perfect example of what we’re talking about. The first photo is from the original person’s profile. The second one is how a friend sees the same profile. Note that the ‘Likes’ are different.

Photo of likes menu
The two ‘likes’ show in this photo are hidden from everyone but are visible to the profile owner.


Photo of Likes menu
Innocuous likes such as Mickey Dolenz and Triumph are fine, right? You may want to hide the fact that you like Andy Williams, however.


Now that you can see why it is valuable to have two profiles, let’s get back to work. The next step is to show you the difference between sharing and allowing things to be seen on your timeline. So far, all of this has to do with YOUR stuff and YOUR actions. We’ll get into your various interactions later.


Your Facebook timeline is a constantly evolving record of what you do on Facebook. As long as you stick to simply sharing things, you can hide that from others, all or some or none. As we showed you in our last post, you choose whom you want to share your own stuff with. That post is here: Ultimate Guide Part One . Today, we’ll deal with your timeline and show you how to use its edit feature.

There are two ways, at least, to keep things off of your timeline. Let’s deal with your Activity log first. Head to your own timeline, click on your profile pic up on the top right then click on Activity log. The next page that opens is a long list of things you’ve done recently. Each of those things can be edited, depending on what it is. Two more pics will explain this better.

Photo of Activity log
This item is something that someone else posted. Hovering our cursor over the circle icon, we can see that it is allowed on our timeline.

In the photo above, there is a comment on something that was posted on someone’s profile. It is allowed on the timeline. How do we get it off the timeline?

Photo of Activity log 2
Because we commented on someone else’s post, we can ONLY delete the comment. That is the only way to get it off of our timeline.


We can only delete the comment. Yes, this is going over the same stuff as our last post but we feel that we have to reinforce this concept. Let’s deal with something that we did. Facebook is more forgiving with things that you post yourself.


Photo of a photo
This album is, for now, allowed on the timeline.


Photo of another photo
If you click on the circle, you can perform several actions as far as your timeline is concerned.


If you put something up on Facebook, you can hide it from your timeline. It sounds simple but we think it gets a bit confusing (and frustrating) for some of you.


TIP: When you share something with some of your friends but not all of them, the former can see it on your timeline but the latter can’t. If you hide something from your timeline, you are hiding it from EVERYONE. More on this in the next post.

Thanks for reading!

Computers Made Simple is on Facebook!


We finally took the plunge and started our own Facebook  page. Here is the link: https://www.facebook.com/ComputersMadeSimple

We’ll give it a shot and see if we can get some fans, some action and maybe even some questions. We love comments here, too, but if you comment on our Facebook page, you will get an answer right there instead of having to come back here to read it. We usually send an email response as well so here or there, it doesn’t matter. We love comments.

The Facebook page will allow us to share links that don’t really fit here plus it will give us an opportunity to actually interact with our readers. Computers Made Simple gets quite a few hits for such a tiny spot on the ‘net and we’re excited to provide a new opportunity to get our solutions out there.

This is what our new page looks like:

Photo of Computers Made Simple Facebook page
Only one ‘like’ so far but we hope to see more!

In the near future we’re looking at posts on QQ, Facebook, back-ups, recording different things with your computer, etc. There’s always something new to write about. If you have requests or problems, contact us here with a comment or on our new Facebook page. We’d love to hear from you.

Thanks for reading!