Tag Archives: avi

Five Must-Have Pieces of Free Software


Everyone loves free stuff, right? I’m writing this post just after Christmas and free software is about the only thing that I can afford! I’ve mentioned all of this software in other posts. In this one I will simply highlight the best of the best of the best.

1. VLC Media Player VLC is amazing, really. Not only is it the fastest player out there, it’s a wizard when it comes to repairing video files. If you’ve got an AVI that is somewhat corrupted, VLC will repair it. Save the repaired version and you’re done. As far as playback is concerned, VLC lets you slow down the action or speed it up with a simple keystroke for each. I don’t use VLC for music playback but it does that, too.

2. Irfanview – Once you have tried Irfanview, I defy you to live without in the future. I’ve been using it for years, putting it on every computer in the house. Irfanview is quick, efficient and offers a feature list that boggles the mind. Screen capture, batch processing…it’s got it all. Make sure you download the plugins and make sure you download it from Tucows. CNET is reportedly putting malware in its downloads.

3. Google Chrome – Why is a browser on this list? Aren’t they all free? Sure, they’re all free but other browsers pale in comparison to Chrome. I can safely say that Chrome has opened up a whole new world for me, simply because it translates every website that I visit. The Internet is more than the boring English sites that you’re used to surfing. Check out what people around the world are doing on the web, visit and investigate your next international vacation spot, or just see what cool things are for sale in, say, China or Japan.

TIP: One of the best things about the Internet is that most sites are designed in English, even if they use another language for navigation. If you’re stuck on a site and can’t figure out what some of the buttons do, simply hover your cursor over a link and look down to the left of your window. Nine times out of ten you’ll find out what the button leads to, written in plain English.

4. Dropbox – Dropbox is both software and a service. With 1 gigabyte of free storage, Dropbox allows you to share documents from one computer to another around the world. Even if you are on someone’s computer in India, you can access your files via the Internet. There is no need to have the Dropbox application installed. Additionally, you can share files of any type with friends and relatives by giving them guest access to your online folder. Need more than a gig of storage? Open up a few free accounts. You can’t go wrong.

5. Burnaware Free – Burnware is a free, fast and dog-simple burning app. DVDs/CDs/ISOs, Burnaware takes care of it all. Roxio makes a fine product from what I hear but I have only used Burnaware for the past ten years or so. In my opinion, you don’t need any more than this for your daily burning chores. I back-up my computer religiously and you should too. DVDs are cheap and losing lifetime photo memories is expensive. Don’t let a crashed hard drive ruin your life. Get Burnaware and some DVDs for 20 bucks and relax. Your kids will thank you!

All of these applications have full sets of options and features that will make your computer experience much more fulfilling than any piece of retail software would. For that reason, if you’re a bit flush with cash, consider making a donation to the creators. Good karma will follow.

Thanks for reading!


Archive VHS Tapes


If you have old VHS tapes that you’d like to save, here’s a relatively cheap and easy way to do it, without the use of a TV or separate monitor.

1. Find a  Diamond One Touch Video Capture unit online or in a store near you. I paid about $40.00 for mine.

2. Hook it up to your VCR as described in the instructions and then to your computer using the supplied USB cable.

3. Follow the instructions to install the capture software.

TIP: Guard the program shortcut with your life! Once you install the software, it’s very hard to find the shortcut if you move it. I’m a geek and found it hard to find. Warning!

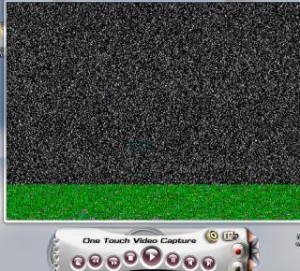
4. Start the capture software. You’ll see a screen like this:

Diamond capture screen and menu
This is the menu that you DON'T want to see.

What’s wrong with this image? The green line across the bottom, that’s what. Down on the lower left is an X. If you see this kind of screen, hit the X and reopen the program. Maybe this is just on my computer but I have to restart the program in order to get rid of the green lines on the bottom.

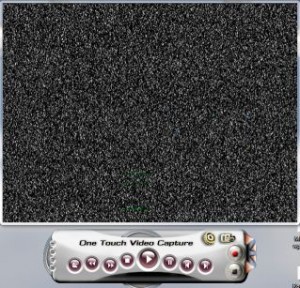
Your screen should look like this:

Proper capture screen
This is what you should see before you start playing a tape.

Once you can see this screen, you’re ready to go.

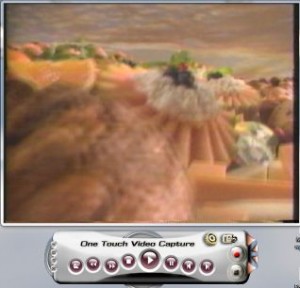
5. Pop a tape into your VCR (could be Beta or VHS or camcorder, it doesn’t matter what you use as a source). Start to play it and you’ll see this kind of screen:

Video showing on one touch screen
The video on the screen with no scan lines on the bottom.

6. Once you can see this kind of image in the window, you’re all set. Use the VCR to control the tape, then record the bits and pieces that you want to save using the One Touch controls. The red button records what’s in the window, including sound if you have the cables set up correctly, and the black button (which turns red after you start recording) stops the capture.

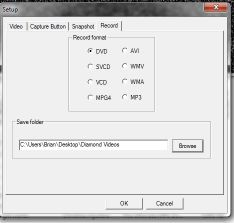
7. In the Settings menu, shown here:

Settings menu
Here's where you adjust the settings.

This is showing the Record tab where you can set the file type (I use DVD for small file size) and save the files in a folder on my desktop. Set your preferences according to your tastes.

8. Once you have the tapes sorted and have saved the files that you want, rename them to keep track of them and then you can archive them to DVDs, etc. I prefer to change the files to either FLV or DIVX in order to keep the files as small as possible. If the video if very important, leave it was a DVD file and write it to a disc.

That’s it! Simple and cheap, without the pain of having to have a TV monitor cluttering up your desk or work area. Not only does this method capture fine quality video (depending on the source, of course), it eliminates the need for a video monitor. Alternatively, you can feed your TV output into this unit and watch and record live TV on your computer.

Thanks for reading! If you have questions or comments, write them below or follow me on Twitter: @_BrianMahoney


Video Screen Capture Using CamStudio – it’s free!


There are times when we’d like to capture a video that is on our computer screen, whether it is from a webcam or a streaming video site such as Netlflix. Until I found CamStudio , I was stuck with doing individual screen captures with Irfanview. Here’s a short course on how to use CamStudio.

1. Download and install CamStudio. It’s free and available here: http://camstudio.org/

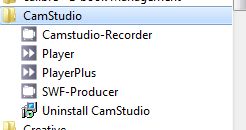
2. Head over to your Start button and find CamStudio. When you find it, the menu looks like this:

The CamStudio Start menu choices
For recording, choose Camstudio-Recorder

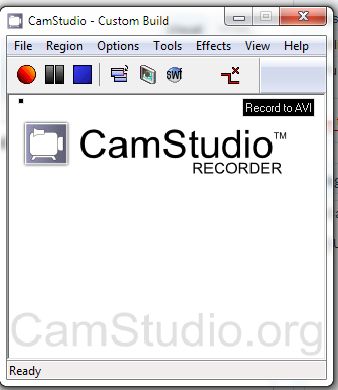
3. Choose Camstudio-Recorder. The program will start in a few seconds and you’ll be faced with this menu:

Camstudio main menu
The red button records, the blue button stops the recording.

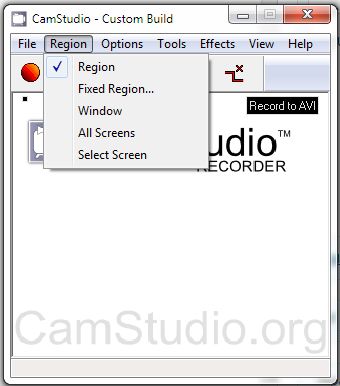
4. The main menu gives you all the controls you need to use CamStudio. Red for record, blue for stop and so on. Under Region you’ll see this:

CamStudio Region menu
I use Region and then drag out my choice in the video window.

5. Choose what area you want to record. If you choose ‘Region’ and click the red record button, you will have to click on the video window of your choice and then drag a rectangle/square shape of what you want to save. This is great for webcam windows but not for Netflix. For Netflix you would choose Select Screen. If you always use CamStudio for a certain size window, set it up in Fixed Region. If you have two monitors and want to record both, choose All Screens.

6. When you click the red button the recording box will flash, showing you that CamStudio is working. When you’re done, click the blue button. Depending on what you’ve chosen in your Options, CamStudio will then render your video and save it.

7. You have a pretty complete set of options in CamStudio. I’m not going to get into all of them here but I’ll give you some tips.

Tip 1: I save all of my captures as ‘avi’ files. The SWF format didn’t work. These saved avi files can be saved to your desktop or a folder in CamStudio. I STRONGLY recommend that you set up a folder on your desktop. The CamStudio folder is very hard to find. I’m an expert computer user and I had a hard time finding the actual files. CamStudio uses a shortcut system and keeps the actual avi files in a separate folder.

Tip 2: If you use dual monitors, play around with the settings. CamStudio works fine with dual monitors but I found that I had to play with the video options as well as which monitor recorded from in order to make it work. It seemed that CamStudio worked best on my main screen (number 1 in Windows screen selection menu). Give it a shot and see what you can sort out. Write it down so you’ll remember what you did.

Tip 3: Choose the option for having CamStudio name the saved file for you and don’t choose to let CamStudio play the video as soon as it has saved it. If you are in the middle of recording something, you don’t want to be bothered with naming or watching the file. Just record what you want now and watch the video later.

That’s it for now. CamStudio is free and works extremely well. There are ample options to choose from so play with them and work out what’s best for you. For free software, it’s a pretty sweet setup.

Thanks for reading! Follow me on Twitter: @_BrianMahoney