Category Archives: Video Capture

Save Vevo Videos…sort of.

Vevo is a fantastic site, chock full of music videos. Most, if not all of them are in HD, too. What’s the difference between Vevo and Youtube? Well, we can download Youtube videos but we can’t download Vevo videos. That’s the bad news. The good news is that we’ve figured out a roundabout way to ‘download’ Vevo videos. Here’s how we did it:

1. You need several bits of software to accomplish this trick. Here’s the list:

A. Irfanview – It’s available here. Irfanview is free and we use it every day for basic image handling.

B. Windows Movie Maker – If you don’t already have this, download it here.

C. The music track for the video that you want to save. We use Offliberty for that. Use Youtube as the source, paste the url of the Youtube video into the Offliberty slot and save the MP3.

D. You’ll need lots of hard disk space and a fairly fast computer, as well.

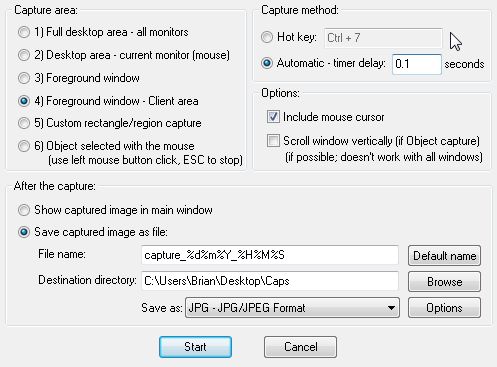
2. We have to set up Irfanview for automatic timed screen captures. Here is our post on how to do that: Multiple Screen Captures using Irfanview   In that post we tell you that 1 second is the minimum timing interval. We were wrong. In order to save a Vevo video, you have to set the timing to a maximum of 0.10 seconds. You might try quicker caps, maybe down do 0.01, something like that. The more caps you have, the smoother the video will be.

3. Get the Vevo video set up, ready to play, then Pause it. Go to Irfanview and set up the capture, making sure you save the caps to a new folder on your desktop. This makes it easier to access them later. There will be many caps, probably thousands, so make sure you have enough room for them, a few gigabytes should be fine.

Photo of Save Vevo Videos    2
Auto capture set up for 0.10 seconds.


4. Turn your sound off because Irfanview beeps for every cap it makes and the beeping will drive you bonkers.

5. Start the capture and immediately open the Vevo tab in your browser and press Play.

6. Watch the video till the end, then open Irfanview and close it down.

7. Check the cap folder to make sure the screen captures are there and see if they need to be cropped. If they do need to be cropped, you’re not going to do them one by one so head over here: Batch Conversion in Irfanview What you’re going to do is mark the starting point on the top left corner of the area you want to crop (it has an X and a Y coordinate), then draw a box with your cursor over the area you want to crop (all you need for this is the pixel size of the box, the number of pixels wide by the number of pixels high.) We’ll do a full post on batch cropping later.

Photo of Save Vevo Videos    1
Choose ‘Crop’ and set the parameters.

8. Once the thousands of images have been cropped, open Windows Movie Maker and import all of the screen caps into it. There is nothing complicated about this part of it but you have to set the duration of the slide to match the timing of the screen capture. In other words, if you set Irfanview to take a cap at 0.10 seconds, you have to set the onscreen duration of each slide to the same 0.10 time limit.

Photo of Save Vevo Videos    3
Import the caps then set the duration.

TIP: The duration setting is not available until after you import the caps. Contrary to other sites out there, you can’t set the duration before you import the images.

9. Once you get the timing set up in WMM, save the project.

10. Import the MP3 of the song and separate the audio and the video tracks. Play around with the audio track until it is about the same length as the video. Allow for some overlapping, if you can.

11. Save the project and then have WMM create the video. We used the Save to Computer rendering and ended up with a pretty decent video. Sure, there was a bit of choppiness but the particular video we chose was not available anywhere else on the Internet. Besides the choppiness, the audio didn’t match up perfectly with the video but we’re quite sure we can work on that, maybe with a better, more fully-functioned editor. Overall, it was a fun experiment. Give it a shot and see what you can come up with. Share your videos with us!

Thanks for reading! Why not Like our Facebook page:  Computers Made Simple on Facebook


Another way to save online videos


We’ve written about saving online videos before using Freecorder but this time we’re going to look at Realplayer.  Realplayer is free, at least the version we use is free, but they offer premium versions as well. The premium software includes more features but we like free at Computers Made Simple. We feel that the no-cost version works just fine, thank you.

Real had some problems in the early years of the Internet. Maybe you don’t remember those days but Real was pretty much shunned by early Internet users because they included bits of malware in their software. OK, it wasn’t really malware but the original Realplayer kept track of many things that a user did on the Internet and sent that information off to Real, without the user being aware of it. Now, Realplayer seems pretty safe, even though Google’s StopBadware.org has named Realplayer as badware. We can’t find dates on any of the articles we researched on this but, to us anyway, Realplayer seems quite safe. The two knocks against it were that Realplayer would have pop-up ads, which weren’t there when we used it, and that it would not uninstall the Rhapsody part of Realplayer. Again, we didn’t notice that because we haven’t uninstalled it yet. It works perfectly.

Once you download and install Realplayer, you’ll be asked to install the browser plug-ins. These are the things that let you download just about ANY video that is playing in your browser. We use Chrome but we also tested the download feature in Explorer and both work equally well.

Head over to Youtube or some other video site and start any video. You should see a little ‘Download This Video’ as shown here:

Realplayer downloading plugin
Click the words ‘Download This Video’ and you’re all set.

If you don’t see the button, run your cursor (mouse) over the top right corner of the video and the ‘Download This Video’ menu should appear. RealPlayer will even tell you if it can’t download the video. Isn’t that handy?

After you click the download link, Realplayer will start to save the video on your computer. Don’t close the browser window until Realplayer has finished. Depending on your Internet connection, you may not have to wait for the video to play completely. In other words, the video will sometimes feed faster than it plays which will allow Realplayer to finish the download before the video is finished playing in your browser. This happens with Youtube more often than some other sites but Realplayer will work on just about every site that has streaming video on it. Because of DRM restrictions, not all sites will work with Realplayer but we found that most do.

Thanks for reading!

Save a Youtube Video as an MP3


If you’re looking for a quick and easy (and FREE) way to turn a Youtube video into an MP3, here’s how you do it:

1. Go to Youtube.com and find the video you want to save as an MP3 on your computer.

2. From the search page, simply right click the preferred link (we like to use the official video link) and choose ‘copy link address’.

3. Head over to offliberty.com

4. Right click in the link space in the middle of the page and choose ‘Paste”. The link you just copied from Youtube is now pasted into the link slot on Offliberty.com. It will look like this:

Paste the url you just copied into the slot.
Paste the url you just copied into the slot as shown here.

5. Click the OFF button and wait a second or two.

6. Right click the slot, now yellow and filled with instructions, choose ‘Save link as’ and the MP3 of the video you chose is saved to your computer. You can, of course, tell your browser where you want the file saved. The screen looks like this:

The right click menu at offliberty.com
The slot is yellow until you right click it, then it turns black. Click ‘Save link as’ and choose where to save the MP3 file.

7. If you want to save the video, click ‘I want video file’. You could save the MP3 first and then save the video file, whatever you want to do.

This system is infinitely faster than any other system we’ve found to save MP3s from Youtube videos. We hope you like it and use it.

Thanks for reading!

PAL to AVI – convert your PAL DVDs to an AVI file


This weekend, a friend came over with a DVD that wouldn’t work on her DVD player.  Turns out that the DVD was from England and was in the PAL format. Not that this matters too much to you but a good portion of the world has a different broadcast system for their TVs. Our native North American system is known as NTSC while their system is known as PAL. We’re not talking about regions here, as in DVDs that only play in one region even if that region is PAL or NTSC. The regions have to do with DRM (digital rights management), not transmission systems. Regardless of the reason, her PAL DVD wouldn’t work on any North American NTSC system. How would we fix that?

After hours of trying to re-author the DVD using some very arcane and complicated software, I decided to take the simple route. Since the DVD is essentially a group of video files, I decided to convert those files to AVI files using Format Factory. We’ve written about Format Factory before and it’s one of our go-to programs for converting video or audio files from one format to another. Read our posts here: Format Factory  and here: Format Factory

Almost every DVD player out there will play AVI files. You can also pop those files onto a flash drive and connect it directly to some TVs and play the files from there. Here’s how we converted the PAL DVD to a group of AVI files :

1. Download Format Factory here: http://www.formatoz.com/  and install it. Watch out for some of these downloads since they will want to change your search options or home pages. Don’t just assume things when you are clicking your way through the screens. Read them one by one before you click OK and make sure you uncheck anything that seems fishy.

TIP: A PAL DVD can be read by your computer but not played on your TV. The TV screen is different from your computer monitor screen, to put it simply.

2. Make sure the PAL DVD you want to convert is in your DVD drive on your computer.  Start Format Factory. This is the opening screen:

The first Format Factory menu
You're looking for the DVD to Video file button.

3. Click the DVD to Video File button and the following screen will pop up:

Format Factory DVD to Video File menu
If the PAL DVD is in your optical drive, your screen will be much like this.

This menu looks complicated but it isn’t. On the top you’ve got your DVD drive with the title of the DVD shown. Below that are the various VOB files that make up the DVD with two files already checked. I wanted to convert all of the files so I had to check Title 2, 3 and 5. On the right side, I have changed the output to AVI and I want the files to be converted to XVID 640×360 Wide Screen HD. The default setting is MP4 but that resulted in pretty crappy, but watchable, video files. This particular setting works perfectly. There are no subtitles offered on the DVD but you can choose your own setting here. Leave the Audio Stream at default and it should be fine. Change the file titles if you want.

4. Once you’ve set all the parameters, click Convert and go and have lunch. Depending on the speed of your computer, conversion could take hours. We used a reasonably fast computer with 8 gigs of RAM and the conversion of this short DVD took about half an hour.

5. Format Factory will beep when the files are all converted. Look for the files in My Documents in the folder named ‘Format Factory Output’, unless you have created your own directory already.

6. Once you have checked that the files work on your computer, burn them to a fresh DVD or pop them onto a flash drive and try them on your DVD/TV setup. They should work perfectly.

TIP: A DVD is made up of many VOB files, some small, some large. The main movie, obviously, is simply the largest VOB file but you might want to convert all the VOBs anyway. You can then sort them out later on and delete them if they aren’t worth saving.

This method of converting PAL DVDs to watchable AVI files is much simpler than any PAL to NTSC method that I’ve discovered. It’s also completely free. We don’t buy software at Computers Made Simple and, while there are several pay solutions for this problem, we decided to look for a free solution. Thanks for Format Factory, we were able to solve the PAL DVD problem quite easily. We hope it works for you.

Thanks for reading!


Windows Live Movie Maker – How to split audio from video

The problem: my digital camera records video in the MP4 format. Because of that, I can’t split the audio from the video in most video editing programs. I use Windows Live Movie Maker most of the time and this free program doesn’t offer splitting audio from video anyway. The video is in high definition and looks great but today I had to shoot a scene where only the audio could be used.

The solution: This is a multi-step process. Here’s how I edited the whole thing to create a movie using only the audio from the original shoot.

1. Edit the video (sound and all) in Windows Live Movie Maker, removing all the extra sections. Make sure you remove everything you don’t need. WLMM will edit MP4s but it outputs the file as a WMV file, which isn’t a problem.

2. Take the completed WMV file and convert it to a WMA audio file in Format Factory. Format Factory is available here: http://www.formatoz.com/ (you can use any converter you want, obviously, but I like Format Factory.)

3. Open WLMM again and put in the visuals that you want to use, could be video or photographs.   Try to make sure it is the same length as the audio track you have created in the previous step. I used a series of photos to create the video portion.

4. Add the ‘music’ (the WMA file that you created with Format Factory)  that you created in step 2. It could be music or spoken word, doesn’t matter. Your timeline will have to be adjusted to make the audio match the photos/video but that’s easy.

5. Save your video as normal and WLMM will put the two together in the final WMV that it creates.


That’s it! It took me a few hours to figure this out but now I know how to do it. So do you!

Thanks for reading.