Category Archives: Security

Online Privacy Part 2 : TOR


What is TOR? Here is the description from the TOR website:

“Tor is free software and an open network that helps you defend against a form of network surveillance that threatens personal freedom and privacy, confidential business activities and relationships, and state security known as traffic analysis.”

What this means is that once you are using the TOR browser, your surfing habits are hidden from prying eyes. TOR also hides your location from the rest of the world. Here is how TOR describes what it does:

“Tor protects you by bouncing your communications around a distributed network of relays run by volunteers all around the world: it prevents somebody watching your Internet connection from learning what sites you visit, and it prevents the sites you visit from learning your physical location. Tor works with many of your existing applications, including web browsers, instant messaging clients, remote login, and other applications based on the TCP protocol.”

If you’ve watched any recent cop show on TV, you’ll know that tracing a criminal can be easy, depending on the time limit in the plot. As far back as Three Days of the Condor (Six Days in the novel), smart operatives defeated tracking software simply by bouncing their source signal from place to place, either in a telephone exchange as Robert Redford did in Condor or through various servers around the world as Lisbeth Salander did in The Girl with the Dragon Tattoo.

Once you start using TOR, your surfing might slow down a bit but you will be as anonymous as you can get on the Internet.  Take a journey with me as I begin to discover TOR’s capabilities. I’ll also try to test it’s effectiveness at hiding my IP address in several places around the world. I should say now that TOR is free. There are other ways to hide your IP address from prying eyes but every one that I can think of involves spending some bucks. I’m all for free, aren’t you?

Start by reading the documentation here: https://www.torproject.org/docs/documentation.html.en   Start to discover on your own what TOR is about, download everything and pop back for more updates on Monday. (I’m donating blood tomorrow so I’ll be tied up most of the day.)

Thanks for reading!

Check Your User Settings in Worpress


This morning I received an email from this site telling me that someone had registered as a user. Needless to say I was surprised. I wasn’t quite sure what damage a new user could do to my site but I logged in, deleted him and changed my settings. When WordPress asked me to confirm the deletion, it also asked me if I wanted to delete any links that the new user had put up here. I said yes, of course, but that made me think about my settings on my other sites. The default WordPress settings make it very easy for anyone to subscribe to your site AND to post links. Here’s how you can protect your site before this happens to you.

Head over to Settings, second last link on the left side of your Dashboard window. Once you are there, you should be on the General Settings page but make sure that this is where you are.

Halfway down you’ll see ‘Membership’ with a box that is, probably, checked. If it is checked then ‘Anyone can register’ which isn’t what you want. You want to un-check that box to prevent people from adding themselves as users. You can still add users but you have to be logged in as admin in order to do that.

The second thing you want to do, now that we are on this subject, is to limit comments on your posts. Yes, you want comments but you don’t want spam. There are two ways to prevent this. The first is to go to Settings then to Discussion Settings. What you are looking for there is ‘Email me whenever’ and ‘Before a comment appears’. In the second one, make sure that the box is checked beside ‘An administrator must always approve the comment’. Then, in the section above, make sure that you get an email when someone makes a comment and when one is held for approval.

If you have your WordPress installation set up this way, you won’t get surprised by someone adding themselves to your user list AND you won’t get spam comments showing up unannounced, either. Sure, you will get spam but you can check the comments and delete them. How can you prevent spam completely? You can’t. But you can add a plugin that will put check all comments and automatically put the ones that are spam into the proper folder. Here’s how.

Akismet is a standard plugin that you get with WordPress. To get it working, you need to activate it. To activate Akismet, you have to register and then get what they call an ‘API Key’. Don’t worry, it’s free. All of the links are there on your WordPress Plugins page. The key is the only thing you need before Akismet roots out spam for you. It won’t send an email but it will hold all the comments that it thinks are spam, and it is never wrong, until you show up to delete them.

There are other ways to secure your WordPress installation, these are only two. WordPress is probably the most documented bit of brilliance on the ‘net. Keep learning and keep safe, people.

Thanks for reading!

Facebook Timeline Privacy Settings – Part 1


On January 31st, 2012, you’ll be forced to accept Facebook’s new timeline profile. There are some new privacy settings that you might want to adjust. In the change from the standard Facebook interface to the new timeline interface, your previous settings won’t survive the transition. You’ll have to adjust them again.

Why is this important? For me, it’s not. For you, if you are a teenager or a single woman, for example, there are dangers to having all of your activities past and present open to the world. Ex-partners, teachers, prospective employers can now access all of your past information very easily. There isn’t much danger of me being stalked but for many people, that is a very distinct possibility.

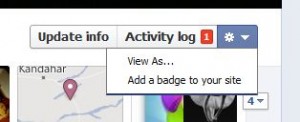
TIP: The best thing about the new timeline interface is that you can see immediately how your profile looks to strangers or to any of your friends. See the little arrow just to the right of the gear icon on your profile page? Here it is:

The View As menu on the timeline
Click on the View As line.

Once you click on the ‘View As’ line, your profile will change to show how strangers will see it. You can then change the view to show how your friends will see it, depending on your settings for each of them. You may want to hide things from some friends. In that case they will not see the same profile as everyone else.

Step 1 – Hide Your Past from Strangers: Follow these steps to ‘Limit the Audience for Past Posts: https://brianmahoney.ca/2011/09/facebook-control-your-old-post-privacy/ You must do this again, even though you may have done this in the past. Once you have done this, take a look at your profile as I have described just above this to ensure that your past is hidden from strangers/people who aren’t your friend.

Step 2 – Hide Your Friend List From Everyone: If you have family members on your friend list, it might be a good idea to hide your list from them. If you have your privacy settings wide open, everyone can see your list, allowing them to troll through it for ways to contact you. Whatever the reason, I think it’s a great idea to hide your list of friends from everyone. Here’s how you do that:

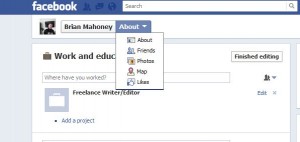
1. See the photo up above this? Click on the ‘Update info’ section. This will bring you to a page that allows you to edit virtually any part of your personal information. It also provides a link to your other personal settings. Click on the arrow beside the word ‘About’ and you’ll see this:

Settings Menu
This has links to all of your personal settings, including your friend list.

When you click on ‘Friends’, you’ll see a complete list of your friends, of course. What you are looking for now is the Edit button up on the top right. Click it and you’ll see this little menu:

Menu for your friend list
See the padlock on the right? Click it.

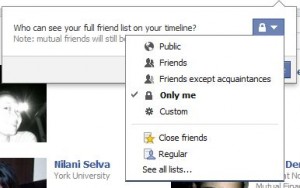
Once you click on the padlock you will see this menu next:

Locking your friend list
I would choose 'Only me' here but it's up to you.

As you can see, I have chosen ‘Only me’ for my friend list. Any friend who has a mutual friend will be able to see a list of mutual friends but that’s it. See the tip below but for now, no one can see your whole list except you.

TIP: The new timeline will not allow you to hide mutual friends from anyone on your list. Keep that in mind.

Everyone has different levels of security that make them feel safe online. I’m pretty open about most things but I don’t see why my friends have to see who I am friends with. I can further adjust these settings by grouping my friends into smaller groups. More on that in a future post.

Thanks for reading! Comments are welcome.