Tag Archives: Windows

Windows Disk Management – Initialize your disk

We added two new hard drives to one of our computers this week. It had two drives already but we wanted to install Windows 8 and decided that a new drive would be a good thing to add. We had a 2 terabyte drive ready to install then we and a 3 terabyte to the collection. That gave us four, one for Windows 7, another for Windows 8, one for Linux Ubuntu (already installed) and the last one as a spare for storing important files.

Before we could partition the drives, we had to initialize them. What does that mean? Contrary to popular belief, it does not mean ‘formatting’. Let’s say someone gives you a book. There is nothing on the outside of the book to tell you what it is. Therefore you have to look inside it to see what it is. You ‘initialize’ the book when you look inside. Now, that book has nothing in it but once you open it, you know it has nothing in it. At this point you recognize that book as a book with nothing in it. This is a rough description, of course. In reality Windows puts its own little notes on the drive so it will know what that drive is. There are two types of notes that Windows uses. Here’s how to figure it all out.

1. Add the new drive to your computer. That part is quite simple but if you have a problem with it, enlist the aid of a techie friend.

2. Start your computer and, once it’s booted up, click on the start button the look for the word Computer. Right click Computer and choose Manage. This is what this all looks like:
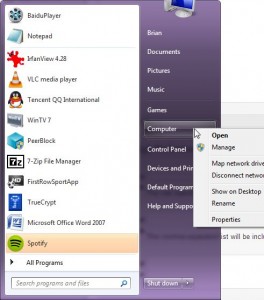
Photo of Window's Disk Manager  1
Start then Right Click the word Computer.


2. When Computer (used to be My Computer) opens, look for Disk Management down on the lower left:
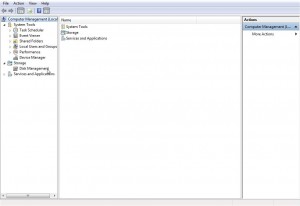
Photo of Window's Disk Manager  2
Disk Management is what we want.


3. Windows will take a few moments to think about your request then, when it sees that one or two drives are not initialized, you’ll see this menu:
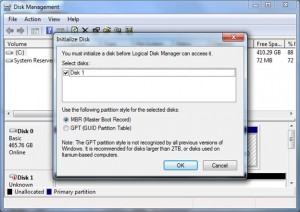
Photo of Window's Disk Manager  3
MBR or GPT?

4. We installed two drives at the same time. As it turns out, we could use the MBR partition style for one drive but not the other. Remember that one drive was 2 terabytes while the other was 3 T? MBR only works for drives smaller than 2 Terabytes or for partitions smaller than 2T. Since we wanted a full 3 T partition on one drive, which would allow Windows 8 to do what it wanted to the drive on installation, we opted for GPT on the larger drive.

5. We could use GPT on both drives, keep that in mind, so your choice might be just to opt for GPT right from the start. Unless you are using Windows XP, you are quite safe using GPT. No worries.

6. Once you initialize your drive, this is what you’ll see:
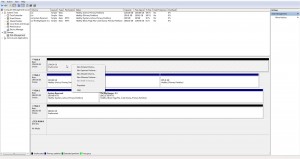
Photo of Window's Disk Manager  4
Now the drives are showing their correct size and you can interact with them.

Across the top you’ll see that two of the drives are unformatted but Windows knows what they are and tells you the size, etc. Down in the middle, you can right click and choose what kind of volume you want. Since there are a number of options, we’ll leave that for you to investigate. We might do another post on that later on but, for now, we’ll leave this as it is.

TIP: If you’re starting out with a new computer, a new drive and a new installation of your operating system, that operating system will take care of all of this.

How did we get into this? We tried to install Windows 8.1 on one of the new drives. During the early stages of the installation we saw a message that we’d never seen before, and we’ve installed Windows at least 50 times over the years, maybe more. At that point we thought that if we initialize the disks, Windows would install itself on one of the new drives. We were wrong.

We’ll give Windows 8 a shot next to see if it works but at least we were able to teach you about initialization, right? If you have questions, make a comment below and we’ll answer it as soon as we can. Better yet, like our Facebook page and you can ask us on it. Here’s the link: Computers Made Simple on Facebook. 

Thanks for reading!


DVD Covers – Create your own for free

We’ve shown you how to create DVD movies and DVD slideshows in our last two posts. Since many of the DVDs that you create will be gifts, why not dress them up with an attractive cover?

DVD cases, at least the basic plastic ones, are about five inches by five inches. This refers to the size of the image that you’d want to create. For the front cover, a combination of words and images would work well and for the back cover, perhaps some notes or a dedication would be better. Either way, the covers are easy to create.

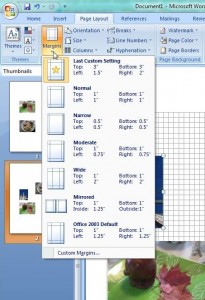
Here’s how we prepared a cover in Word. Setting the margins to leave a five by five square in the middle of the page works best. We used a top and bottom margin of three inches and one and a half inch on the left margin, two inches on the right. Then we chose to show a grid so we would know what our actual working space was. Here’s how it looked in Word:

DVD Cover
Use the Custom Margin setting.


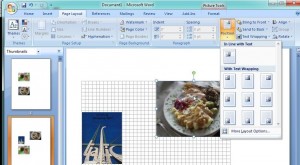
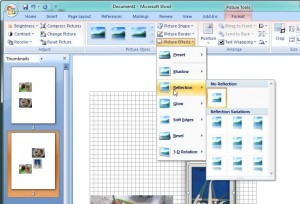
Arrange the photos in the square and dress them up a bit using the menus in Word. Here are a couple of the settings that you can use:

cover 3

DVD Cover  2
Choose the borders and other effects in this menu.


DVD Cover  3
Place each image with this menu.


There are almost an infinite set of choices for your covers in Word. We’ve given you some ideas about the basics but you’re on your own as far as finalizing everything else. Once you have the photos set up, type in the words and print it up. Remember to leave a bit of wiggle room around the edge for cropping after you print. Keep your words away from the edge as much as you can. Our five by five dimensions are approximate, right?

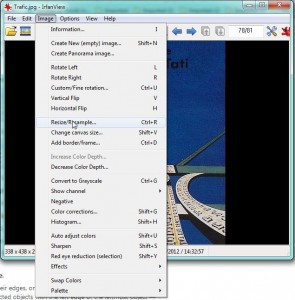
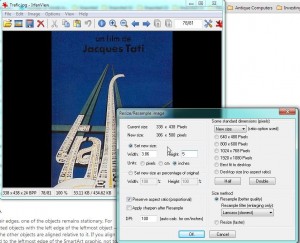
If you’ve created a DVD movie or copied a movie that you own, you can download cover art from the IMDB site, for example. Original movie posters abound on the Internet. Save the image to your computer, open it in Irfanview and adjust the size until one of the dimensions is about five inches. Since photos aren’t ever square, use your discretion as to which dimension you set to five inches. In our experience, setting the height to five inches is usually best, leaving the width to be settled according to the height you choose. You must preserve the aspect ratio in order for the image to look normal. Here are the menus you need when you’re editing a photo in Irfanview:

DVD Covers 4
You want to resize the image.


DVD Covers 5
Set the new height (usually) to 5 inches and make sure you select Preserve Aspect Ratio (Proportional) in order for the width to look appropriate. If you set the height, the width is set automatically.

That’s about it, folks. Create the DVD using Windows DVD Maker, then use Word and/or Irfanview to create the cover. If you take your time, you’ll be able to come up with very professional results. If you have the program already, use Photoshop or GIMP to do the same thing. Most people have Word already, that’s why we chose it.

Thanks for reading! We love to hear your comments so don’t be shy, say something down below.
Free Slideshow Software

Slideshow 01
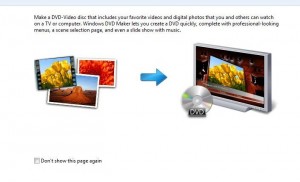
The splash screen for Windows DVD Maker.

We’ve all seen those magical slideshows before, right? Ken Burns has done whole movies using them. Baseball and the American Civil War came to life by using a relatively simple slideshow technique. Now, if you’re using Windows 7, you can release your inner Ken Burns by creating your own slideshow, complete with music accompaniment. Here’s how:

1. Most versions of Windows 7 and one version of Windows Vista, come with Windows DVD Maker. We mentioned this software in our last post, describing how to create DVD movies using AVI files. Here is that post: Making Movies using Windows DVD Maker  . The same software will also create a cool slideshow. You can either insert a blank writeable DVD or go to All Programs and run the program from there. Here is the first menu you see:

Slideshow 1
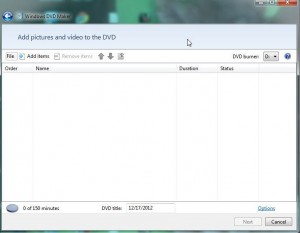
This time we are going to add photos (pictures) to the DVD menu.


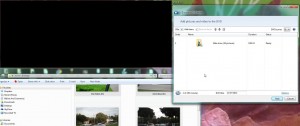
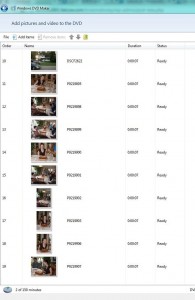
2. You can  drag and drop photos into the blank space or use the standard Window’s browse menu. We dragged a series of photos from a folder into the open space in the window. Here’s what we ended up with:

Slideshow
Select the photos one by one holding the CTRL key down, then drag them all to the window.


3. Once the photos are in place inside the software, they are in a folder that Windows uses to create the DVD slideshow. Double click on the folder on the menu, the one that reads Slide show (? photos), and you will be able to rearrange them in the order that you want. If you do this beforehand, it’s probably easier but feel free to experiment. Drag the first photo to the first space and continue on through your photos. There is room on the DVD for a lot of photos, probably 140 or more, so if you want a specific order for them, it will take time. Here’s what the menu arrangement menu looks like:

Slideshow 02
Drag the photos up or down the line to arrange them.


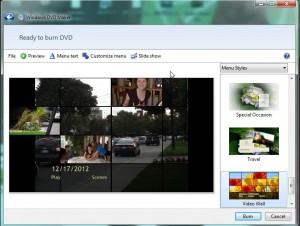
4. Once the photos are arranged, click next and continue to design your slideshow. On the main menu, look to the right side and experiment with the different menu styles by clicking on any that look interesting. This sets up the menu or splash screen that you’ll see when the DVD first opens. There are lots of good ones so scroll through them all. Here’s what you’ll see:

Slideshow 03
Menu styles are on the right.


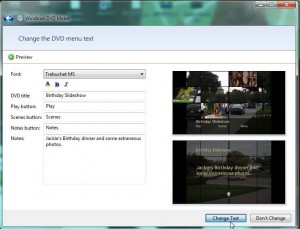
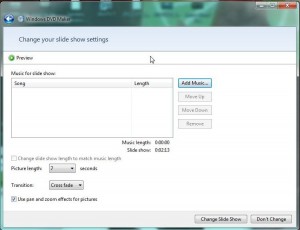
5. There are other parameters that you can set for the slideshow. On the top of the menu above, you’ll note where to change the Menu text, customize the menu or adjust the slideshow itself. The following photos show some of these settings:

Slideshow 06
Add a title, change the names of the buttons and add notes.


Slideshow 07
Add music, change the interval between slides and use different transitions.


The tools in the menu above are quite powerful for such a simple program. You can add music to fit the length of the slideshow, change the length of time each photo is on the screen; you can even change the way slides are presented in sequence. Once you’ve got some settings arranged, press the preview button and you’ll be able to run through the slideshow in test mode to see if everything works the way you want it to. If not, go back and change things again.

If you aren’t ready to burn the slideshow now, make sure you save the project for another time. If you are ready to record it to a DVD, simply press the burn button on the main screen.

TIP: Besides making video DVDs and slideshow DVDs, Windows DVD Maker will let you make multimedia DVDs as well. Add photos and slides to the same project and WDM will sort it all out and come up with an amazing DVD that will amaze your audience. You can record a narration track and add it to the slideshow, too. Use your own creativity to explore this free software.

Thanks for reading! We hope you enjoyed our last two posts. We also hope you will create wonderful DVDs for your friends and families, just in time for the holidays.


Windows Restore – your very own time machine!

Sometimes things go wrong with your computer. It starts to act different, freezing or locking up after you’ve installed some software or added a new driver for a piece of hardware. In the old days, you’d have to figure out the problem, sort it out and maybe reload Windows. Remember those days? Well, thanks to Microsoft Window’s restore function, there’s no need to do any of this. Just go back in time to when your computer was functioning properly. Here’s how you do that:

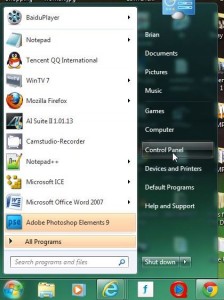
1. Head over to the Start/Windows icon button, click it and look for Control Panel.

Photo of Windows Restore   1
Click ‘Control Panel’


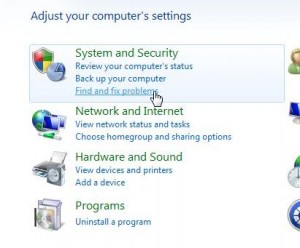
2. Here’s the next screen. Look for System and Security.

Photo of Windows Restore   2
System and Security up on the top left then ‘Find and fix problems’


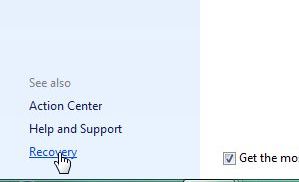
3. The next screen that pops up is pretty much vacant but down on the lower left, look for the word Recovery on the bottom left, as in this photo:

Windows Restore   3
The last word on the lower left is ‘Recovery’. Click it to continue.


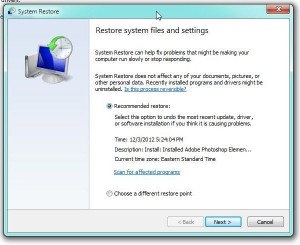
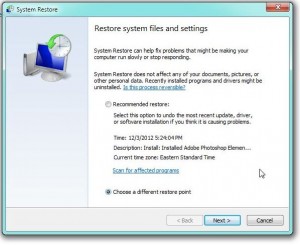
4. The next menu explains what system restore is all about. There is even a recommended time and date, basically the last restore point. Read the menu then click on ‘Scan for affected programs’. Restore does not affect anything that you have created, such as a document or photo. All it does is restore your computer to an earlier date and time, getting rid of  any changes to system files or installed software. When you ‘scan for affected programs’, Windows will tell you what software you’ll have to reinstall. Here’s the menu that we’re talking about:

Photo of Windows Restore   4
Once you’re read this menu, click on ‘Scan for affected programs’.


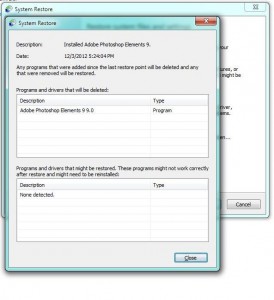
5. Let’s see what would be affected if we restored this computer right now:

Photo of Windows Restore   5
We installed Photoshop Elements recently so it is the only software affected if we use restore right now.


6. If you know that the suggested restore point is not the one you want, click on the button to the left of ‘Choose a different restore point’. Like this:

Photo of Windows Restore   6
Click Next after select ‘Choose a different restore point’.


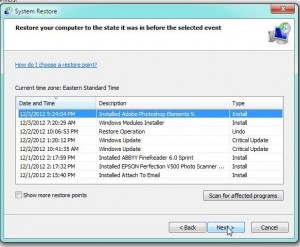
7. At any given point in time, Windows has several restore points to choose from. Obviously, the farther back you go in time, the more programs will be affected. Here’s a list of the restore points for this computer:

Photo of Windows Restore   7
There are eight restore points on this computer, each one just before software was installed.


8. Before Windows installs any software or even its own updates, it creates a restore point. That way, if something screws up, you can go back to the time before that software was installed and start over again. If you’ve made a mistake in the installation process, you get to go back in time to fix it. Wouldn’t it be great if life were like that?


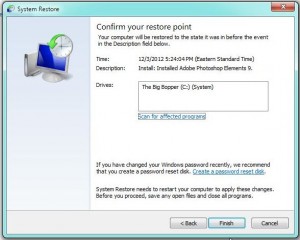
9. Once you decided on which restore point, click Next and the final menu pops up:

Windows Restore   8
Here are all the details of what you’re about to do.


10. Once you click ‘Finish’, Windows will start the process and reboot. When you log in again, your computer will be set back to the date you chose, complete with all of your documents, photos, etc. but without the offending software or update. Life is good again, right?

Thanks for reading! Hit us up with a ‘like’ on Facebook and you’ll get all of our updates and tips. Here’s the link:   Computers Made Simple on Facebook
How to Undelete a File – even if you’ve permanently deleted it.

Even if you have never heard of it, Windows System Recovery works silently in the background as you use your computer. It’s a small but very powerful tool that you can use to rescue a file that you have accidentally deleted, even if you have permanently deleted it. Here’s how it works:

1. Windows System Recovery is turned on by default when you install Windows. Unless you have specifically turned it off, it’s running now. Check this by clicking Start then right clicking Computer and choosing Properties. Click on System Protection and you will very likely see that System Restore is on.

2. Next, you must know the exact name of the file that you deleted. It doesn’t matter what kind of file it is, Windows can recover it. However, you must know the exact name of the file, including what kind of file it was. The last three letters, whether they be .txt or .avi or .jpg, etc.,  are important here.

3. The file can’t be something that you just saved and then deleted. There has to be a restore point in between the time you created the file and the time that you deleted it. Go back to Computer and check how often Windows creates a restore point. Restore points can be created manually but won’t be any good after you have accidentally deleted a file.

4. Here’s the fun part. Windows Notepad can save a file as anything, it doesn’t have to save something as a .txt file. What we’re going to do is create a phony file then ask Windows to find an older version of that file.

5. Go to the folder where the file was when you deleted it. In this example, we will use a file that was accidentally deleted from our desktop.

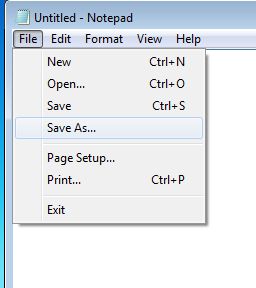
6. Open Notepad and type a couple of letters in the window that opens up. Next, click up on the top left to bring down the Save As menu:

Photo of Windows Restore   menu
Click on Save As.


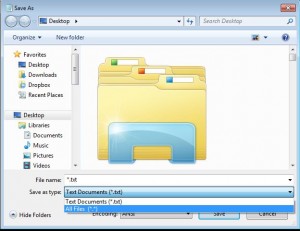
7. Once the next menu comes up, click on the line at the bottom to get to ‘All files’. Like this:

Photo of Windows Restore  Menu 2
Make sure that All Files is highlighted.


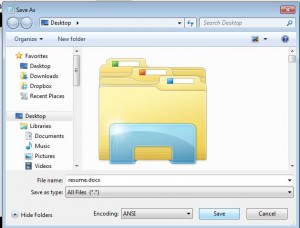
8. We don’t want to save the file we just created as a text file, unless it was a text file that you accidentally deleted, right? Let’s make this file a Word document. We will type in the name and the file type, separated by a period, in the slot. This is what you want to see:

Photo of Windows Restore  Menu 3
We used ‘resume.docx’ for this example.


9. We saved that file to our desktop as a .docx file, even though it is really a simple .txt file. Here’s how it looks on our desktop, complete with the Word icon:

Photo of Windows Restore  Menu 4
Although the file is a text file, Windows thinks it is a Word document.


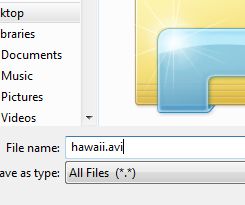
10. The file that you create doesn’t have to be a word or text based file. With Notepad, you can create any type of file that you want. Of course, the file you create isn’t a real version of that file type, it’s just identified or named as that. In other words, if you create a video or photo file, let’s say an ‘.avi’ file, Windows will think it is an .avi file but it won’t be able to open it. We made an .avi file, just to show you that it can be done:

Photo of Windows Restore  Menu 5
We told Windows that this is an an .avi video file, even though it isn’t.

Here is how this phony .avi file looks on our desktop:

Photo of Windows Restore  6
We use the VLC player for our videos, hence the icon.


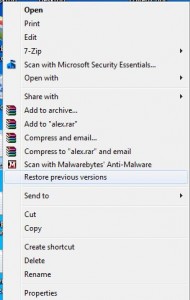
11. Now for the trick. If we had deleted that hawaii.avi file, all we have to do to get it back again is right click it and choose ‘Restore previous versions’. Right click the file and you’ll see this:

Photo of Windows Restore  Menue 7
We just want one old version but Windows might have a few available.

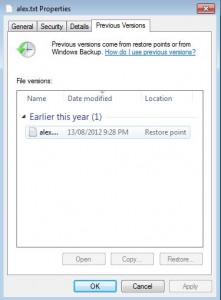
Depending on how old the file is and how often Windows has created a restore point, you may have a few version of the same file available for restoration. No problem. You can copy any file in the vault to any place on your computer. Once you click ‘Restore previous version’, this menu pops up:

Photo of Windows Restore  Menu 8
There is only one version of this particular file available.

In this case, the file hasn’t been changed since August 13, 2012. If it had been changed, there would be several other versions of the same file available. All you’d have to do is to copy the one with the correct date and paste it into any folder on your computer. If you aren’t sure of what the correct date is, copy each file and put each one in a different folder. Remember that you can’t have two files with the same name in the same folder.


12. Highlight the file you want. You can open it to see if it’s the right one, copy it to another folder or ‘Restore’ it to the folder where we created the phony file.  In this example, we would choose “Restore’ and Windows would then replace the file we created with the version of that file which was stored in its System Recovery folder.


TIP: This procedure will work for files or folders. If you have deleted just about anything, and you have a restore point between the date the file was created and the date you deleted the file, you can get it back…even if you permanently deleted that file.


This exercise is relatively simple but it’s worth trying out before you get stuck. Sometimes if you accidentally delete something, you panic. If you’ve run through this demo step by step, there will be no need to panic when things go bad. We hope this helps you someday. Questions and comments are welcome.

Thanks for reading!