Gmail Drive – a great way to store even more stuff

GMail Drive is what’s known as a shell extension for Windows. Since I don’t know what a shell extension is, you don’t have to either. Just use GMail Drive as I do and you’ll have seven gigabytes and counting of free online storage.

1. Download GMail Drive from here This is the url, in case you are paranoid :http://www.viksoe.dk/code/gmail.htm

2. GMail comes as a zip file so unzip it and install it, then reboot as per the instructions. You have to reboot because GMail Drive actually adds a virtual drive to your computer. More on that later.

3. Once you’ve rebooted, start up Internet Explorer. Don’t ask me why this is one of the steps but it is. GMail Drive does not work unless you have Internet Explorer running in the background. If you don’t have Internet Explorer running, you will get an error message on login which suggests that gmail has changed it’s permissions. This is NOT the case. GMail Drive still works, you just have to have Internet Explorer running in the background.

4. Now for the cool part. Right click START, then choose EXPLORE. Down at the bottom left side, under your hard drives, DVD/CD drives and removeable drives, you will see GMail Drive. Right click it and choose Login As. The typical menu pops up and you enter your gmail account name as well as your password, then click AutoLogin if you are on a secure computer and you’re done.

5. GMail Drive is now, essentially, part of your computer. Go back to your desktop and right click a picture, or a song, or a document. Under the Send To option you will now have a GMail Drive choice. If you are logged in to your gmail account you can now right click a file and ‘send it’ to your gmail account.

6. There are some limitations to all of this. First the file has to be under 20 megabytes. Officially the limit is 20 megs but unofficially the limit is about 24.   Second, you can’t send every mp3 on your computer to your gmail account at one time. Select a few, send them up and wait. Lather, rinse, repeat, right?

Now, thanks to GMail Drive, you can share pics, music or just about anything with friends or just with yourself. One of the way I use my gmail accounts is to share tunes with friends around the world. Say I meet Etsuko in Japan. If she wants to listen to my tunes and I want to listen to hers, then we get a new gmail account and share it. Etsuko uploads her tunes through GMail Drive while I upload mine the same way. One of the terrific benefits of gmail is that you don’t have to download an MP3 to play it. Gmail has a player built right into it. Click on a tune, wait for a second until gmail scans it for viruses then click PLAY. The MP3 plays right there in your gmail account.

GMail Drive is a quick and easy way to access your gmail account from your computer. Try it! You’ll like it!

Sorting out the gmail mess – Part Two

Since we now have our hotmail (or yahoo or any other account that allows this) account added  to our gmail account, every time we log into gmail we get our gmail and the new messages from the other account. In my case, I get my gmail and all of the messages from two other hotmail accounts.

My inbox only shows my gmail, however. All messages from the other accounts are still there but they are ARCHIVED, or saved in the general folder. How do I see them? Well, there are two ways.

On the left side of your gmail page, under Inbox there is Sent Mail then Drafts then All Mail. All Mail is the toggle that will show you All of your mail, including any other accounts you receive mail from and your gmail. If you select Inbox, you just get the gmail or any mail that you have selected to go to your inbox. If, as I showed you last time, you selected Archive Incoming Mail, then all of your mail from any other account goes into the All box.

Now the cleaning up part. How do you get to see JUST the email from one of the other accounts? Look on the left side of the main page and click on the email address that you would like to see the mail from. This is new, by the way. Yesterday, July 2 of 2009, you had to Manage Labels to see the email from one account. Today, the account is showing on the left side. Click on it and you will get just the email from the one account. Simple and efficient.

There are other ways to organize gmail and I’l be writing about these in future entries. Stay tuned here for a piece about Gmaildrive, an amazing piece of software that makes better use of your gmail account.

Sorting out the gmail mess

Recently, because of a problem with accessing my hotmail accounts, I set gmail up to receive the email from the three accounts so that I could view my mail in gmail without using hotmail. It worked quite well, although mail reception isn’t instantaneous as it is on hotmail. Gmail picks up 200 messages every time it logs into my hotmail accounts so, after a bit of time, all of my hotmail messages were in my gmail account. Having the messages in two places is handy for me since I use my hotmail accounts for family letters, billing from my hosting company, etc. and I want to have copies of all transactions and family stuff for posterity.

When you set  gmail to fetch mail from another email source, there are a few settings that will make the subsequent actions a lot easier for you.

Step 1: Click on SETTINGS then ACCOUNTS then, beside GET MAIL FROM OTHER ACCOUNTS, click on ADD A MAIL ACCOUNT YOU OWN  (I wonder who writes for gmail? This seems like bad English to me!)

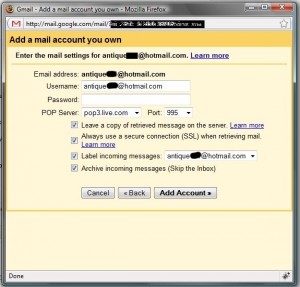
Step 2: Type in the email address in the box that comes up then click NEXT. This box is where you get to choose the settings that make your gmail inbox a whole lot cleaner, much less messy.

menu

Here is the menu, full-size so you can read it more easily. Add the password and then make sure you check the settings which I have chosen. Since I want a record of all email in the account in two places, I chose ‘Leave a copy of retrieved messages on the server.’ The messages are still in hotmail, unopened and safe. The next box is checked automatically so just leave it. Then, I chose to ‘Label incoming messages : antique &&@hotmail.com.’ This is very important and make sure it is checked BEFORE you click ADD ACCOUNT.  Since I don’t want my inbox full of messages from gmail AND my hotmail account, I have chosen to ARCHIVE INCOMING MESSAGES. From now on, messages from my hotmail account will only be visible when I choose ALL in my inbox settings.

I’m going to publish this now and then I will continue it later. If you have questions, please make a comment.

A throwback to PS2 and Gran Turismo 4

I’ve been playing GT4 for about a year now, maybe two. Recently, I’ve discovered some ways to ‘cheat’ the game. Since I’ve never come across these particular techniques before, I thought I would outline them here. I’ll add to this as time goes by but I’ll give you a few now. I’ve just been able to purchase the Black Cars in the used car lots on day 1394, I missed them the first time. Don’t hold your breath waiting for them since they can be beaten quite easily.

Tip 1. If you want to test out a car in a race but don’t want to upset your win/loss percentage, simply turn the game off before you back out to the main screen. Let’s say you are in the Japanese manufacturer’s area and you trick out some kind of Nissan. Race all you want, change your settings, add more stuff to the car but DON’T back out to the main screen! As long as you stay in the Japan world, or any other for that matter, nothing you do in there is saved until you back out to the main screen. Nothing is the key word. If you win a race and turn the game off, the win isn’t saved. If you trick out a car and get all the settings right and turn off the game, nothing is saved. This can save your bacon or ruin a good race! In the Missions area, or any other area for that matter, make sure you back out to the main screen in order to save your efforts.

Tip 2. May the force be with you! In the last couple of weeks I’ve been in some one make races where I just can’t seem to tune the car to get the win. I’ve come close but haven’t been able to grab the checkered flag. What I’ve discovered is that a good old demolition derby technique works just fine. Ram the leader! If you can get close enough to the leader, usually on a corner, ram him hard. Drive him off the track and scoot on by to win the race. This definitely isn’t kosher, or racing, or even nice, but it works. You can also do this in the SpecialConditions area when you are just a bit underpowered. Yes, you will get hit with a 5 second penalty but if you are hogging the lane, the guy isn’t going to get by you anyway.

Tip 3. If you have cars  just a bit ahead of you, you can drive much deeper into a corner by ramming the cars ahead of you. You can also use other cars to prevent a slide out on a tight corner, just get beside them and use their car as a bumper to make the corner. If you drive them off the road, even better!

Tip 4. If you get a car that you can’t handle too well, use the B Spec driver to win the race. I was racing the Lotus series this week and, for the life of me, I couldn’t control the Elise. Maybe I had it set up wrong but it was out of reach for me. Enter the B Spec AI and all of a sudden I had a winner. The AI could handle the car much better than I could and won the series.

Tip 5. If you need cash, enter the second Special Conditions race, the Malfi one, with a decent car such as the Cadillac that you win in the first Special Conditions race. The car you win, the Toyota rally car, can be sold for about $250,000 dollars and you can win it as many times as you want. Total time is about 20 minutes for that money, depending on the car you enter. Clear the winning record and race again. Then sell the car you win to build up your cash reserves. This is also a great way to practice with different cars. Yesterday I won it in the Land Rover and, believe it or not, the LR handled quite well.

I hope this helps someone out there in the ether. Let me know if you got something from all of this.

What WordPress is and how to install it – a series – Part 3

This blog isn’t in any kind of proper chronological order. You’ll have to sort through it to get a complete concept of what I’m trying to explain. If you’re a pro, this will look pretty lame, I’m sure. If you’re a newbie, like me, you just might be able to figure it out with this and the WordPress tutorials. Basically, I’m trying to add some missing points to the tutorial that the good people at WordPress have created.

Before we get too far into the installation, we have to back up a bit. There are some necessities that WordPress needs in order to be able to work on your behalf. One of these is something called MySQL. Another is PHP. The former is a database management system, read Mom. The latter is something that produces web pages from code. WordPress produces the code when you type your stuff into it, telling it what to put where. As soon as you click on SAVE or PROCESS or PUBLISH, WordPress spits out the code and PHP pops out a nicely designed web page and puts it up on your website, complete with links to your old posts and any other little things that you tell it to do, all automatically. WordPress needs PHP to work. The whole point of WordPress is linked to PHP. You type your words in a browser and PHP creates a web page for you. That’s why your index page, the main page of your site, is an index.php file instead of an index.html file.

As far as MySQL is concerned, let’s think about your house or apartment. It’s a database, right? It’s full of bits and pieces of your life. Sometimes you know where things are, sometimes you don’t. When you don’t know where something is, you call in your Mom or your wife or your girlfriend/boyfriend. They become the MySQL in your life. Bing, bang, boom! Suddenly that missing piece of paper is in front of your nose. The missing socks are all put back in your drawer. That’s what MySQL does on your website. It keeps track of all of the bits and piece of your website, sorting it out and keeping track of it. WordPress needs MySQL to work. It sorts out all of the bits and pieces of your web pages and tells anything that asks it where everything is.

My hosting company has three levels of hosting accounts, bronze, silver and gold. Guess which one I was on? Yup, bronze. Bronze was great for my original hosting needs but it didn’t offer either MySQL or PHP. Part of my original setup with WordPress was to change my account from bronze to silver. That took a few days, some emails and, of course, a hit on my credit card. Most hosting companies give you the best price if you sign up for a long period of time. Right now, I’m good for two years.

Once I had my new silver account set up, the first thing I had to do was to create a MySQL database. With this hosting company I am only allowed five databases. Since I have seven domains, I’ll have to figure out a way to split one database between three domains. Details on that later.

The WordPress documentation is pretty clear on how to set up the databases. First you have to name it. Then you have to create a password for it. Then you have to allow people to access that database. Usually, the user is you, right? If you are sharing your site with another creator, then you have to set up user accounts for that person too. This is the same as your bank account. No different. You set it up, you allow access to some people and then you set your parameters. Your kids can only add money, for instance. They can’t take money out! You can add money, take money out, basically do whatever you want.

That’s it for this entry. If you have questions or comments or suggestions, please comment below.

a little bit of hi-tech, a little bit of common sense and a lot of fun