New Privacy Settings on Facebook

The gist of the new Facebook privacy settings has to do with what you share and who sees it and, even more important, who can comment on your shared material. If you don’t have your privacy settings tuned to the new set-up, you might find that Jill Schmoo has commented on your latest graduation photo. Here’s a, hopefully, short run-down on keeping strangers out of your stuff.

If you haven’t logged in to Facebook recently, you’ll see a new notice as soon as you do. Here’s what you’ll see:
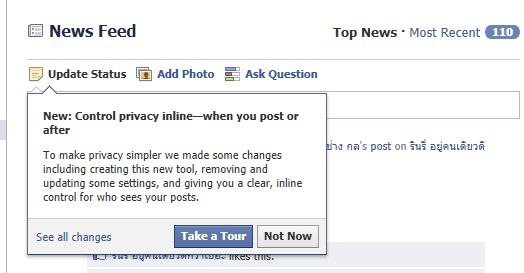
Facebook menu
This is the new Facebook privacy menu that you'll see when you log in to Facebook.

If you take the tour, you’re greeted with menus that ask you if you want to tell people where you are and who you are with. Finally, you’re asked about who you want to share this information with. You can opt out of sharing location, and I would strongly suggest that you choose this option. Each time you post something, you can tag people just like you could before but now those tags open up other features that you have to opt out of if you want to maintain your privacy. An additional setting allows you to approve tags, which is completely new. This option will create a new set of alerts for you to make a decision about but you won’t be faced with incessant tagging as you might have faced previously. I’ll explain this in detail as we go.

Step by Step:

1. First opt out of sharing location. If you want to opt in, you’re on your own if you get stalked!

2. Head over to your Account button then down to Privacy Settings. If you’re reading this, you are concerned about sharing. This area of Facebook should be familiar to you already. If not, get used to it and scout around for all of the settings that pertain to what you share and who you share it with. Do you want to share your phone numbers? Your workplace? Think about it, OK?

This is where you should be :
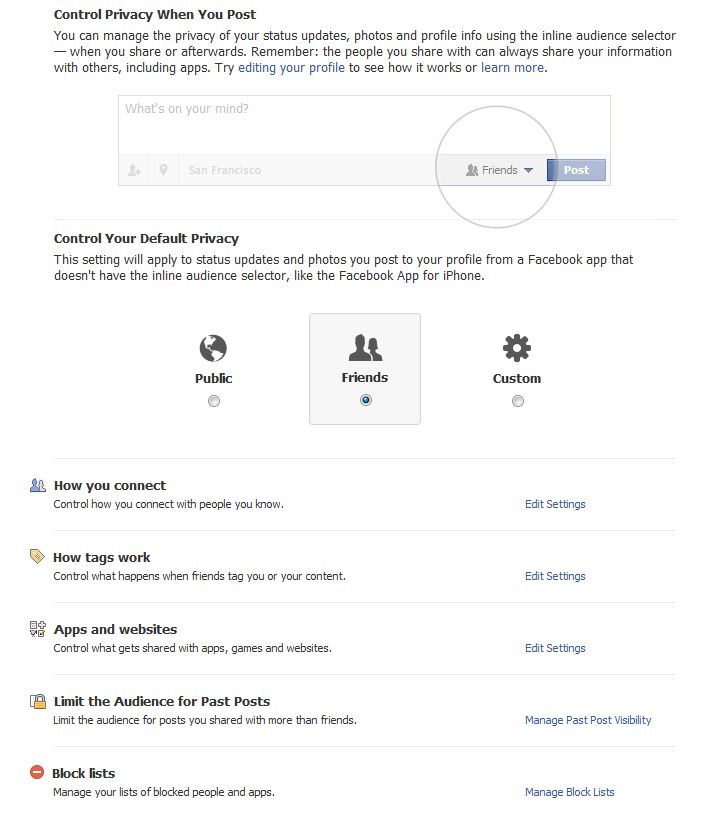
Facebook privacy menu
Everything to do with your privacy is here.

4. At the top, click on the ‘Edit your profile’ link. Choose what you want to share with whom. Run through all of the menus on the left (Basic Information, Profile picture, Friends and family, etc.) and use the drop-down buttons on the right of the bluey-grey area to select the level of sharing. I don’t share my friends with anyone, nor do I share my email address or my mobile phone number. Again, get used to this set of menus and fine-tune it for your comfort settings. If you’re on Facebook and you aren’t old enough to legally be on it, make sure these settings don’t lead a path to your door or to your school or workplace. Don’t be paranoid, just be smart.

Here’s the menu I’m describing:
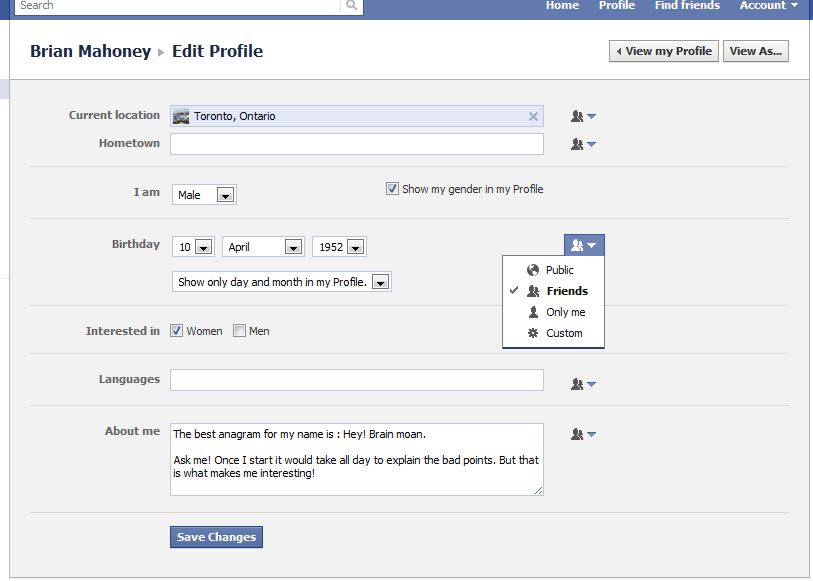
Facebook privacy menu
Set your profile privacy settings here.

(You’ll note that I don’t share my year of birth with anyone. That way Google can’t tune their ads to my age.)

5. Next comes your default privacy. I have mine set to ‘Friends’. Default is ‘Public’ but I don’t want everyone to know everything about me. I don’t even want my friends to know everything about me. You decide what’s good for you. The ‘Custom’ setting allows you to fine tune your settings even more. If you have someone who you don’t want to unfriend, tune your privacy so that this person can’t see everything you do. He or she will see what you want them to see, not the same things that your normal friends can see.

6. The next section, ‘How you connect’, has to do with whether your profile is private, available to friends or available to everyone as well as who can post on your wall and who can see the posts of others. Here’s a shot of what my settings are :
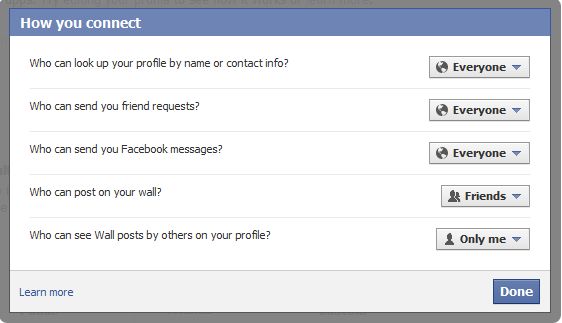
Facebook profile settings
Everyone can search, send friend requests, message me but only friends can post on my wall. No one but me can see Wall posts.

7. The next section has to do with the new Facebook tag and comment settings. Check this one out carefully. My settings mean that I have to approve tags on friend’s material before they go on my profile. These tags may still appear elsewhere on Facebook but they won’t be on my profile. Next, I get to approve tags that my friends put on my stuff. I used to be able to tag Joe on Jill’s photo but now I can’t unless Jill wants me to. Actually, this is more private than the old setting. ‘Profile visibility’ allows you to change who sees posts that you are tagged in. This could be everyone, friends or Custom. Custom can be set to Friends, Friends of friends, Specific people or Only me (you). You can also block these posts from certain people. To me, this is complete flexibility in setting privacy settings.

The next setting, Tag suggestions, is only available in some countries, not here in Canada.

Finally, you get to choose who ‘checks you into places’ using the mobile Places app. Mine is set to ‘Off’.


This is long enough for one post. I’ll continue this on another day. Questions or comments are welcome. Follow me on Twitter: @_BrianMahoney


Thanks for reading.


How to Block Spam on Hotmail – Part 2

Last time, I talked about a simple way to block spam from your MSN Hotmail account. This time, I’ll explain a more detailed way to keep that spam from coming back. If you don’t know too much about the Internet, I’ll give you a small lesson before we begin.

A domain name is something you might be familiar with. Hotmail.com, for instance, is a domain name. All spam emails originate at a domain of some sort. The email address that sends the mail has two parts, the part before the @ sign and the part after the @ sign. The part before the @ sign means nothing and is usually gibberish. The part after the @ symbol is what you want to block. Why? Read on.

Let’s say that 123skidoo.com is sending out spam. Joe@123skidoo.com sends you a piece of spam. Using my technique that I described last time you will block joe@123skidoo.com. What is sally@123skidoo.com sends you spam? You’d have to block her, too. Today, you’ll learn how to block 123skidoo.com to ensure that no one at that domain sends you spam. OK, well they may still send you spam but you won’t see it.

Using the same technique as I described yesterday, go into your junk mail folder, check mark the emails you want to sweep and choose Block From under the Sweep button. Then STOP!

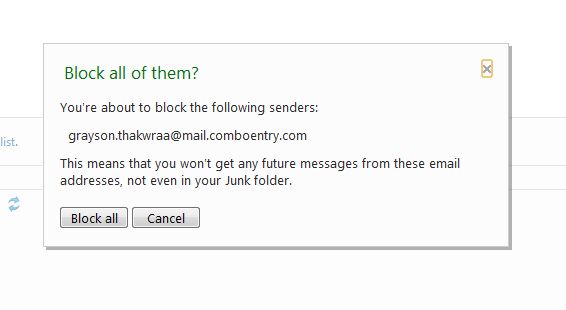
Here is a shot of the menu that you want to stop at:

hotmail block menu
This is were you see the actual domain name of the sender.

You’ll see that the domain name, mail.comboentry.com, is where the spam email came from. The name, grayson.thakwraa, means nothing. If you just block that person, someone else at that domain will continue sending spam. You have to block ‘mail.comboentry.com’ to eliminate ALL spam from that domain.

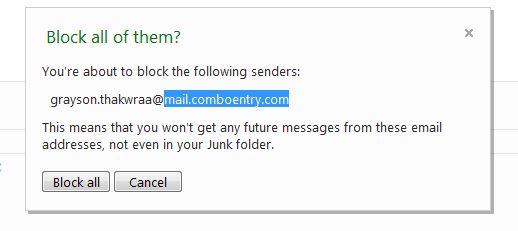
Highlight and copy (Hold the left mouse button, drag the mouse over the domain name and then right click and choose COPY  the part after the @ symbol as shown here:

block menu domain highlighted
The same menu with the domain name highlighted.


Then click Block All and wait for a second or two. Next, click on the link that says ‘Manage your block list’ as shown here:

manage block list menu
Click on the blue 'Manage your block list' link.


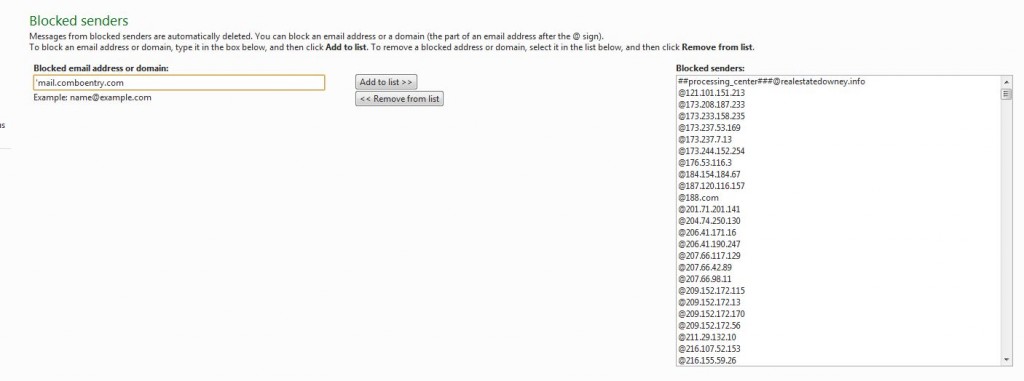
Once you get to the next page, paste the domain name into the slot that reads ‘Blocked email address or domain’ and then choose Add to List. Here’s how it looks :

add to block list menu
You can add domains to your blocked this using this window.

You can see on the right side that I have many domains blocked already. Now, I have this one blocked and I won’t see any spam from this guy again, no matter who sends it from that domain.

This post is longer than most but I think it’s important to keep spam out of your email folder. This works well for hotmail which I use every day. I never use the email account that I get with my ISP and you shouldn’t either. An ISP email account puts email right into your computer while hotmail keeps the email on its servers. More about that later.

Thanks for reading!

How to Block Spam on Hotmail – Part 1

I’ve been using hotmail for years, probably since 1998 on my main account. Did you know that HoTMaiL (the original name) was a play on HTML, the language of the Internet? Anyway, some hotmail accounts are prone to tons of spam. Depending on the size of your presence on the Internet, you could be besieged with huge amounts of unwanted email or spam.

Hotmail has always had a block list but there used to be limits on the number of addresses that you could put on the list. There might still be a limit but I can’t determine what it is but hotmail has recently introduced a very cool feature that helps you quickly and easily block spam email addresses. Here’s how:

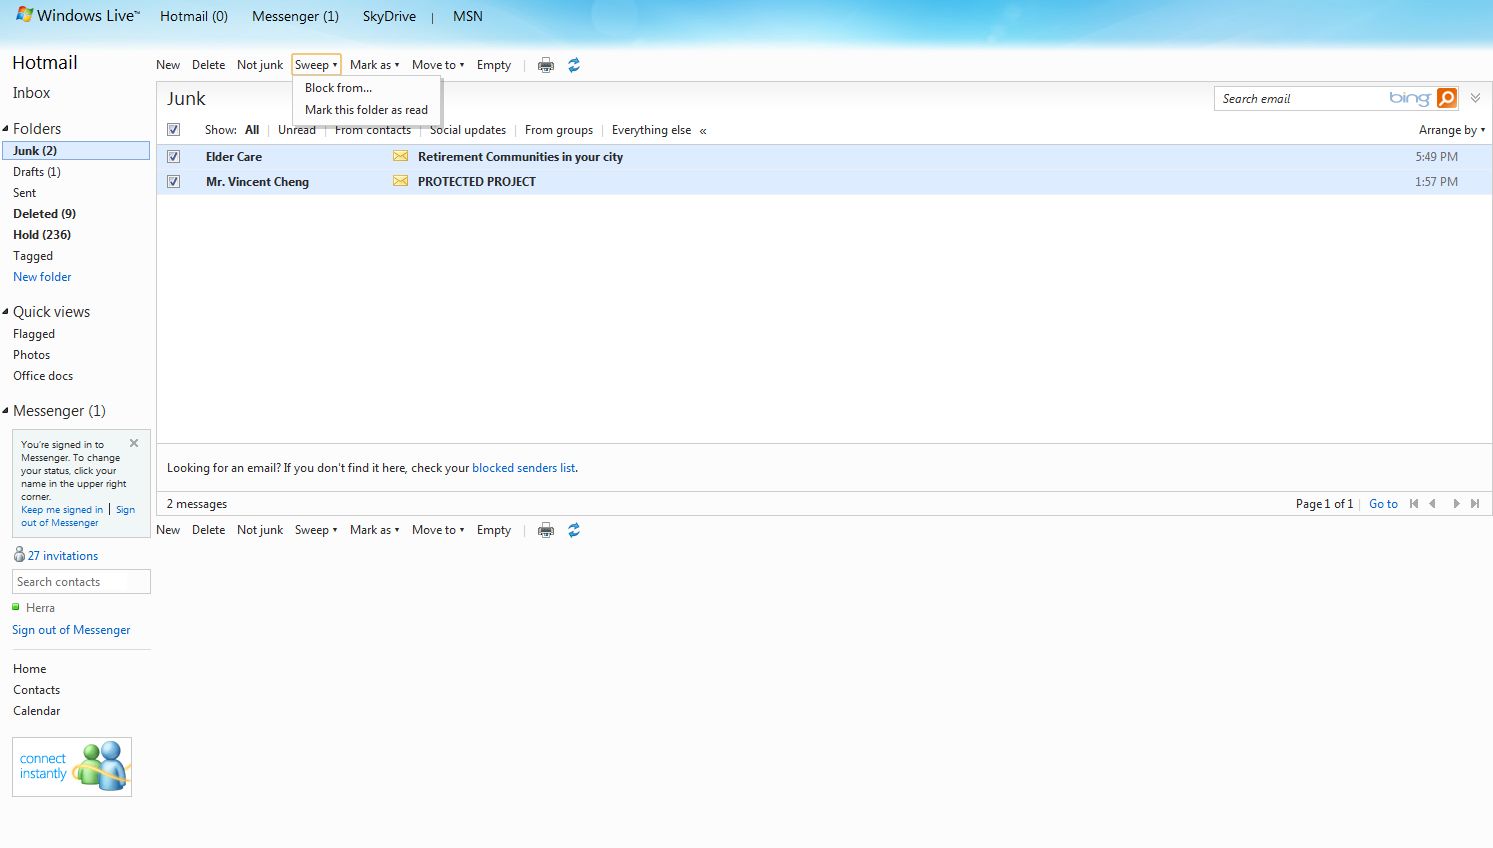
1. Head to your junk mail folder. If you’ve set up your hotmail to send everything except email from your contacts, then you will likely have some email in your junk folder. Scan it quickly to see if any of it is important. You’ll get used to the typical spam subject lines but others, maybe some from Facebook or your bank, will look safe. Check them out first but almost all Facebook emails are spam.

2. Click on the little box to the left of every junk email. A little checkmark will appear.

3. On the menu right above your emails, click on the word SWEEP. Choose ‘Block from…’ and click OK when the little menu box pops up.

4. Wait for a few seconds before you change to another page. Hotmail will confirm that you’ve added all of those addresses to your block list. Now you can move on to your inbox or close your hotmail window.

Next time I will show you how to tune your blocking setup to prevent even more email from getting to your inbox.

hotmail visual
Hotmail junk mail box showing two junk mails selected for blocking.


blocking junk mail.
Two junk emails about to be blocked.

Force WordPress to Use Your Domain Name in the Site URL

If you’ve started a new WordPress blog, don’t forget to change the URL setting in WordPress to reflect your domain name instead of your hosting account name. I just ran into that problem and had to edit the settings to reflect each of my domain names. Here’s the problem explained and how to fix it:

1. When you sign up for a hosting account, you usually sign into the control panel using your hosting account name and password. Most shared server hosting accounts allow you to run multiple sites on the same server.

2. Once you set up your hosting account, you then have to move your domain name(s) to the site. In the root directory you will set up a folder for each site. My site looks like this, for instance : root\brian . Brian is the folder that holds everything that pertains to brianmahoney.ca. When I was setting up the site using WordPress, the install program didn’t see my site as brianmahoney.ca, it say it as myname.myhostingcompany.com\brian  and that was the name that came up in the URL window when I would browse to the site.

3. Obviously, I didn’t want to advertise my hosting company and I wanted people to get to know my domain name, brianmahoney.ca.  At first I thought this was a problem with the hosting servers. Somehow, I felt, they had screwed up the directory structure. Oooops! It was my fault all along. Here’s how I fixed it.

4. In the settings menu on the left of the screen in WordPress, the first setting is ‘General’. On the right side you’ll see two URL settings. The first is for the folder where the files are stored. WordPress has to know how to find the files even though it’s in them already, right? The next URL setting is for the Site Address. This is what I had to change to https://brianmahoney.ca

Once I changed that, the hosting company’s name didn’t show up in my browser URL any more. Relief! This is what to do in WordPress, if you use another type of blogging software, you’ll have to root around the settings to find the spot where you can change the site URL so that it reflects your domain name.

That’s it! I hope I’ve helped you a bit. I had to figure this out on my own. Ah, it pays to be smart, right? Hahahaha.

directory structure on host server
This is how the directory structure looks on the host server.

Crayon from Dryer – How to get crayon marks out of your dryer

If someone leaves a crayon in their pocket while drying their clothes, the resulting mess is both frustrating and colorful…usually. Here’s an easy way to remove the crayon marks from your dryer. This is from my experience, not something I’ve stolen from the Internet.

What you need:

1. Goof Off

2. Baking soda

While Goof Off  will remove some of the crayon marks, it doesn’t get rid of them all. Additionally, it stinks to high heaven and is probably noxious (bad) for you. Here’s what you do:

Put a good amount of baking soda in the drum. Wet a decent sized portion of a clump of paper towelling and start rubbing the baking soda. Move your towelling around the part of the drum you can reach WITHOUT turning the drum. Once the baking soda/Goof Off stops working, add some more Goof Off and continue rubbing. Make sure you clean the wing things, too. Once you’ve cleaned that third of the drum, vacuum up the remaining baking soda.

Turn the drum one way or the other and repeat the process. Start with a new clump of towelling and more Goof Off and baking soda. You’ll find that you don’t need all that much Goof Off. There seems to be a kind of reaction between the two products and the mixture really does a great job of getting rid of the crayon marks. The baking soda won’t do it on its own and the Goof Off won’t either. Together, they work magic.

Once you’re finished the whole drum, grab some more towels and use a liquid detergent/water solution to clean the drum. Do this a couple of times and then rinse the drum with just water-wet towels. I would suggest running a couple of loads of old dark clothing or second-rate towels through a few cycles to make sure the drum is shiny and clean again.

Throw out the vacuum bag, too, or the next time you vacuum the not-so-delightful smell of Goof Off will waft its way through your home.

Good luck! Remember where you heard this tip and come back now and then for other tips such as this. This isn’t hi-tech but it will safe you time and trouble.

Crayons
The culprits

a little bit of hi-tech, a little bit of common sense and a lot of fun