Our last post was about WordPress usernames vs. names that are publicly displayed in various places on your site. Whatever you do, don’t reveal your username and, more importantly, don’t leave the username set to ‘admin’.
Today, we’re moving on to two plugins that really lock down your WordPress site. One, Wordfence, is something we’ve written about before. Check that out here:
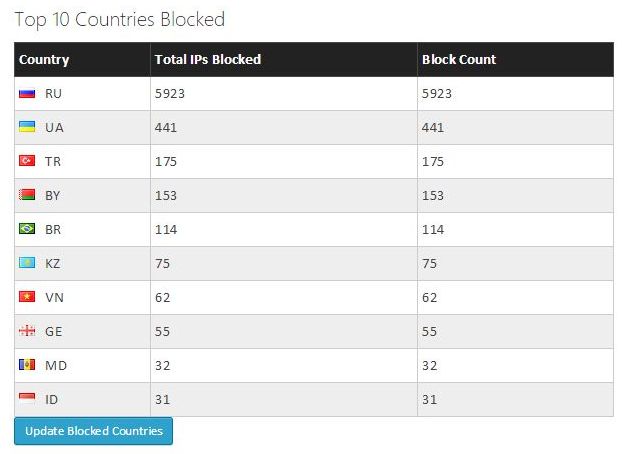
Wordfence aims to lock out intruders, anyone who uses the wrong username and/or password. It can also lock you out of your own site but that is easily corrected. This photo will give you an idea of how often WordFence steps into action on this site:
This photo shows the attempts to break into this site. Most are from Russia, is that a surprise to anyone?
This list of countries is not complete, Israel should be on the list but isn’t. We were surprised that hackers from Israel would be attacking this site but anything is possible, right?
The various options that Wordfence offers are too complex and detailed to explain here. Check out their site, read about the premium option (we don’t think it’s worth it) and install it from your WordPress dashboard. You’ll be glad you did.
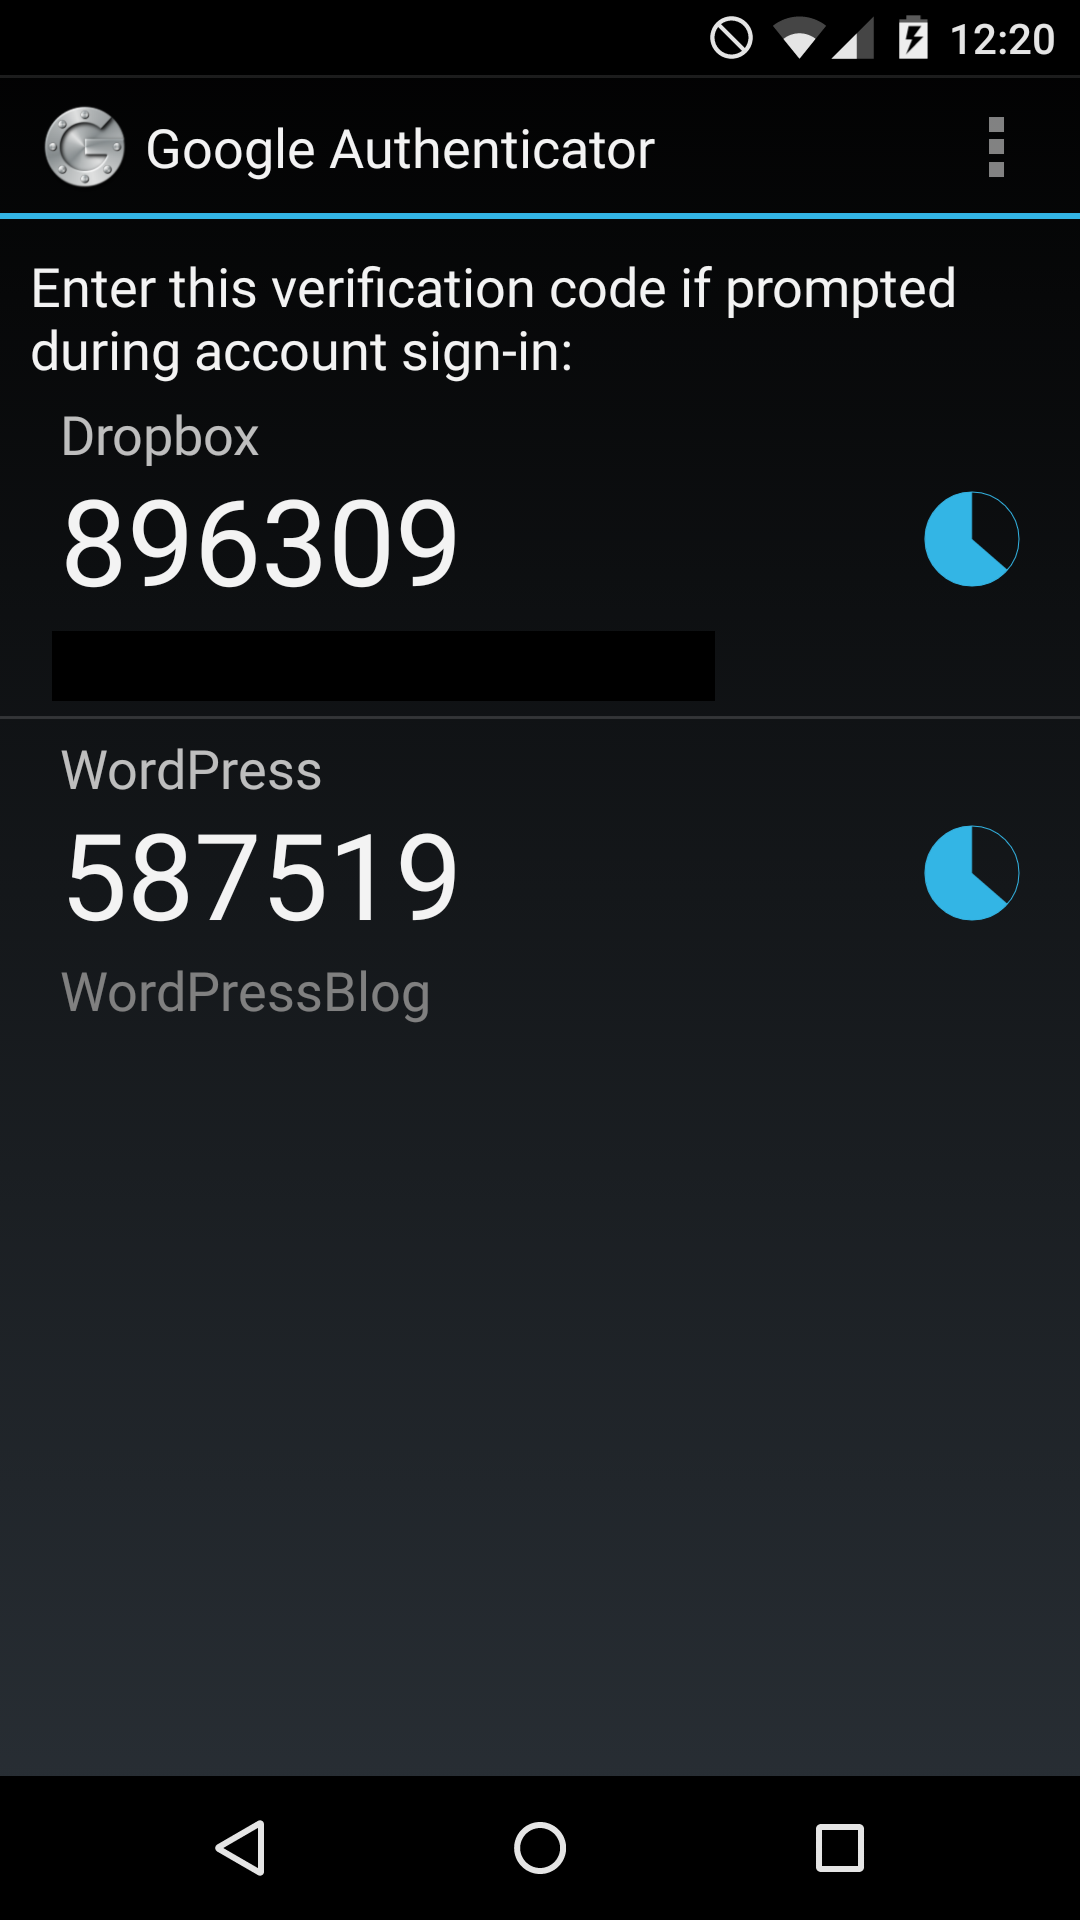
The second plugin that we use on this site is Google Authenticator. Again, this is a free plugin, one that locks your WordPress site down if the correct code isn’t entered. Install it on your WordPress site from your dashboard then install the app on your mobile device, it’s available for Android, iPhone and Blackberry. Once the plugin is activated, you’ll see a code like this on your phone:
Enter the code within the time limit and you’re in.
There is a time limit on the app, not on your website. It the clock is close to the top, let it go past 12 and enter the new code.
With these two plugins, you can pretty much relax in the knowledge that your WordPress site is secure and safe from hacking. Good luck!
Comments and questions are welcome but Likes on our Facebook page get immediate attention. Here’s the link: Computers Made Simple on Facebook . Thanks for reading!
Believe it or not, this site averages 650 hacking attempts every day. There are so many attempts to get into it that we’ve stopped the email notices from the main plugin that we use to keep hackers out. Computers Made Simple is reasonably popular but it’s not remotely near the top of the list. Despite that, we get hundreds of hacking attempts every day. Here are some tips on how you can protect your WordPress site, big or small. Even if your site is brand new, hackers are trying to get into it.
While the two steps mentioned in our previous post are good, we’ve discovered a way that hackers can see your username, even if you have it set to something different than your posting name.
TIP: If you run a site with several contributors, make sure they read this post.
WordPress now allows you to have your author’s name displayed publicly as something different than your username. The importance of this can’t be ignored. If a hacker is able to discover your username, they are 50% of the way into getting access to your site. Don’t let them! If they don’t know your username, even if they somehow divine your password, they won’t be able to get into your WordPress installation.
Head to Users then edit your admin account, the one that has admin privileges, in other words. Hopefully you’re not still using admin as your username, right? If you are, it’s even more important to change it now.
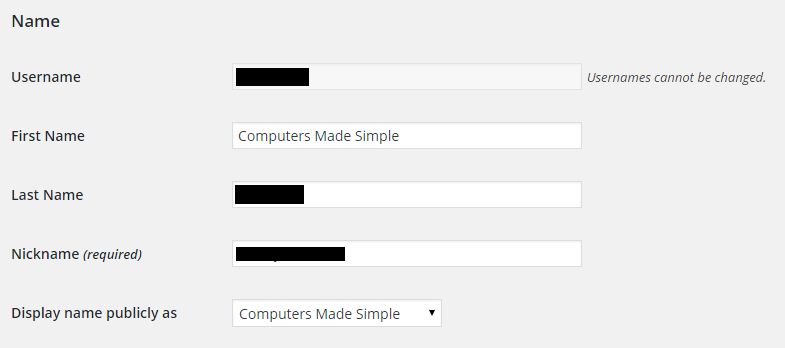
Look for this section on the editing page:
Make your first name that does not resemble your username. Your nickname could be anything, or blank. Display name will be your first name.
The important thing here is to make sure your username is:
1. Not Admin
2. Not in the ‘Display name publicly as’ space.
Nickname is not required, so don’t worry about it. If your username is still admin, change it using these instructions:
At this point you’ve prevented hackers from discovering your username. As long as it’s not ‘admin’, they won’t be able to get in, even if they know the password.
In our next post we’ll detail another way to lock down your WordPress site.
Comments and questions are welcome but Likes on our Facebook page get immediate attention. Here’s the link: Computers Made Simple on Facebook . Thanks for reading!
If you are one of the millions of people using WordPress on your website, here are two simple ways to make your installation more secure. One involves a plugin, the other is just common sense.
TIP: If you don’t know who is trying to get into your WordPress site, you’re in for a big surprise. Small or large, your site is most likely under attack from hackers 24/7.
Step 1:
By default, every WordPress has a user account under the name of ‘admin’. Your job is to get rid of that account entirely. Here are the steps you need to go through in order to do that.
1. You can’t remove the admin account until you create another account with admin privileges. That’s rule number one.
2. When you create another user, use a unique username that cannot be guessed by someone trying to log in to your site. In other words, create a username that has nothing to do with your name, your site’s name or the name of anyone who writes for the site. If all the site’s posts are by Francis and Francis is also the username of the admin account, a hacker has 50% of the information needed to get into your site.
3. Once you create a new user with admin privileges, delete the old admin username.
TIP: If the old admin had posts written under ‘admin’, make sure you rename the author of those posts before you delete the account or the posts might be lost forever. You can do that from the All Posts menu by choosing all posts by admin then selecting Edit under Bulk Actions then switching author to another username.
Step 2:
Download the WordFence plugin from Plugins, New. We’re not affiliated with WordFence but we’re very glad that it’s around. The fact that it’s free, at least in it’s basic form, is good too. Install WordFence, sign up for notices using an email that you check daily and you’re pretty much home free.
WordFence is free, simple to use and it will send notices to you every time someone logs in or is locked out.
Just so you know, we had some security concerns recently. Because of these concerns we went on a search for plugins that would help us lock down our site. WordFence came out on top. It’s free, too. There is a premium version but we find that the free one works fine for us.
Just after we installed WordFence, we received an email that someone had tried to log in to this site. How many times did they try? Twenty. After that WordFence blocked them. Since then, we’ve installed WordFence on every site we own. We’ve also limited the number of unsuccessful log in attempts to four, a reasonable number.
Protect your website now, before you lose it. It is possible for someone to gain control of your WordPress installation, locking you out in the process.
That’s it for today, thanks for reading! Comments and questions are welcome but Likes on our Facebook page get immediate attention. Here’s the link: Computers Made Simple on Facebook
WordPress is the most popular blogging platform in the world, by far. It has become so pervasive on the Internet that you probably might not recognize that you’re actually on a site that uses WordPress. We’ve already covered the installation and several other aspects of handling WordPress and its seemingly endless array of plugins and features. Here are ten steps you should take to lock down your WordPress site.
WordPress sites often don’t look like WordPress sites.
Popularity breeds contempt, as they say, and WordPress is certainly popular. Hackers and spammers all over the world make it a point to attack sites that use WordPress, hoping to take advantage of new webmasters. Once these folks find a hole, they will exploit it as much as they can, often taking over the site while the owner is not even aware of it.
Step One: Get rid of the user name ‘admin’.
Every WordPress site defaults to the main user being named admin. Even with a secure password, leaving that username in place means that a hacker already has 50% of what he needs to access your site. Add another user, keeping in mind Step Two coming up, and make that user admin. At that point you can delete the original username ‘admin’. Hint: You need to assign the admin role to another user before you can delete the user named admin.
Step Two: Name the user with admin rights something other than any user who can post.
If you post under the name Jane Doe, don’t assign admin right to that user (usually you). When someone reads your posts, they could assume that Jane Doe is the admin. As in step one, if Jane Doe has admin rights, they already have half of what they need to gain access to your site. Change the admin user name to something completely different, something that can’t been found on your site.
Step Three: Keep your WordPress installation up to date.
This goes without saying but we’re saying it anyway. WordPress is constantly being updated, with security loopholes constantly repaired and additional features added. Make sure you keep your installation fresh by updating it whenever WordPress prompts you to do it. We use the automatic update and the whole process takes about a minute. Make sure you do the same.
Step Four: Keep your plugins up to date.
Update notifications are right in front of you as soon as you log in to your site. These include updates for WordPress as well as the various plugins you use. Make sure you keep everything up to date, including those plugins. Once an exploit has been uncovered, plugin creators change the bits and pieces that make up the software and then release an update. WordPress tells you instantly when an update is available so there’s no reason not to take a moment and update everything.
Step Five: Use Akismet to filter spam.
Akismet is free and using it is a no-brainer. We get thousands of spam comments every day here on Computers Made Simple. If it wasn’t for Akismet our site would be a mess of ridiculous comments that would steer users away from our site. We’ve covered installation of Akismet before in our WordPress installation series.
Step Six: Make sure all comments must be approved by your admin user.
As with the use of Akismet, this goes without saying. If a spammer’s comment is missed by Akismet, and that happens frequently, you must make sure that you can report it as spam before that comment shows up below a post. We all know that some sites, actually some big name sites, don’t filter out these comments but make sure that you do. Any savvy reader will be able to spot a spammer’s comment and will naturally think less of your efforts. To them, it might seem that you want these spam comments visible, as if your site was more popular than it actually is. Don’t fall into that trap. Change your discussion settings and moderate all comments.
Step Seven: Don’t inhibit comments.
We had a spammer attack our site a few weeks back. Every day we’d get twenty or thirty comments that Akismet was missing for some reason. To us, the comments were obviously spam but to Akismet, they seemed legitimate. What to do in this situation? We thought that adding a captcha (Completely Automated Public Tuning test to tell Computers and Humans Apart, believe it or not) device to our site. You’ve all seen them, the little photos of pictures and/or numbers that you have to type in to prove you’re human. Well, we tried but the results didn’t work out well at all. For the duration of the ‘attack’, we simply marked those comments as spam and, over time, Akismet either recognized them as such or the company which was commenting gave up the battle.
Please Note: If you want to comment on our site, all you have to do is give us an email, a name and a comment. The email is never published, it doesn’t even have to be a real one. The only reason we ask for it is to make sure you get our reply to your comment, not to spam you. We don’t even really see your email, except when we reply. At that point a WordPress plugin sends our reply to you automatically.
Step Eight: Use one admin, no more.
Even if you assign user accounts to other writers/posters, don’t assign anyone else the admin position. Anyone with the admin designation can change any setting in WordPress, even to the point of locking you out of your own site. Don’t do it. Keep the admin rights and keep your site safe.
Step Nine: Don’t let anyone access your site for whatever reason.
Again, this is from personal experience. We purchased a theme and, after installation, found that there was one setting that was causing us problems. After a few emails back and forth with the theme creator, he suggested that we give him our password and let him see if he could fix it. Our warning beacons went off immediately. Yours should too. Let’s say we did allow this person to access the site then changed the password immediately afterwards. In case you didn’t already know this, all WordPress installations are made up of a vast array of php scripts that work behind the scenes, controlling every part of your website. Unless you are a very smart programmer, you would never know what this person might have changed deep inside your WordPress installation. No matter how innocent a request for access is, don’t do it. If something needs to be fixed, there are hundreds of very helpful people and sites out there to assist you.
Step Ten: Take control of your own site and your own destiny.
WordPress is complicated, we all know that, but it’s not rocket science. If you’re in the blogging game, you have to expect some confusion and you have to allow some time for learning about things other than what you’re blogging about. We are assuming, of course, that you own your own domain name and are using a hosting site for your WordPress installation. None of the steps above apply to bloggers using a community blogging site, but if you’re reading this, you probably already know that. Take the plunge, buy a domain and get a cheap hosting account. There are vast amounts of WordPress resources out there to help you along the way. Good luck!
Finally, we’re not WordPress experts in any sense of the word. We get things done and we have always learned to do things by actually doing them, after reading up on the topic, of course. The worst thing that could happen is that your site might be down for a bit. Hopefully, your frequent readers will realize that glitches happen and will come back another time.
Thanks for reading! Comments and questions are welcome. Like us on Facebook and you’ll get a direct path to us for relatively instant updates and solutions: Computers Made Simple on Facebook
a little bit of hi-tech, a little bit of common sense and a lot of fun