Category Archives: WordPress

Protect Your WordPress Site

Here’s a quick and dirty way to keep your WordPress site safer from hackers. While you may never be able to fully protect your site, take our advice and perform these steps now. Hackers are very good at what they do but the harder it is to break into your site, the safer you are.

Everyone knows that the default user for every WordPress site has the username admin. With the username and the proper password, anyone can gain access to any WordPress site. Do you see the shortcomings of using the default name for the primary WordPress user? If you leave that name in place, hackers already have 50% of what they need to control your site. Here’s how to protect yourself:

1. Open your WordPress site by logging in with the current admin username and password. When you install WordPress, you are assigned a fairly decent password. We’d suggest making that password a bit tougher but the standard one is not too bad. Whatever you do, change your admin password on a regular basis.

2. Once you’re in, look for the word ‘Users’ on the left pane:

Photo of WordPress Security   1
Users, click on All.


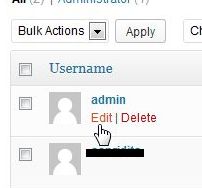
3. On the default menu, there is only the ‘admin’ user. That user has full admin privileges. That’s not what we want. We want to remove the admin user or take away their roles. In the following menu, there are two users:

Photo of WordPress Security  2
Hover over the word ‘admin’ and select Edit.


4. Once we click Edit, we can change the role of the admin. In the previous photo, you can see that you can also Delete that user but, remember this, you can only do that if you have another user that you have assigned the role of admin to. Makes sense, right? You can’t administer a WordPress site with an admin to do it. For now, this photo shows what we want to do. Later on we will delete this ‘admin’ user, after we have assigned the role to another user.

Photo of WordPress Security  3
We want to choose ‘No role for this site’ for the user named admin.


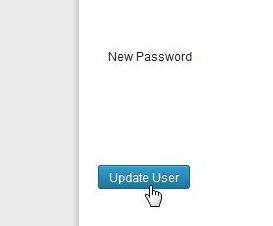
5. Once you set that menu to ‘No role for this site’, make sure you scroll down to the bottom and click ‘Update User’:

Photo of WordPress Security  5
Update user or your work is for nothing.


TIP: For extra security, don’t assign usernames that are actually the names of the users. If, for instance, you assign the admin role to a person whose real name is Bronwyn, don’t use Bronwyn’s real name. Choose something like Lana or Ralph or a set of numbers. Whatever you do, don’t allow hackers to guess the username. Why? As we said before, if they know the username, they are halfway there to getting access to your site. No matter how much time they spend trying to figure out your password, they’ll spend the same or more time figuring out the admin’s username. Please keep that in mind when you’re setting up or changing your WordPress site.

6. We figure that you’ll know how to add another user and assign them the admin role so no need to confuse the issue. Once you set another user as admin, you are free to delete the original ‘admin’. For your own security, WordPress will not let you delete the default admin unless you have assigned that role to another user. Don’t worry, they think of just about everything.

That’s it for today. Hackers are actively targeting WordPress sites. Keep yours as secure as you can.

Thanks for reading!

Most Recent Post Not Showing on WordPress Blog

If you run a blog on WordPress, it’s common for the latest post to show at the top of the page. Our last post, the one about burning DVDs with Burnaware, wasn’t doing that. Here’s how we solved our particular problem. Remember that WordPress is a fairly complicated blog engine and, as they say, your mileage may vary. What worked for us may not work for you.

The clue to the solution lay on our Posts page, the WordPress page that lists all posts in chronological order. The current cover post was the one previous to our latest post. On our Posts page, the latest post was at the top. For some reason, that post had a ‘Purge from Cache’ notice on it. It was the only post that had this notice on it so we figured that this had something to do with the problem. Turns out we were right. Once we purged that post from our WordPress cache, it became the cover post on our main page. Here are some screenshots that will help you solve this problem:

Photo of WordPress Latest Post  1
This is the Posts page. The ‘Purge from Cache’ notice is missing but this is where you’d see it.


If you hover your mouse just below the post’s title, this menu comes up. You can purge the post from here or later on after you are editing it.

Photo of WordPress Latest Post  2
You can purge the page from here or after you click Edit.


Photo of WordPress Latest Post  3
Click Edit and this will allow you to purge the post another way.


Once you get to the Edit page, look on the right to see this:

Photo of WordPress Latest Post  4
Another place to purge the page from the WordPress cache.


We feel that this problem is sometimes linked to the theme you are using but even that may be related to the page cache. WordPress suggests to install the same theme again or to install a different theme. We think that doing so clears the page cache and the problem is solved that way, too. We’d suggest purging your cache first. There’s less chance of an error, in our opinion, and it’s a whole lot simpler.

Thanks for reading!


WordPress – insert link in comment reply

For some reason, maybe it’s a problem with the latest WordPress update, links in comment replies are NOT working. This was written on March 11, 2013 and the problem may be fixed by the time you read this but if it isn’t, here’s how to repair the problem.

1. When you reply to a comment on your WordPress blog, you are actually writing in HTML, more or less. All of the HTML codes are shown, unlike the normal WordPress window which shows a kind of Word window, completely void of HTML coding. (Yes, you can work in HTML if you want but most people don’t.) In other words, the comment reply window is not WYSIWYG (what you see is what you get).

2. The comment reply window looks like this:

Photo of Comment Window
An example of faulty HTML code.

3. In the example above, we have pasted in the URL of our Facebook page and have asked WordPress to give us the HTML code which would show the link AND open it in a new window. Unfortunately, WordPress has given us faulty code.

4. Here is what the code should be:

Photo of Comment Window 2
Bad code on top, good code on the bottom.

We’ve put both codes in to show you the fine difference between the two.

5. Here is the correct HTML code that you can copy and paste. Make sure you change the URL and the title before you use this:


<a href=”https://www.facebook.com/ComputersMadeSimple” target=”_blank”>Computers Made Simple</a>

You can change it this way:

<a href=”insert the URL between the two quotation marks” target=”_blank”>Put the name of the link here. This will be visible in the reply.</a>


That’s it! A simple fix for a frustrating problem. Hopefully WordPress will fix this situation in a future update.


Thanks for reading!

Comment Reply Notification for WordPress


We’ve just added comment reply notification to our WordPress installation here at Computers Made Simple. Yes, we should have had it before but we thought it was already part of WordPress. Silly us, right?

Adding the plugin named ‘Comment Reply Notification’ was very simple, as was the one step set-up. You can either download the app then upload it to your site or, as we did, simply install it from the plug-in section of your WordPress Dashboard. That’s what we will do today. Follow our photo flowchart to get this important feature on your own site.

Here we go:

Step 1:

Photo of Comment Reply Notification 1
Head to your Dashboard then hover over the word Plugins on the left then choose Add New.


Step 2.

Photo of Comment Reply Notification 2
In the search box, type in ‘comment reply notification’


Step 3.

Photo of Comment Reply Notification 3
1.4 is the latest version. Click on ‘Install Now’.


Step 4.

Photo of Comment Reply Notification 4
Accept the message from the webpage by clicking ‘OK’.


Step 5.

Photo of Comment Reply Notification 5
Once the Plugin is installed, click on ‘Activate Plugin’. You’re not done yet but this will start the activation process.


Step 6.

Photo of Comment Reply Notification 6
Hover over the word Settings on the left side and choose Comment Reply Notification.


Step 7.

Photo of Comment Reply Notification 7
Select ‘Commenter choose to do so (default checked)’. Look at the other choices but that is the best one, in our opinion. Click on Update Options.

TIP: Don’t forget to click on Update Options or the plugin won’t work.


Step 8.

Photo of Comment Reply Notification 8
Make sure that you see the words ‘Options Saved’ before you leave this page.


You’re done! Now, whenever someone makes a comment and you reply to it, they will be notified of your reply. They can then head back to the page, using the link in the email, and read your reply.

Tip:  This process is the same, pretty much, for all WordPress plugins. Some have more complicated set-up processes but the actual installation is the same. Be sure to check the settings page which applies to the plugin you choose to install.


Thanks for reading!

Import WordPress Blog


If you want to copy and paste your current blog into another website, here’s how you do it using the WordPress export feature.

The beauty of WorPress is that everything works better than you’d expect. WordPress is free so you’d think it would be kind of wonky, kind of unprofessional but it’s not. It’s smooth as silk. One of the best features, one that we’ve just discovered here at Computers Made Simple, is the ability to export your current blog to a completely different site. In our last post, we showed you how to export your blog to your computer. This is a good way to back-up your current blog. The post is here:

Easy WordPress Back-up

In order to copy your blog, use the steps in the last post to get the xml file from your current onto your computer. Follow the steps and remember them. You’ll be using some of them to do the copying.

You’ll need another website, obviously, with WordPress already installed. You can find how to set up WordPress and new websites on this blog. Once you’ve got that done, go to your Tools menu in the WordPress installation that you want to copy the file into. It’s on the left, follow the steps in the post above to get to that menu.

This time you will choose to Import instead of Export. Here are the steps to accomplish the import.

1. Once you click on Import, WordPress will ask you what kind of blog you want to import. Since we are talking about WordPress here, we chose WordPress but you can choose any of the other blogs if you are currently using them.

Blog Choices to Import
We chose WordPress but there are others to select.

The various selections are listed above.

Next, you will have to install the plugin for the type of blog you want to import. Here’s what you’ll see:

Showing plugin installation menu
Click on the Install Now bar if you are importing a WordPress blog.

TIP: Before you install any plugin, make sure it’s compatible with your version of WordPress. If you haven’t updated your WordPress installation, do it now. Keeping up with WordPress updates is vitally important as far as the security of your blog is concerned.

Once you click the Install Now bar, WordPress downloads the plugin and installs it. You will be taken to your plugin page where you must activate the plugin. Once you do that, you might have to clear your page cache but that’s just a simple click on the notice that comes up. The plugin activation menu will look like this:

Showing Activate Plugin and Run Importer
Click on the words Activate Plugin and Run Importer

Once you click on the link shown, this menu will pop up:

Showing browse to file to import
If you know where the xml file is, find it with the Choose File button now. If not, find the file using Windows Explorer and then copy it to your desktop. Then you can use this menu.


Once you click on Choose File and find the file on your computer, WordPress will proceed to import everything in that file; all posts, comments and photos. Once that is done, you’ll have to adjust your user settings to account for the new posts. Go to your Users page and the various names of the posters for the new material will be there. Adjust their access limits there or, which is what we did, change the name of the poster to reflect something other than the user account holder. Why? Because if the poster’s name shown to the public is the same as the name on the user account, hackers are already halfway to getting access to your site. All they have to do is figure out the password since they know the username already. That’s why you should not leave the admin account open. Change the admin privileges to an unidentified user and always login with that name but always post under another name. This last paragraph is important. Make sure you read it a few times if you don’t get it right away. Ask us if you need clarification.

OK! You’re done. WordPress has worked its magic once again and you have a completely new blog on a new site that is exactly the same as the one you copied. Let us know if any of these steps confused you.

Thanks for reading!