Category Archives: Shortcut keys

Encrypting Your Stuff – Create Very Strong Passwords

There’s no sense in encrypting your personal files and folders if you don’t secure them with a strong password. Today, we’re going to show you how to do just that. You’ll create an easy to remember password that will lock your material tighter than Fort Knox.

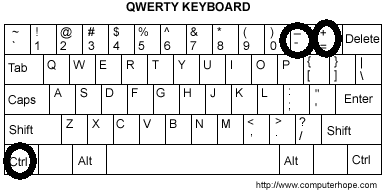
1. There are some prerequisites to this course. In order to create this special password, you have to use a number pad, either the one on the right side of your full-size keyboard or the numbers you can access using the FN key on a laptop, for instance. Yes, there are numbers across the top of every keyboard but those are not the ones we want to use here. If you always use a full-size keyboard, make sure the NumLock key is pressed down. If not, figure out how to use the ‘other’ numbers, usually on the top of certain keys, like this:

Photo of Character Map Passwords   1
See the small numbers on top of some keys, even on top of number keys?

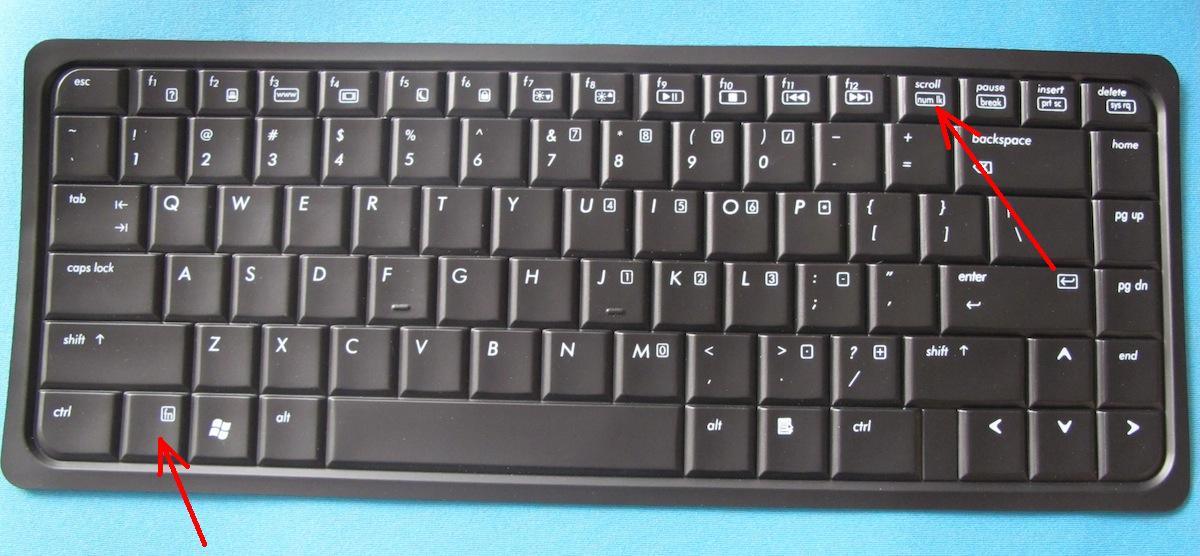
On this keyboard, you would press the FN key and the J or K or L key, etc. The normal number keys on the top row are not what you would use, except for 7, 8 and 9 with the FN key.

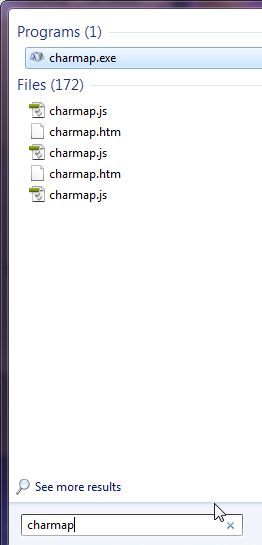
2. Ok, once you’re clear on that, let’s bring out the Character Map. Click on start, down on the bottom left of your taskbar, then type ‘charmap’ into the slot. Charmap.exe should show up but, if it doesn’t, type charmap.exe and press enter.

Photo of Character Map Passwords   2
It’s up at the top there, but you may have to type the full charmap.exe.


3. Welcome to Character Map! Here’s what you should see when you hit Enter:

Photo of Character Map Passwords   3
This is known as Character Map.

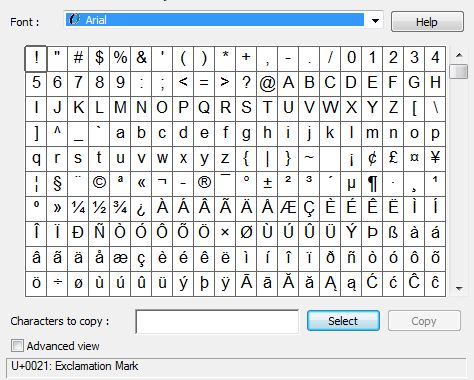
With this handy part of Windows, you can pretty much type any letter in just about any language. Symbols, archaic letters, they’re all here.

4. The default typeface for us is Arial. Your default typeface may be different. Here are some of our choices:

Photo of Character Map Passwords   3
Lots of choices here but make sure you remember which one you choose.

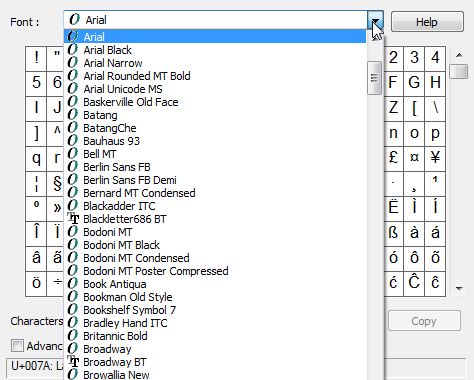
Whichever one you choose to create your password, make sure you remember it. Each selection here has a completely different set of characters. You can make a password out of any of them but you must remember which typeface you chose.

5. Once you make a selection, click on one of the letters/symbols. This is an example:

Photo of Character Map Passwords   5
This is an O, sort of, with two dots on top. See the keystroke on the bottom right?

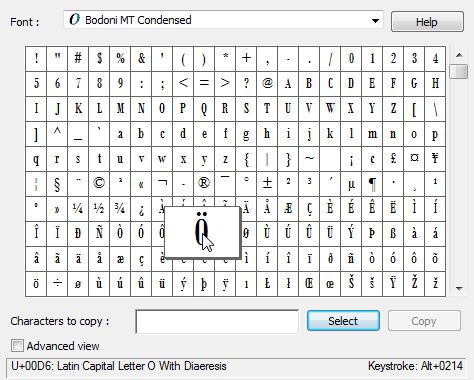
This letter, according to Character Map is ‘U+OOD6: Latin Capital Letter O with Diaeresis’. Phew! Forget that, it’s not important. What is important are the words on the bottom right corner: Keystroke: Alt+0214.

6. Open Notepad. Use Notepad not Word or Wordpad. Notepad doesn’t mess with letters, it just shows what you type, nothing else. Once Notepad is open, Press the Alt key down and keep it down. On your number pad, type 0124 then let up on the Alt key. Like magic, this Ö appears. Practice in Notepad until you get it right.

Note: Not every letter or symbol has an ‘alt+number’ shortcut. Obviously you would choose ones with a shortcut, otherwise you have to copy and paste the symbol which wouldn’t be as easy. What we want here is to be able to type the symbol/letter without opening Character Map, right?

7. Now it’s time to play a little memory game. You can do this a few ways but here’s a suggestion. Look for a symbol that has a familiar number shortcut. In our example above, the shortcut is Alt+0214. Maybe 0214 are the last four digits of your phone number. Get it? Look for a combination that rings a bell and is something you can never forget; your age, your address, your shoe size, whatever. Once you have that symbol, you’re on your way to a very secure password.

8. The hard part is done. You have a symbol that pretty much locks up your password from anyone who doesn’t know your secret. You could still use something simple for the rest of the password but once you insert that symbol, it is very, very secure.

9. Here’s an example of an unbreakable password:     !pass0214ÖBod

For fun, we’ve put both the typeface we used, Bodoni, and the number you have to use with the Alt key to create the special character, Ö.

These are the basics and we’re sure you can create very strong passwords using this technique. Have fun with this and make sure you comment if you have questions about this.

TIP: Character Map is for reference only. You only need it to find the character you want to use and the numbers that create it with the Alt key. Character Map does not have to be open when you are typing the character.


Thanks for reading!


10 Windows Tricks and Tips for Beginners

Windows can be confusing by times, even for experienced users. Here are ten tips that will help you spend more time working and less time getting frustrated.

1. Multiple Windows Explorer windows: We use Windows Explorer often. Many times, we’re moving stuff around from one folder to another. If you have one window open while you do this, it takes time to do just about anything. Here’s how to get two or more windows open. Click on the folder icon on the bottom left of your taskbar to get one window open then right click the same icon and choose ‘Windows Explorer’.  A second window will open up which will allow you to move things around from window to window, one folder in the left and another folder in the right. How do you move stuff around? Read #2.

Photo of Two Explorer Windows
Drag things from one window to the other. You can have more than two, too.

2. Dragging and dropping is easy, right? Select something with your left mouse button but don’t release that button. As long as the button is pressed, the thing you selected can be dragged around your screen, even from one folder to another. If you want to move a file to another folder, just click on the file, hold the button and drag it to the folder you want it to end up in. You’ll know when to let the button go when the target folder turns blue. Want to select more than one file? Read #3.

3. Multiple file/folder selection: There are several ways to select more than one file. If you click anywhere inside a folder, hitting CTRL and the A key at the same time will select everything in the folder, single files as well as folders. If you click on one file in a line of files, move your mouse down to the last one you want to choose then hold down the shift key and click your left mouse button. That will select the first and last file and/or folder and everything in between. Want to select only a few files? Hold down the CTRL button and click on every file or folder that you want to select. Read #4 to see what you can do with the files or folders after you select them.

4. Right click menus; Your right mouse button is very handy once you have selected something in Windows. Right click a selection and read the menu. There are all kinds of things you can do from that menu. Right now, we’ll choose Copy and Paste. Once you choose Copy, the whole selection you’ve made is copied into Windows memory (RAM). It will stay there until you select something else or until you Paste it all into another folder. Once you decide on a location, click anywhere in the white area (or on a folder if you want to Paste it all into that folder), right click and choose PASTE. Read #5 for a faster way to do this.

Photo of Right Click Menu
There are many choices when you right click a file or folder.

5. Shortcut Keys: If you select something, there are several shortcut keystrokes that you can use to interact with that selection. You have to press two keys at the same time but, believe us, it’s a lot faster than using your mouse. Here are some shortcuts you can use: CTRL/a (select everything inside a folder), CTRL/c will copy any selection, CTRL/x will ‘cut’ any selection (cut removes the selection from its current location while copy leaves the selection where it is and puts a copy somewhere else when you choose Paste later on), CTRL/v will paste anything that is in Windows memory into whatever you choose to paste it into, CTRL/s will save something that you’ve already saved again or it will open up the ‘save as’ window if you haven’t already saved your selection or file, CTRL/z will ‘undo’ whatever action you’ve just performed. Remember this last one. If you move a file or do something drastically wrong, hit CTRL/z and that action will be undone. There are more shortcuts but that’s enough for now.

6. Screen Captures: Sometimes you want to save a photo or part of something that is on your screen. You can’t always save an image you see so you have to do a ‘screen capture’. On your keyboard, and it varies from computer to computer and laptop to laptop, look for a key near your F (function) keys. It will have ‘PRTSCN’ or something similar on it. Sometimes you have to press another key to make it work but normally you just have to press the key itself. Do that and your whole screen is saved temporarily in Window’s memory, waiting to be pasted into an image program. We use Irfanview for all of our basic image work and we recommend that you do the same. Just open any photo in Irfanview, hit CTRL/v or right click and choose Paste, and the copied screen is pasted into a new photo window, ready to be saved as a picture.

7. Highlight sections of text:  Remember we told you about ‘drag and drop’? Well, you can use drag and drop to highlight whole paragraphs on the Internet or in a document, or single words or sentences for that matter. Click your mouse on the first word but don’t let the button go, then drag the mouse over what you want to copy until you reach the end. Everything that is selected or highlighted will turn blue. Right click in the blue section (or hit CTRL/c) and then open Notepad or Word and choose Paste or hit CTRL/v. This is a fast way to copy bits and pieces of text from one area or folder or document to another.

Photo of Drag Selection
The text in blue can be copied or cut.

8. Zip to the top (or bottom) of a page:  If you’re on Facebook and you’ve scrolled all the way to the bottom of the page and want to get back to the top instantly, just press 7 on your keyboard number pad. If you want to get to the bottom of a page, press the 1 key. Note that this only works on a keyboard with a number pad and Numlock has to be off. Some laptops have the number pad, some don’t.

9. Safe Ejection: If you’re using a flash drive or something similar, Windows doesn’t always let you eject it. Windows insists that some program is using the drive and you have to wait until it’s finished. Don’t just yank the drive out, it can be ruined. The quickest way to get it to eject is to log off then back on again. It’s reasonably quick and very effective when a drive and/or Windows is stuck and won’t let you safely eject it.

Photo of Logoff menu.
Switch user will work just as well.

10. Permanent File Deletion: We’ve saved this one till the end, mainly because it can backfire on you. You all know how to delete something, right? Select it, right click and choose ‘Delete’. Whatever it is that you selected is sent to the Recycle Bin. What if you want to get rid of that item permanently? Simply hold down the Shift  key and then select Delete. Windows will ask you, Are you sure you want to Permanently Delete this file? It’s your choice to say Yes or No to that. If you choose Yes, that file is gone forever. You’ve been warned….

Photo of Ten Tricks and Tips
Make sure before you select Yes.


If you send the item to the Recycle Bin, it can be restored. Use this tip carefully, just in case you make a mistake.


Thanks for reading! Hey, why not Like us in Facebook? Keep up with our posts and updates. Here’s the link: Computers Made Simple on Facebook

Copy and Paste from Windows Command Window

If you know what a ‘command prompt’ or command window is, you may not know how to copy and paste from it. Here’s the trick:

1. You can get the window to appear in at least three ways. Type cmd into the search line after you click the start button; right click in most folders while holding the shift key and choose ‘open command window here’, or navigate to All Programs then Accessories and choose Command Prompt.

2. Once the command window opens, it’s DOS from then on. Enter your parameters, something like ‘tracert brianmahoney.ca’ and your window will fill up with all of the steps it takes to get to this site.

3. What if you want to copy and paste that data into another program, Notepad for instance? It’s easy! Here are the photos to show you:

Photo of Command  1
The command window showing the trace route path to Yahoo.


On the border of the command window, right click. This will come up:

Photo Command  2
Right click on the border, move down to Edit then choose Mark.


Click on where you want to start the copy action. We chose the T on tracert.

Photo of Command  3
Click on the first letter of where you want the copy to start.


Hold down the shift key and click on the LAST letter or number of what you want to copy:

Photo of Command  4
The selected text will turn white as soon as you click the last letter/digit while holding down the shift key.


Back up to the border of the command window, right click and choose Edit then Copy:

Photo of Command  5
Choose Copy.


Open Notepad, right click anywhere in the white part and choose Paste:

Photo of Command  6
There is the text that you copied from the command window.


You may never need to use this but now you know how it’s done, just in case you ever need it.

Thanks for reading!


Make Text Bigger – two simple ways to make text on your computer screen larger

Is the text on your computer screen looking a bit smaller than normal these days? While this is a natural part of the ageing process, we can help a bit. Here’s how you can increase the size of the text on your computer screen:

1. In any browser, at least the ones that we’ve tested, as well as programs such as Word, simply hold down the CTRL key (control key) and roll your mouse button away from you. To make the text smaller, roll the mouse button towards you.

2. Alternatively, just in case you are using a laptop or an older mouse, hold the CTRL key and press the key just to the left of the backspace key, the one that has the = and + symbols on it. This is easy to remember because of the + sign. Conversely, hold the CTRL key and press the – key, just to the left of the + key, to make the text smaller.

Photo of qwerty keyboard.
Here are they keys to look for.


If you’re using a photo editing program, Irfanview for instance, you can zoom in or zoom out using this same key combination. This won’t work on menus but it will work in just about every software program that we’re tried. When you want to change the text back to normal, in Google Chrome anyway, look for the magnifying glass icon up on the top right. Click it and you can instantly set the text back to its default size.


Photo of Chrome Zoom Setting.
This is at 110% but click Reset to bring it back to normal.


While you may not need the zoom all the time, remember this tip for those times when you do. Also, if a friend or a relative seems to be having a problem with this, show them how to make use of this tool.

Thanks for reading!


Increase the font size in your browser


Here’s a short post on how to make the typeface (some people say font) bigger in your browser.

Click anywhere on the page that is open in your browser. Hold down the Ctrl key (lower left corner of your keyboard) and roll your mouse center wheel away from you.

To make the type smaller, roll the wheel towards you.

This works any computer with a mouse and a center wheel.

If you are on a laptop and or you don’t have a mouse with a center wheel, simply hold the Ctrl button and press the + key (shift and the = key) a few times. The type will get larger. Alternatively, press the Ctrl key and then the – (or hyphen) key and the type will get smaller. Cool huh?

Now back to our regular programming.

Thanks for reading!