Today it’s all about adding a printer to Windows 8/8.1 and adding/changing your desktop themes. Check out our video on Youtube.
Thanks for reading! Oooops, that should be ‘Thanks for watching!’

Today it’s all about adding a printer to Windows 8/8.1 and adding/changing your desktop themes. Check out our video on Youtube.
Thanks for reading! Oooops, that should be ‘Thanks for watching!’
Well, we did it! Yesterday we installed CamStudio and today we created our first official Computers Made Simple video. It’s short, less than five minutes but we show you how to boot to your desktop, add a PIN to log on to Windows and, best of all, how to shut down your computer.
http://www.youtube.com/watch?v=wSPV_RyHBwU
We will still be writing posts now and then but we’re trying to open up our audience. We will post every new video here, of course, so you won’t miss anything. Speaking of that, why not head over to our Facebook page and click the Like button? That way, you’ll always be on top of our latest posts and videos. Here’s the link to that: Computers Made Simple on Facebook
Thanks for reading! Comments on the video are welcome…just don’t be too critical.
Windows 8 has made the simple task of turning off your computer into something substantially more frustrating. Microsoft is pushing its tablets, of course, having stepped into the hardware world lately. Tablets shut off with the push of a button, at least they go to sleep that way. For the rest of us who use laptops and desktops, finding the shutdown menu can be very irritating. Here’s where it is:
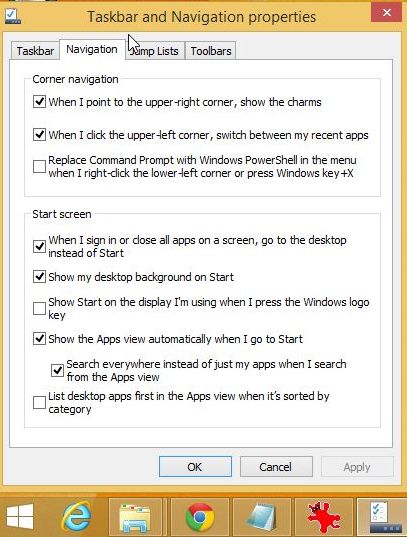
1. If you’ve installed the 8.1 update, you can get a desktop view, something very similar to the older versions of Windows. How do you do that? Right click on a blank section of your taskbar, choose Properties then click on the Navigation tab on the menu that comes up. Choose “Show my desktop background on Start”. Like this:
2. So where is the Shut Down switch? Well, it’s carefully hidden behind that little window on the lower left corner of your taskbar. It would make sense that by clicking this window icon you’d have some choices, just like the old versions of Windows. Unfortunately you don’t. All you get is a mass of programs icons. Try right clicking that window and see what happens. Here’s what you get:
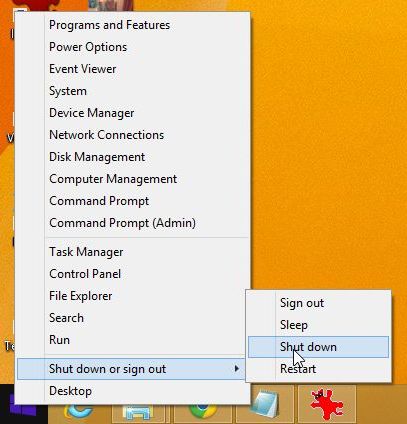
3. You can choose to Shut down your computer or simply Sign out. Sleep is also an option on a desktop. A laptop would have a choice to Hibernate.
There, you found it! Windows 8 is a bit of a mystery, isn’t it? What problems are you having with it? Let us know in a comment or, better yet, Like us on Facebook and ask us there. Here’s the link:
Computers Made Simple on Facebook
Thanks for reading!
We’ve been avoiding this for a while but it’s probably time to do something about Windows 8. If you haven’t guessed yet, we’re not thrilled with it. Here’s why:
1. We don’t see why our email has to be tied to our Windows user account. (We thought this was a pain, and it is, but you don’t have to use a password every time. You can use a four number PIN. More on that later.)
2. Where did the Start menu go? This is something that is just a bit too new for us. We’ve been faithful Windows users since the early ’90s and the Start menu is ingrained in our brains! If we were just starting out on computers it might be different but we’re not. Yes, there are third party apps to get the Start menu back but we don’t think this is a wise idea. We’ll muddle through and sort things out but, right now, this is a problem.
3. Because everything is in a different place, the average user feels lost and very frustrated. Yes, there are instructions as you start to use Windows 8 but taking the time to go through them, let alone remembering them all, is aggravating. For those of us who have the option, it seems better to stick with Windows 7. Sales of Windows 8 seem to reflect our opinion.
Over the next little while we’ll be giving you some tips on Windows 8, little bits of hopefully helpful information that will smooth the transition from Windows 7. Today we’ll show you how to get a PIN number to speed up your log-in routine.
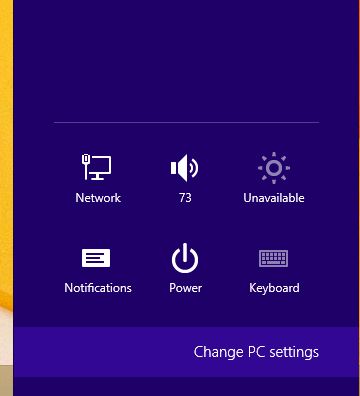
1. Move your cursor (mouse) up to the top right corner of your monitor and let it rest there for a second or two. You should see these images appear on the right side of your screen:

2. You want the gear setting on the bottom. Click it and you’ll see this up next:
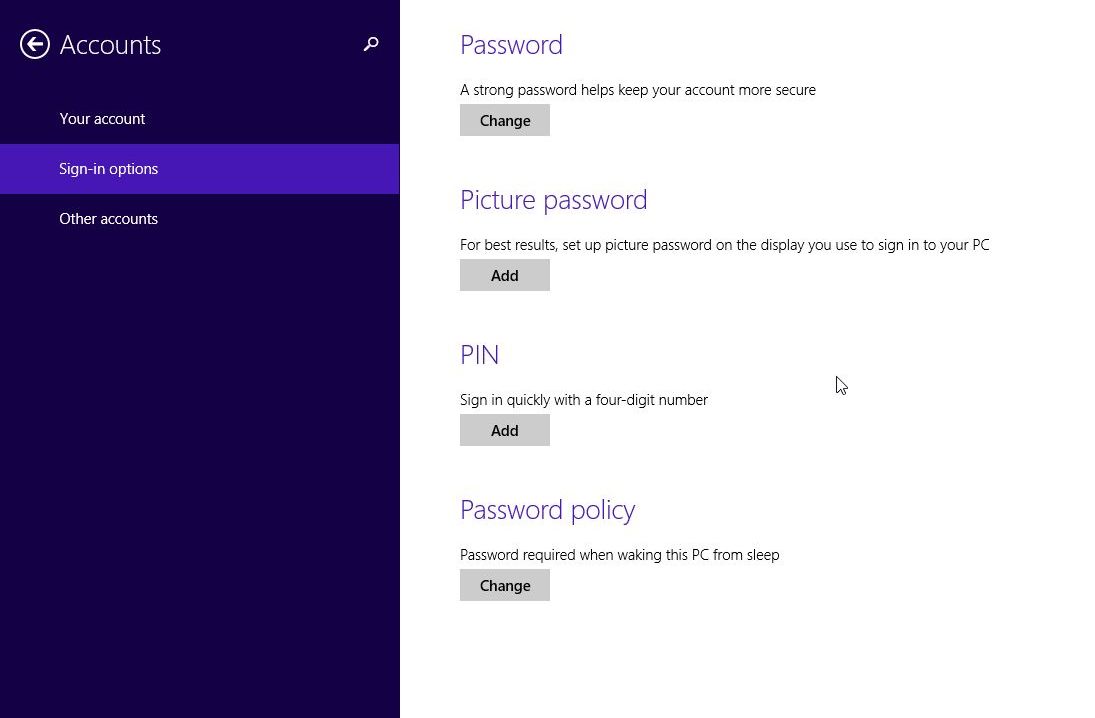
3. Next up comes this:

4. Once you get to this section, choose to add a four-digit number (a PIN). You’ll be asked to enter your current password first. Once that is out of the way, enter your PIN twice and you’re all set. Just don’t forget it, OK?
Now that you know your way around the Windows 8 screen a bit, why not experiment? We hope you’ve already upgraded to the free 8.1 version. That update is a bit more user friendly. It seems that Microsoft listened to the objections…finally.
Tell us what you think of Windows 8. Is it yay or nay with you? We’d love to know your thoughts. Comment below or give us a shout on your Facebook page. Here is the link:
Computers Made Simple on Facebook
Thanks for reading!
Windows Explorer is pretty handy, isn’t it? One click and you can see your whole file system. Um, not quite. By default, you can only see what Microsoft wants you to see. We’re here to change that. Let’s get started.
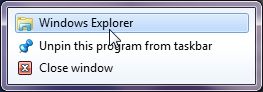
1. Click on the folder icon on your taskbar. (TIP: If you have one copy of Windows Explorer open already, right click the icon and choose Windows Explorer to get a second one. You can drag and drop files between the windows that way.)
Here’s what you want:
2. On the window that opens up, look up to the top left and click on the word ‘Organize’. On the menu that pops down, choose ‘Folder and search options’:

3. The next menu has some settings that we won’t get into today. What we want now is the View tab:
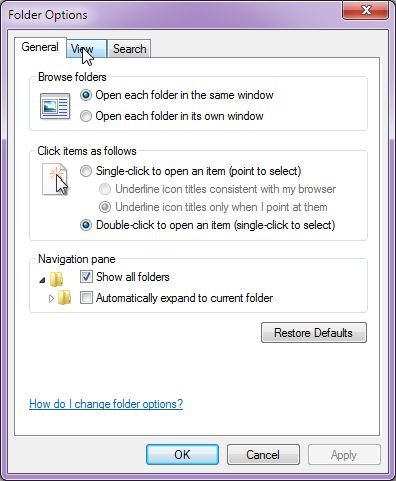
4. You will want your menu to look exactly like ours. The two things that we think are the most important are ‘Show hidden files, folders and drives’ as well as unhiding extensions for known file types. We’ll tell you why after the photo:

5. Here’s why we want to change the default settings. First, we don’t want any hidden files, folders or drives. If something is on our computer, we want to see it. Second, we want to know how large a file is. That’s pretty basic but, for some reason, Microsoft wants to hide this from you. Third, we live by file extensions here at Computers Made Simple. You’ve read our posts about .avi or.jpg files and maybe you’ve wondered what the heck we’re talking about. Well, unhide the file extensions and you’ll see what type each file is.
There’s one more little trick to show you about Windows Explorer. Icons are great but sometimes you just want to see the file name and how large it is. Up on the top right of your Windows Explorer window, look for the third icon from the right. Far right is a question mark, middle is a small icon of the Explorer window itself then to the left is the one we want. This is where you change your view. You have choices that include Details, Medium Icons and so on. Like this:

6. Here’s what you see when you choose the Details view:
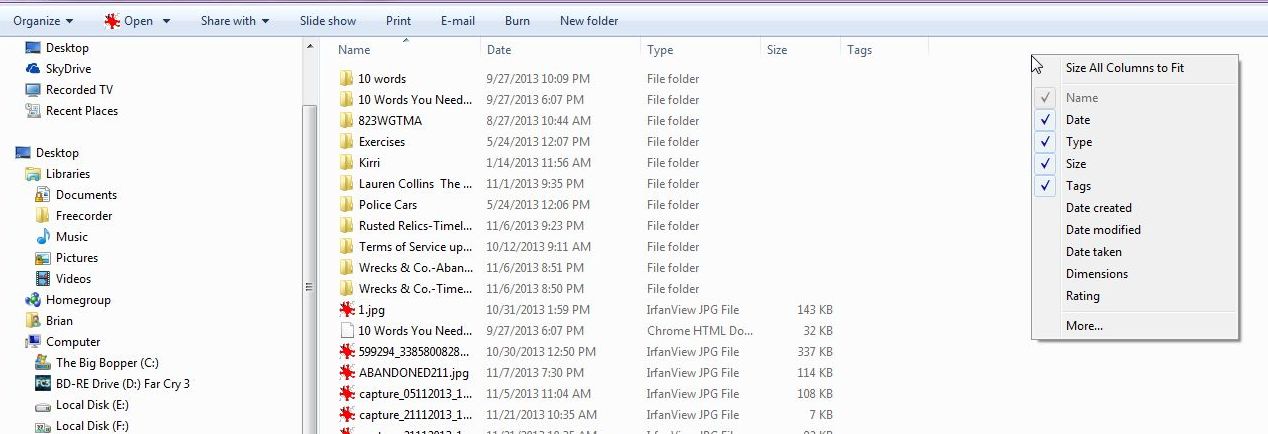
On the far left side we’ve got the drives and main folders. A single click on any of those will bring up its contents on the right side. As you can see, the details view shows you many things about a file or folder: the file name, the date is was created, what type of tile it is, the size, etc. If you right click on the white section just below the light blue area, you’ll bring down a menu that allows you to choose other organizational parameters. Did you change a file yesterday? Put a check beside ‘Date modified’ then look for yesterday’s date. By the way, clicking on any of the parameters, things like Name, Date, Type, Size etc., will organize the whole folder or drive into whatever order you choose. Let’s say you want to find the largest files in a folder. Click on Size to arrange files from the largest to smaller size. Click Size again to toggle that view to smallest to largest.
There are a few other details that we will leave for another post but we think you’ll feel more comfortable using Windows Explorer after reading this post. If you’re nervous about all of this, just take a look around until you feel comfortable with this tool. Once you gt to know Windows Explorer, you’re on your way to becoming a power user. Stick with us and we’ll show you the way.
Thanks for reading! Share this post with friends or, better yet, Like us on Facebook. Here’s the link: Computers Made Simple on Facebook