Category Archives: Windows

Security and Encryption


It seem that every day we hear about people spying and snooping into other people’s email and personal information. I thought it was time to start a series that would help you keep your stuff safe from prying eyes.

If you do have something to hide, you already know how to keep snoops out. For the rest of us, the next few posts will deal with security, basically how to lock your emails and files up so no one can get at them.

Steganos, a fairly well known online security company, has created a free tool, Locknote,  that encrypts text. It’s deceptively simple, very small and does not install itself on your computer. Locknote is both the container and the text file at the same time, the term self-opening works here.  There is no special hardware or program needed to make it work. Locknote is almost too simple for words. Here’s how you make it work:

1. The download link is here: Locknote  At the time of writing, the link led to Sourceforge.net . This might change but, don’t worry,  you’ll be able to find it.

2. The download is a zip file. Unzip it and copy the folder that is created to your desktop or to your Dropbox folder.

3. Inside the folder is an .exe file and the source code for Locknote. All you need is the .exe file. The source file is for developers.  You can move the .exe file onto your desktop and delete the rest of the folder.

4. Double click the locknote.exe file. This is what pops up:
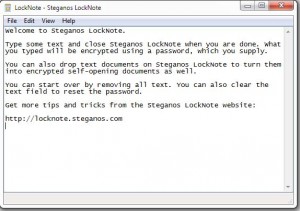
the locknote window
This is all you see when you start Locknote.

5. Don’t get confused here. This is all you get. What you are seeing is the program and the password locked note, all in one. Type something. You’ll see that I typed a few letters at the bottom. Close the program by clicking the red X on the top right. (Duh, right?)

6. Locknote will ask you if you want to save it. If you say yes, it will prompt you for a password. Once you put in the password, DON’T FORGET IT! If you do, you’ll be locked out of Locknote. Sure, you can simply download it again but the point here is that if you lose the password later on, all of your important or personal stuff will be lost. You’ll be locked out!

7. You have to look at Locknote as a self-contained encrypted container, program and file, all in one. You can carry it around with you on a flash drive, store it online  or send it to yourself in an email.

 To send Locknote in an email :  Put it into a zip file or rename the locknote.exe to something like locknote.txt. Most email programs will not allow you to send an executable file as an attachment. Change the .exe at the end to .txt then change it back to .exe when the other person gets it. Ignore the warnings from Windows, it works.

Changing the file type does two things:  First, it makes the program fit to be emailed and, second, it adds another layer of security to your personal information. If you rename it to adcsn.txt, who will know what that file is? Only you. You can bury it inside of Windows, in another folder; pretty much anywhere you want. As long as you remember the password, all you have to do is change the last three letters (the ones after the period) to exe. You don’t even have to name it Locknote.exe since ‘note.exe’ will work just fine.  Beauty, right?

 What will you put in your locknote file? Just about anything you want. File size is unlimited. It can only be text, of course, but you can put in dates, passwords, personal information, stories, love letters, anything you want. If you have someone that you want to email on a regular basis, or if you want to send someone a bit of personal information, use locknote. Change the last three letters and send the result as an attachment. Have the person rename the file at the other end and use the password to open it. Locknote uses 256 bit encryption. You can rest assured that no one will be able to access your files, even if they do fall into the wrong hands.

TIP: Locknote can be in several places at the same time. You can use one file for passwords, one for banking information, whatever you want to keep hidden. You can use the same password for each one or different passwords, just keep them organized so you know which pw opens which Locknote.

TIP:  Locknote is only as secure as your password. For goodness sakes, don’t use your normal password here. Make up a good one, fourteen or more digits, letters (upper and lower case mixed), symbols, etc. Don’t even think about using a real word or anything about you or your life. Make it obscure and write it somewhere else as if it was something else. Send it to yourself in an email or use some kind of mnemonics to remember it. If you lose it, no one can help. If it’s strong enough, no one can get into your files. Cool huh?

TIP: You can copy the Locknote file and paste it anywhere on your computer. You can have the same file in ten different places although, of course, once you change one version the rest won’t be synced with it.

That’s the first post on security. Keep coming back and I’ll have more. I’ll help you keep your personal information and email out of the hands of anyone who’s snooping around where they shouldn’t.

Thanks for reading! Follow me on Twitter: @_BrianMahoney


SkyDrive


SkyDrive, part of Microsoft’s Hotmail division, gives you 25 gigabytes of storage for free. Yes, you read that right. While I have posted about the glories of Dropbox before, SkyDrive serves up more than 12 times the amount of room for the same low figure…that would be FREE!

You might think that SkyDrive is just for photos, and it works extremely well for that, but you can put just about anything you want in it. Sure, it’s fun to share photos but you can also share documents and other files, too. Don’t feel that you have to share everything, either. You control access to your own SkyDrive, just the way you can with Dropbox. If you want to share photos, for example, select a current contact or add an email address and SkyDrive will send out an email to the person with a personal invitation which includes a link to the photos.

Let’s say that four or five friends take a vacation together. Instead of screwing around with swapping pics via email or Facebook, you can all upload your pics to the same folder or each person can create their own folder and upload their pics to that. Depending on the permissions, you can share the folder for viewing or allow anyone to add, edit and delete photos, too. Watch out for that one, though. Make sure you set the permissions correctly or one of your ‘friends’ just might delete some of your pics.

It should be obvious that you need a Live account to use SkyDrive, right? Head over to msn.com and sign up for a hotmail account, if you don’t have one already. SkyDrive is available with any hotmail account, depending on where you live, I guess. Maybe in your part of the world you don’t get 25 gigs but here in North America you do. Once you’ve signed up and signed in, you’ll see the SkyDrive link at the top of the window. Click on it and you’ve got instant access to 25 gigs of space to use at your discretion. No porn, please. Even if you are the only person who can see what you put up there, part of the agreement or EULA that you ‘sign’ says no porn.

Here’s how I am using SkyDrive right now, as we speak. On Saturday I was the official photographer for my niece’s wedding. During the day and evening, I took 1248 photos. How the heck do I share all of those with friends and relatives? Well, I am uploading them all to one of my Skydrive accounts. Once the upload is finished, I can share the album with anyone who has an email address.

Here’s a pic of the GUI for SkyDrive:

The SkyDrive menu
This is where you set permission or add files.

This is a small pic, the original was very wide but you get the idea. Folders listed on the left, details across the center and folder controls on the right, shown with a mouse-over or hover to reveal the small ‘info’ button. You can add folders at the top, hell you can even access these drives from Windows Explorer simply by mapping a network drive. Details on that later.

You know, people think Hotmail is a silly concept, only used by teens or tweens. It’s not. With SkyDrive, Hotmail has become real competition to Gmail and any other free or ad supported mail service. I’m not a fan of Microsoft in any way but Hotmail is what I use day in and day out for my email and online storage. Give it a shot. Tell ’em Brian sent you.

Thanks for reading. Follow me on Twitter: @_BrianMahoney


Secret Files – well, just system files but Windows wants to keep them a secret.


System files, hidden by default in Windows, can be useful sometimes. Not that you want to change or delete them but sometimes a virus mimics a system file. In order to get rid of the virus, you have to be able to see the file in the first place. Sure, we all use anti-virus programs but sometimes they need a bit of help. Here’s how you can change your file system to reveal Windows secret files. As a bonus, you can also change the setting to let you know what kind of files you have on your computer. If you don’t know an .ini from an .exe, this won’t matter much but it’s a good idea in spite of that.

1. Depending on your version of Windows (and you really should be using Windows 7), either click the folder on your task bar or right click the Start button and choose Explore.

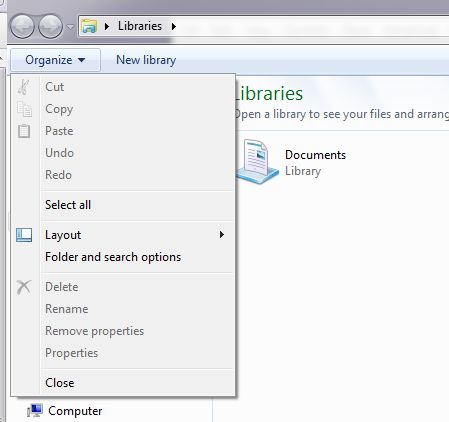
2. On Windows 7, click on the ‘Organize’ button, then Folder and Search Options, just the way it looks in this pic:

Windows file menu
Click Folder and Search Options

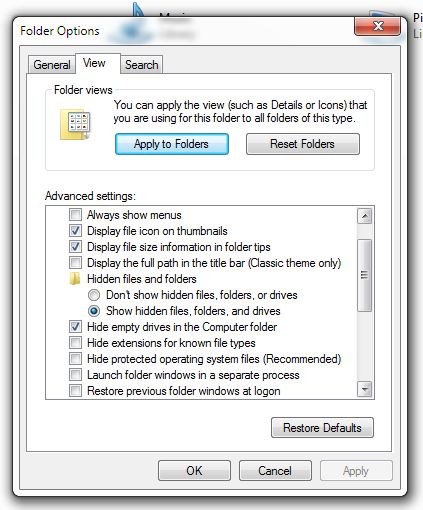
3. The next menu is Folder Options. Click on the View tab to get to this menu:

menu for folder options
Two places to click here.

4. In this menu, make yours look just like mine. Check ‘Show hidden files, folders, and drives’ and uncheck ‘Hide extensions for known files types. Lastly, uncheck ‘Hide protected operating system files (Recommended)’. The last one is optional but I like to have complete control over my computer and, even if I can’t do anything with the protected files, it’s nice to be able to see them.

5. Click OK when Windows says ‘Are you sure’, and then click your way out of the menu.

This is a basic change to your folders that will help you get more involved with your own computer. Instead of seeing file names, you’ll be able to see what kind of file it is. Every file in Windows has an extension, something that tells the computer (and you) what kind of file it is and what it will do. A plain .jpg is a picture file while an .exe file is an ‘executable’, an action file that will open a program. You’ll get to know the file types over time, don’t worry. Once you remove the buzz words and geek-speak, computers aren’t that difficult to understand.

TIP: Don’t delete files unless you know what they are. The files you normally use are .jpg, .doc or .docx files. You don’t ever delete an .exe. file or a .dll file unless you know what you are doing. Delete programs you don’t use through the Control Panel. The purpose of this exercise was to help with your computer knowledge.

Thanks for reading! Follow me on Twitter: @_BrianMahoney 


Change Your Desktop Icons – fast and free


Windows allows you to change your desktop to suit your personality or mood. With different color schemes and a wide choice of backgrounds and screensavers, you can pretty much tune the look of your desktop any way you want. Changing the icons for folders and shortcuts isn’t quite as intuitive as changing your desktop background but it’s not rocket science. Here’s how you do it.

1. Before you begin, download and install Irfanview (if you haven’t already). If you have read my blog before, you’ll know that I love Irfanview. It’s free and totally indispensable when you want to view a photo or do some minor editing on an image.

2. Decide what kind of icon you want. Windows has some icons already which you can access by right clicking any folder and choosing Properties then Customize then Change Icon. These are your typical icons, nothing too far out here. They are available in this location: %SystemRoot%\system32\SHELL32.dll in Windows 7. But, let’s make our own, OK?

3. Find an image or a color swatch, anything that you suits your style. Open the image in Irfanview.

4. Select the area of the image that you want as an icon then left click your mouse and drag a rectangle or square to suit the size you want. (If you use GIMP, you can draw an oval or circle to make really different icons.)

5. Press your Control key and the y key at the same time to crop your selection.

6. Press the Control key and the s key to save your new icon.

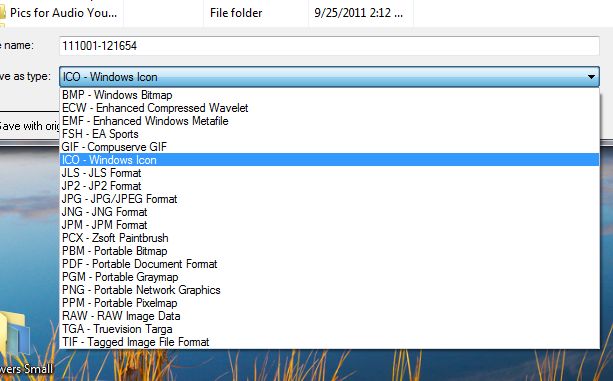
7. In the ‘save as’ menu, click on the arrow to the right of the ‘save as type’ and choose ‘ICO – Windows Icon”, as pictured here.

showing save as icon
Save your selection as an ICO file.

8. Save the cropped image on your computer, preferably your desktop so you can find it easily.

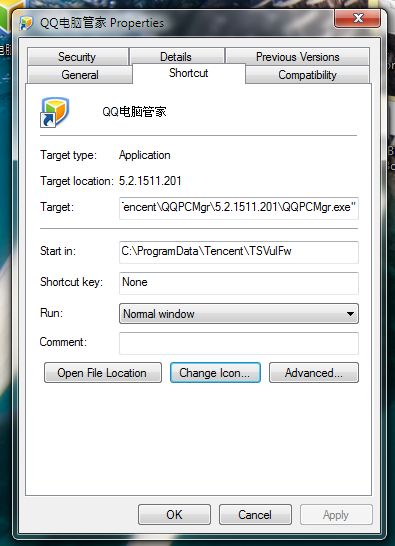
9. Choose the folder or shortcut icon that you want to change. Right click it and choose Properties then the Shortcut tab. It looks like this:

shortcut tab
This is the shortcut tab, look for 'change icon'

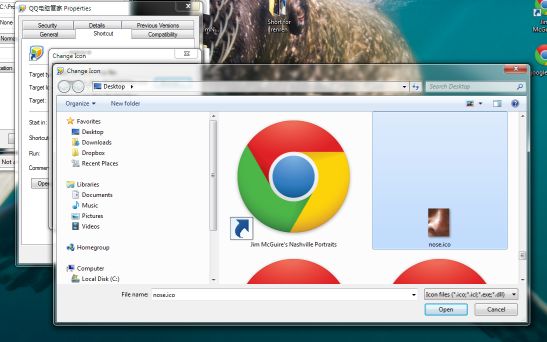
10. Click the “Change Icon’ button and use the ‘Browse’ button to find the icon you created. Here is an icon I made of my own nose that I cropped from a photo on my desktop:

menu to choose icon
Find the icon you made and click on it then click 'Open'

11. Click ‘Open’ after you find it and then click OK all the way back.

12. Your newly created icon is now showing as the shortcut or folder that you chose originally.

There are many sites that offer free icons for downloading but why not make your own? Use pics of your kids, your favorite bands or movie stars, whatever you want. You can see that I made an icon out of my nose, as a matter of fact! I cropped a self-portrait and used it as an icon for a program shortcut.

That’s it. Have some fun with this and make your desktop your very own, not something from Microsoft.

Thanks for reading. Follow me on Twitter: @_BrianMahoney


Ram, Hard Drives and Confusion – computer ads explained


I think that most people just assume that everyone understands the difference between RAM and storage space, dual core and quad core, etc. If that was the case, why does everyone still call the desktop computer a CPU? Here’s a rundown of the terms that are used in a typical computer ad. It’s not difficult once you get past the buzzwords. Here is a typical ad:

Ad for Dell Vostro
It's specs like this that confuse the hell out of people.

This isn’t even the full list of specs. I’ll run through the important ones here. If there is something that still confuses you, ask me in a comment.

This is a notebook, or laptop. Most people these days seem to prefer laptops as opposed to desktops. Mobility is the key here. A huge section of people use mobile phones to connect to the Internet, too. The size you buy is up to you but a 14″ is great for moving around school or work, while a 15.6″ or 17″ can be used as a ‘desktop replacement’.

A netbook is much smaller, usually with a 10″ screen. These are great for taking everywhere you go. I’ll stick to more conventional computers here instead of confusing the issue more with the new pads. The terms are pretty much the same, regardless of the style you buy. Here are some of the terms explained:

1. AMD Quad Core A6-3400DM Processor – This is the brain of the computer, the part that gets really hot and looks huge in a desktop but is really only the size of a Triscuit, and about the same thickness. The two big names are AMD and Intel. You will recognize Intel, I think. Each company maintains a well documented site that will allow you to search out the age of the processor you are looking at. The price you pay for your computer is partially dictated by the price of the processor. This isn’t always the case, however, since Intel’s new processors are even cheaper than the older ones and much, much faster. For most people, the standard dual or quad core is fine. Two heads (dual core) is better than one and four heads (quad core) is even better.

2. 4GB Shared Dual Channel DDR3 at 1333MHZ, 2 DIMM  – This is called RAM (random access memory). It’s what the computer uses to keep track of things while it’s running. These days, 2 gigabytes is an absolute bare minimum, 4 to 8 gigabytes is much more common. The more RAM, the more things your computer will be able to think about. You can run two, three, four or more programs at the same time. Less RAM means your computer can only think of one thing…very slowly. Adding RAM to an old computer will do wonders for its speed. All you really need to know here is how many gigs of RAM you get with the computer and, potentially, how much more you can add. This is using 2 sticks (2 dimms). Most laptops only have two slots so you’d have to swap out the memory completely as opposed to adding another stick. 4 gigs is my minimum at this point. All RAM these days is Dual Channel, that’s just there to confuse you or to make it sound better.

3. 320 GB 7200RPM SATA Hard Drive – This is the storage NOT memory. The hard drive is where you store your files, music, videos, etc. The bigger the hard drive, the more you can store. This particular drive is an OK size and a GOOD speed. Most laptop drives are only 5400 RPM. This one is 7200 which means that it will be able to feed out stuff faster. However, it will also use up more power and create more heat, two things that will affect your battery life. I’m fine with 5400 RPM except for gaming or video capture. This is a plus, for sure, but 7200RPM isn’t necessary at all. 5400 is just fine and cheaper. SATA is superfluous. All drives now are SATA and it means nothing to you.

4. 6-cell Lithium Ion Battery (not shown) – The more cells in a battery, the longer it lasts. This one is average, 8 is much better. Battery life is dependent upon the processor and how much power it uses (faster uses more), the hard drive (7200 RPM uses more than 5400 ROM) and the type of display the laptop uses.

5. 15.6 inch HD LED Display (1366×768) with anti-glare (not shown) – This is a decent display. LED means that the laptop uses much less power than a normal LCD screen. (That is offset by the 7200 RPM hard drive for some strange reason). HD is meaningless, pretty much. Everything retail now is HD. 1366/768 is the screen resolution. Images and text will look clear and crisp on this screen. Anti-glare is extremely important. You will probably be using this laptop outside sometimes. With anti-glare, you’ll be able to see everything without the blinding glare.

6. 8X DVD+-/-RW with double layer DVD+/-R write capability – Put simply, you can write DVDs or CDs with this laptop. You can watch DVDs, listen to CDs but you CAN’T watch or write Blu Ray disks.

TIP: Netbooks, the really small laptops, don’t come with an ‘optical’ (DVD or CD) drive. There are small external drives available for less than $40, often less than $30.

TIP: Don’t spend extra money on software, whether it is Microsoft, Norton, Symantec or McAfee. There are many free alternatives to anything that you can buy. Read my past posts about free software. There is always something free out there. (By free I mean free, not pirated.)

That’s a very long post but I hope you’ll find it helpful. There are many other things to think about when you’re looking for a new computer but this covers most of your important choices.

Thanks for reading! Comments are welcome. Follow me on Twitter: @_BrianMahoney