Category Archives: Video Conversion

VHS to DVD – A hands-free solution

VHS ruled the home entertainment world for about two decades, from around 1980 up till 2000 or so. The switch from analog tape to digital video discs (DVDs) happened rapidly. Unfortunately many of us were left with hundreds of hours of VHS tapes, usually sitting in boxes in storage.

Getting the information from those tapes used to be a very laborious process. The tapes are analog as we said earlier. Analog data can only be transferred in real time, there are no files that can be copied and pasted as there are with digital data.

We’ve written about VHS transfers before.  Here is a link to our original solution: Archive VHS Tapes  Unfortunately the process listed in that post is very hands-on. We’ve recently found a simpler, somewhat faster answer to the analog to digital problem. Yes, the process is still done in real-time but it’s pretty much hands-free.

The Toshiba DVR630: 
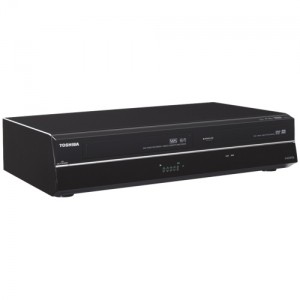
Photo of DVD630
This is the front view of the DVR630. Tape player/recorder on the left, DVD player/recorder on the right.

Priced around $200.00, the DVR630 is one of very few DVD recorders that has a VHS tape player built into it. Memorex has one also, we hear it’s the same unit as the Toshiba, and there may be others. We chose the Toshiba based on the name and the online reviews.

The beauty of this particular machine is that it has an HDMI out port. Why is that important? This means that you can hook it up to your new HDTV with only one cable. The VHS image you’ll see on your screen certainly isn’t High Def but it’s as good as you can possibly get plus there’s only one cable to hook up. Most HDTVs have more than one HDMI port. If yours doesn’t have enough, you can buy an HDMI splitter for less than ten dollars. Here are the ports on the back:
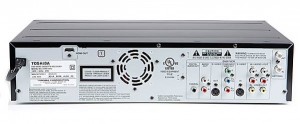
Photo of back of DVR630
The HDMI out is on the upper left side. Quick and easy; sound and picture all in one cable.

Transferring VHS tapes is a bit confusing to set up but once you’ve done it once, it’s basically a two second job the next time. Here are some of the steps you need to perform:

1. VHS to DVD or DVD to VHS? Yes, you can go both ways but VHS to DVD is the norm.

2. Quality of the recording. You can jam 8 hours of VHS tape on a DVD or just 2. Obviously the quality is better on the latter setting.

3. Once the recording has been completed, you must finalize the DVD before you can view it on another DVD player or on your computer. That process takes less than two minutes.

TIP: To save yourself time, record all of your tapes at the lowest quality, highest time per DVD setting. Why? Because once you get the data off of the VHS tape, you can scan it quickly on your computer or standalone DVD player. If you find something that you’d like to save in higher quality, you can re-record it later. Running through a VHS tape from start to finish takes a long time, even on fast-forward. The process is much faster on a DVD.

If you have a large number of VHS tapes, the whole recording process will take a month or more, broken up into six hour stretches. The beauty of the DVR630, aside from its HDMI out port, is that it stops recording once it has sensed that there is no image data for three seconds. If the VHS tape runs out, the DVD recording stops. All you have to do then is to finalize the DVD, switch the VHS tape to a new and insert a blank DVD and start over again. Let it run overnight, you can’t hurt anything by doing so.

That’s it for today, thanks for reading! Comments and questions are welcome but  Likes on our Facebook page get immediate attention.  Here’s the link: Computers Made Simple on Facebook 


Add Videos to Your Mobile Device

Sometimes, music just doesn’t cut it, right? You’re on a bus or subway train, maybe sitting on an airplane waiting for takeoff or in a boarding lounge waiting for your plane to load; wouldn’t it be cool to watch a movie while you wait? Virtually every mobile device out there will play both audio and video files. Today’s post will tell you how to get your favorite Youtube videos from your computer to your mobile device.

Tip: This post is NOT for Apple users. iTunes handles all transfers, video and audio, from your computer to any Apple device. Get to know iTunes and let it do the work for you. For the rest of the world:

‘Download Flash and Video’ is the answer! 

We’ve written about Download Flash and Video before. Check out this post before you go any further: Download Youtube Videos Revisited

DFV is a plugin or extension for Mozilla Firefox. While we normally recommend Google Chrome, we think Firefox is pretty good too, although we only use it when downloading videos. Follow the installation process described in the  post above. Once everything is ready and you’ve found something on Youtube that you want to add to your mobile device, follow these steps:

1. Get the video page loaded and the video playing.

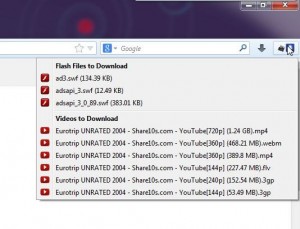
2. Up on the top right, look for the blue and white icon of an arrow pointing down. Here’s what you will see when you click it:

Photo of Download Flash and Video
Lots of choices here. Which is the right one?


Ignore the flash files at the top. Instead, look at the row of  ‘Videos to Download’. (We’ve chosen Eurotrip for this lesson. It’s a bit trashy at the start but, overall, it’s a very funny film. If you missed Matt Damon as a rocker, it’s worth seeing just for that.) Somewhere in that list is the file you need but, you ask, which one?

You have two variables here. The first is the question of how much storage you have on your device. The second is almost as important, that being the size of your display. Although it might not seem obvious to you, the various files listed in the photo above are arranged by size AND screen resolution. Check out the last one, for instance.

We can see that the file size is the smallest at 53.49 megabytes. The resolution is also the lowest, that being 144p. Ignore what those numbers mean, just remember that the lowest resolution is meant for smaller screens. There are two 3gp files but each has a different file size and a different resolution. Confused? Don’t be. Think of the display on your mobile device. Is it tiny? Medium? Large? If you’re running around with an old Nokia, for instance, either one of the 3gp files might be fine for you. The 144p file would look pretty crappy on our Nexus 4 but it would be perfectly fine on one of our tiny video players, the ones with the 1.5″ screens.

Up at the top, check out the very large mp4 file. That is large enough to play on an HDTV, certainly on any computer monitor but it’s overkill for a mobile device. It is 720p, meant for large screen HDTVs. For our Nexus 4, we’d look at the smaller, 360p mp4 file.

What should you do? Download them all. Find a video that you want to use and download each version of it. Now, DFV seems quite slow, to be honest. We downloaded four versions of Eurotrip and it took a while. Be patient, it’s worth it. Once we got the videos into our Download folder, here’s what we saw:

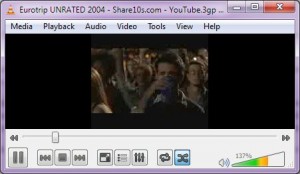
Photo of Download Flash and Video 144p
This is the 144p 3gp file.


This is the worst quality available but on a small screen, it’s perfect. In this photo the image looks grainy but when it was playing on the computer, it looked great…tiny but great.

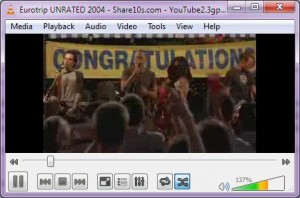
Download Flash and Video 244p
This is the 244p 3gp file.


244p 3gp here. See how the image is bigger in the player? The image is clearer, too.

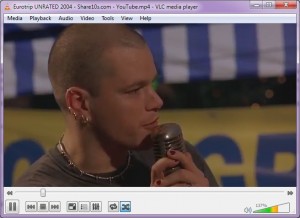
photo of Download Flash and Video 360p mp4
This is the 360p mp4 file.


Much finer image, much larger in the video player and a substantially larger file. If you have the storage room, this is the one to go for but only if you have a decently large screen. For the average cell phone, specially those with the keyboard on the bottom half below the display, the 3gp files are fine.

Figure out how much storage room you have then add one or more of the downloaded video files to your device and see which one works best. That way you’ll know the size and type of file to concentrate on. If you’re using a large tablet and have scads of room, let’s say 32 gigabytes or more, the 389.8 MB mp4 file would be an excellent choice. Smaller screens and smaller storage limit your choices to the bottom four video types.

TIP: Ignore the ‘webm’ file for most or all mobile devices. While its quality is equal to the large mp4 at the top, we doubt that any mobile device would have the ability to play it. It’s a good format but only for computers at this point.

Youtube has millions of videos at your fingertips. Download them using this process and you won’t ever be bored again.

Thanks for reading!

Don’t forget to Like us on Facebook. Computers Made Simple on Facebook


PAL to AVI – convert your PAL DVDs to an AVI file


This weekend, a friend came over with a DVD that wouldn’t work on her DVD player.  Turns out that the DVD was from England and was in the PAL format. Not that this matters too much to you but a good portion of the world has a different broadcast system for their TVs. Our native North American system is known as NTSC while their system is known as PAL. We’re not talking about regions here, as in DVDs that only play in one region even if that region is PAL or NTSC. The regions have to do with DRM (digital rights management), not transmission systems. Regardless of the reason, her PAL DVD wouldn’t work on any North American NTSC system. How would we fix that?

After hours of trying to re-author the DVD using some very arcane and complicated software, I decided to take the simple route. Since the DVD is essentially a group of video files, I decided to convert those files to AVI files using Format Factory. We’ve written about Format Factory before and it’s one of our go-to programs for converting video or audio files from one format to another. Read our posts here: Format Factory  and here: Format Factory

Almost every DVD player out there will play AVI files. You can also pop those files onto a flash drive and connect it directly to some TVs and play the files from there. Here’s how we converted the PAL DVD to a group of AVI files :

1. Download Format Factory here: http://www.formatoz.com/  and install it. Watch out for some of these downloads since they will want to change your search options or home pages. Don’t just assume things when you are clicking your way through the screens. Read them one by one before you click OK and make sure you uncheck anything that seems fishy.

TIP: A PAL DVD can be read by your computer but not played on your TV. The TV screen is different from your computer monitor screen, to put it simply.

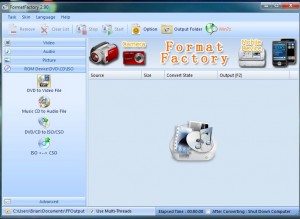
2. Make sure the PAL DVD you want to convert is in your DVD drive on your computer.  Start Format Factory. This is the opening screen:

The first Format Factory menu
You're looking for the DVD to Video file button.

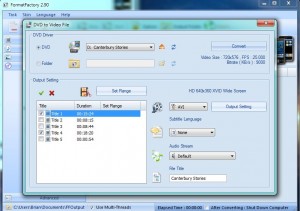
3. Click the DVD to Video File button and the following screen will pop up:

Format Factory DVD to Video File menu
If the PAL DVD is in your optical drive, your screen will be much like this.

This menu looks complicated but it isn’t. On the top you’ve got your DVD drive with the title of the DVD shown. Below that are the various VOB files that make up the DVD with two files already checked. I wanted to convert all of the files so I had to check Title 2, 3 and 5. On the right side, I have changed the output to AVI and I want the files to be converted to XVID 640×360 Wide Screen HD. The default setting is MP4 but that resulted in pretty crappy, but watchable, video files. This particular setting works perfectly. There are no subtitles offered on the DVD but you can choose your own setting here. Leave the Audio Stream at default and it should be fine. Change the file titles if you want.

4. Once you’ve set all the parameters, click Convert and go and have lunch. Depending on the speed of your computer, conversion could take hours. We used a reasonably fast computer with 8 gigs of RAM and the conversion of this short DVD took about half an hour.

5. Format Factory will beep when the files are all converted. Look for the files in My Documents in the folder named ‘Format Factory Output’, unless you have created your own directory already.

6. Once you have checked that the files work on your computer, burn them to a fresh DVD or pop them onto a flash drive and try them on your DVD/TV setup. They should work perfectly.

TIP: A DVD is made up of many VOB files, some small, some large. The main movie, obviously, is simply the largest VOB file but you might want to convert all the VOBs anyway. You can then sort them out later on and delete them if they aren’t worth saving.

This method of converting PAL DVDs to watchable AVI files is much simpler than any PAL to NTSC method that I’ve discovered. It’s also completely free. We don’t buy software at Computers Made Simple and, while there are several pay solutions for this problem, we decided to look for a free solution. Thanks for Format Factory, we were able to solve the PAL DVD problem quite easily. We hope it works for you.

Thanks for reading!