Category Archives: Uncategorized

Speed up Windows – Part 2


In my last post we found out how to disable apps that were running in the background, potentially slowing your computer down. This time we’ll take a look at turning off a Windows feature that seems helpful but really isn’t.

Windows Search used to be speedy, light on your resources and powerful at the same time. That’s all changed. These days, Windows Search is slow, confusing and a resource hog. Here’s how to switch off the indexing that Windows uses to keep track of everything on your computer. This time-consuming indexing runs behind the scenes and slows your computer down.

1. Click Start then Computer or My Computer (depends on the version of Windows you are using.)

The computer menu
The My Computer or Computer display menu.

2. Right click your C: drive and choose Properties. You have to do this for all the drives on your computer except your DVD/CD drive. This is what you’ll see:

C drive properties menu
A pie chart showing C: drive

3. Uncheck the box beside ‘Allow files on this drive to have contents indexed in addition to file properties’.

4. Click OK then close the My Computer menu.

That’s it. Windows Search will still work but, of course, the search itself will be slower. What’s the alternative to this? Well, Google has a app named Google Desktop  that you can download and install in a matter of minutes. The Google Desktop will do the same thing as Windows Search, it has to index your files in order to find something when you want. However, this indexing is substantially faster and less intrusive than Windows Search. OK, that may be subjective but the search results are much better.

When Google Desktop searches your computer, it’s just as intuitive as the Google Internet search that we’re all used to. It even opens up using the same interface as Google Internet Search. I used to love Windows Search, I really did. It was fast and worked well. Now, I’m totally behind Google Desktop as a faster and better alternative. Try it! You’ll like it!

Thanks for reading. Comments are welcome. Follow me on Twitter : @_BrianMahoney


Speed Up Your Computer – use msconfig to trim your start list


If you’ve just bought a new computer or you’ve loaded a ton of new software on your old one, it’s most likely not running as fast as it could. Sure, you might have lots of RAM (memory) and the latest, greatest version of Windows but your computer is still being choked by software that starts when your computer starts…but doesn’t have to.

Additionally, malware or spyware can weasel its way into your system and clog it up. Do you really need all of those toolbars? Does your DVD burning software really have to run the whole time you are using your computer? Here’s how to trim the fat:

1. Click Start. In the search menu there, type in msconfig , just like that with nothing else like commas or capitals.

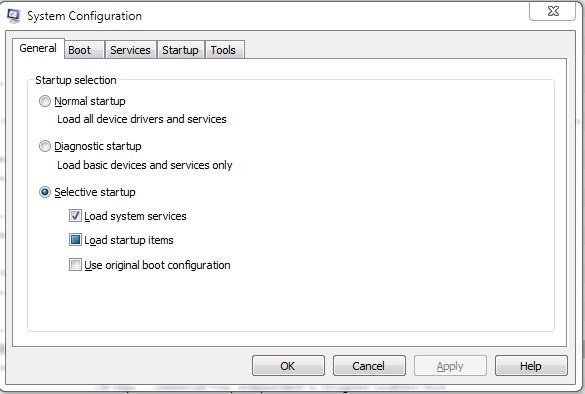
2. Wait for a bit and your System Configuration menu will pop up. It looks like this:

msconfig menu
This is the basic msconfig menu.

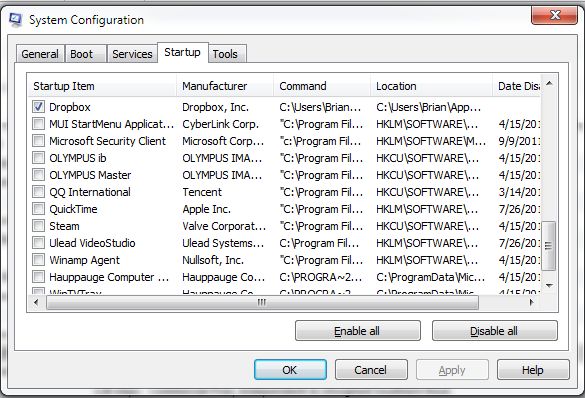
3. The tab we are interested in today is the ‘Startup’ tab, fourth from the left. Click it. This is what should see now:

msconfig startup menu
This is the msconfig startup menu.

4. This is a screen capture of my startup menu. I have scrolled down to show you the things that I have turned off. When I turn these things off, Winamp Agent for instance, this doesn’t mean that this program won’t run. All it means is that it won’t run ALL the time. I can always start the program manually, wait for a second or two, and use it. It doesn’t have to be running in the background. There are many things that you want to run all the time, your anti-virus software for instance.

5. Before you change anything here, check to see what it is that you are disabling. Your computer will still run if you turn everything off. It just won’t run very well. Your virus protection probably won’t work, your scanner won’t start, maybe your mouse won’t have all of its functions…things like that. Do your best to figure out what each one does. Most are self-explanatory but some are not. Realtek Audio Manager might seem safe to turn off but that’s my onboard sound system. I like my tunes so I can’t turn that off.

6. If you have malware or spyware, most likely it is on this list somewhere. Before you change anything here, download Malware Bytes and run it. It’s free, quick and will tell you if you have any bad stuff that is slowing down your surfing. It will get rid of anything that shouldn’t be there.

7. If you see something here that you don’t recognize, google it and see what comes up. Usually the site that tells you what it is will also tell you if you need to have it running. There are many very helpful forums around the Internet (Microsoft runs a few) that will give you an answer on anything you ask. If you decide you don’t need it to run all the time, simply uncheck the box to the left of it.

8. You can use trial and error here, too. Turn off a few things, usually near the bottom, and see if your computer runs faster. I can almost guarantee that if you’ve noticed things running slowly, this is the place to fix it. Get familiar with this little menu and you’ll have a faster, more responsive computer. It probably won’t crash as much either. Sometimes there are conflicts with programs that are running at the same time. If you stop a certain program from loading, you might find that your ‘BSODs’ (Blue Screen of Death) happen less often.

Good luck! You can’t really screw anything up here so don’t worry. You can disable everything here and then start them one by one if you want. Modern computers have lots of ram but if you’re saddled with an older one with less ram, this is a good place to start if you’re looking to speed it up.

Thanks for reading! Comments are welcome. Follow me on Twitter: @_BrianMahoney 


How to save a page full of photos instantly – no need to right click each image


If you like to share images in Facebook and other social media sites, you are probably sick of right clicking a photo in order to save it. If a web page has many images on it, it takes a lot of time to save each one individually. Here’s how you can do the same thing in two clicks.

1. Let the page load completely. Depending on the number of pictures on the page and your Internet connection speed, some pages might take a long time to load. Scroll down to the bottom of the page and make sure that all of the images are loaded.

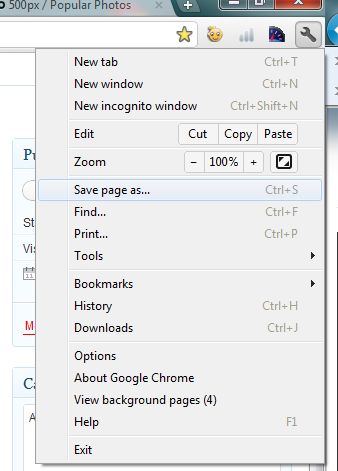
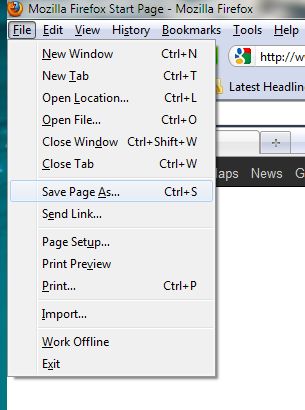
2. Depending on your browser, click somewhere up on the top right where you see a wrench (Chrome) or a gear (Explorer) or File (top left in Firefox) and choose ‘Save page as….’.  At that point, make sure you select ‘Web Page, complete’. Here are screen captures of each of the three main browsers:

the save page menu in Explorer
Top right in Explorer, click the gear and save as a complete web page.
menu in Chrome
Wrench top right, click Save Page As
Menu for Firefox
Look for File on the top left then select 'save as'

3. Your browser will then save the web page for you, usually in your Downloads folder.

4. For each web page saved, there will be two parts. One part is the basic html code that contains the skeleton of the page while the other part is a folder that contains the java, the css information and, best of all, the photos that you wanted to save in the first place.

5. Once you find the folder you can easily select the photos that you want to use or share and get rid of the rest. TIP:  The two parts of the web page are locked together in Windows. If you delete the skeleton icon (it will be the icon of whatever program is your default browser), then the folder with the pics in it will be deleted also. Make sure you do something with the photos that you want BEFORE you delete anything.

6. Unfortunately, not every web pages uses this format for their images. Some use a java app to feed the images to the page. When you save the complete page, you get the java code but not the photos. At that point you have to save the images one by one or do a screen capture and then crop the image to save the photo that you want. I’ve described this in an earlier post.

That’s it! Fast and easy and a great way to save whole web pages for future reference or sharing.

Thanks for reading! Comments are welcome. Follow me on Twitter :   @_BrianMahoney


Dropbox – 6 reasons why you should be using it now.


Dropbox has been around for a while and I’ve talked about it in a previous post. Basically, it’s a folder ‘in the cloud’ where you put files in order to access them from anywhere on the Internet. The files in your Dropbox are also on your computer, too. You don’t need the Internet to access them, you just need the Internet to synch the files on every computer you use.

Dropbox is free, at least the 2 gigabyte version is, and secure. Larger storage options are available at extra cost.

Here are six reasons that you should be using Dropbox if you aren’t already:

1. Security against your own mistakes. Dropbox stores old versions of your files on its servers. If you accidentally delete part of a document and then accidentally save it (don’t roll your eyes! It happens! hahaha), you can head to your online Dropbox vault and retrieve an old, pre-screwup version of your document. I keep copies of all of my writing in my Dropbox, just in case.

2. Security against prying eyes on your own computer. If you have sensitive files on the computer that you share with your family, lock your Dropbox and your files are safe. Hey, I’m not saying you do have, ahem, those kind of files but most of us do.

3. While you should be doing backups on a regular basis, using your Dropbox for your documents, essays, or family photos means that you have them saved somewhere other than on one of your computers. If the hard drives fails, at least you’ve got some of your irreplaceable files safe and sound in your Dropbox.

4. Dropbox is far more secure and easier to access than a flash drive. Sure, you can buy flash drives that are secure, encrypted, fireproof, waterproof or bomb-proof but are they loss-proof? If your Dropbox account is secured with a good password that you change at frequent intervals, it’s hard to ignore the fact that it’s better than a flashdrive for your files.

5. You can travel anywhere in the world and access Dropbox. You don’t have to carry anything with you, not even your computer. No flash drives, no discs, no nothing. Two gigs of storage for free that you can get at if you have an Internet connection.

6. Share files with people all over the world using your Dropbox. Details are in the Dropbox setup but, basically, you create a public folder and lock it with a password then send a link via email to one or more people. They can then access whatever files are in that public folder, be it a video, music files or simple documents.

If you’re not using Dropbox, get off your butt and sign up now. I’m not affiliated with Dropbox in any way. I just like the concept and couldn’t do the things I do without it.

Thanks for reading. Comments, screams, boos, cheers are welcome. Follow me on Twitter : @_BrianMahoney


Hotmail Spam – how to block an IP address


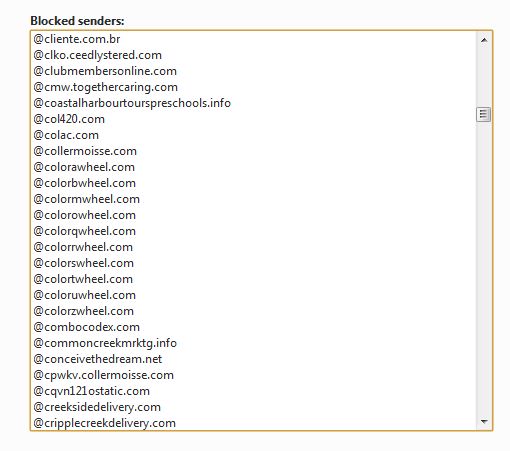
Bugged by spam in your hotmail account? Me too. I’ve written about spam in Hotmail before and described how to ban email accounts from sending spam to you. Spammers, of course, have many tricks up their sleeves and often the email address you are banning isn’t really the address that sent the email. Confusing? Here’s and example for you:

list of blocked spammers
See how there is a list of domains that are similar?

I would guess that all of the ‘color’ domains originate at the same IP address. Let’s find the IP address and block it.

1. Go to your junk mail folder. Find any piece of junk mail, right click it and choose ‘View message source’.

2. A new tab will open in your browser which will look like a bunch of gibberish. Near the top, you’ll see:

header of junk email
This is part of the email message source. Look for the IP address.

3. Find the (sender IP is xxx.xxx.xx.xx) section. The number may not always have two sets of two digits at the end but it will ALWAYS have four sets of numbers and ALWAYS have two sets of three numbers at the start. Each set will ALWAYS be separated by a period.

3. Highlight that number and copy it, being careful not to include any extra spaces at the start or at the end.

4. Go back to your junk mail folder and put the check mark beside the junk email you’ve just found. Up at the top click Sweep and then choose Block From. After a second or two, Hotmail will tell you that this email address had been blocked.

5. Click on ‘Manage blocked senders list’.  This screen will open:

blocked sender slot
Paste the IP address you have just copied into this slot.

6. Paste the IP address from the message source tab into this slot and choose ‘Add to list’.

That’s it! You’ve blocked that IP address completely. You will not receive any email at all from this address. Pat yourself on the back.

TIP: You often receive email from Hotmail, Yahoo and other domains so make sure you don’t block those IP addresses or you won’t receive any email from those domains. Block the email address but not the domain: Block him@hotmail.com but NOT @hotmail.com).

Questions or comments are welcome. Follow me on Twitter: @_BrianMahoney

Thanks for reading.