Category Archives: Troubleshooting

Computer Troubleshooting – fixing random problems

We ran into a problem this weekend with one of our laptops. For some reason, still undefined, we could connect to our central router’s WiFi but could not connect to the Internet. We had good signal strength but no go on the Internet connection. When we’re faced with this kind of situation, we try to look at the problem systematically, running through a series of troubleshooting steps to get to the root of the problem.  Even though we didn’t sort out the trouble, here are some of the steps we went through. If you’re in the same situation, you can try to use a few of these DIY (do it yourself) strategies.

1. We tried to use Windows to sort out the connection problem but, as usual, the Windows troubleshooter was useless. It’s nice that Microsoft tries to help but in all of our years of using Windows, we can’t remember when their troubleshooter worked. You’re welcome to try, but our success rate is dismal, to say the least.

2. Rebooting (restarting) a computer or mobile device is the first thing you should do. Save your work, bookmark any important sites you’re on and restart. Signing out won’t work as well as completely shutting down and starting everything up again.

2. In the case of our WiFi problem, we weren’t sure if it was software or hardware related. Our next step was to uninstall the Broadcom WiFi adapter. While this may sound extreme, it’s not. The adapter is a piece of hardware, yes, but we didn’t actually remove it from the laptop. We simply went into our device manager and uninstalled it from there. Next we rebooted the laptop and, of course, Windows found the adapter and reinstalled it. Why did we do this? Sometimes a driver, the thing that makes a piece of hardware work, gets corrupted. Removing a device then rebooting your computer can sometimes bring it back to life. Windows checks the driver and if it’s corrupted or old, finds a new one or asks you to find one for it.
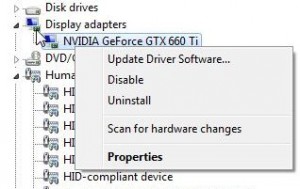
Photo of Disable or uninstall hardware
This is an example of the ‘uninstall’ screen in Control Panel then Device Manager.

3. Since most laptops can use a wired connection as well as WiFi, we took the laptop down the hall and connected it with an Ethernet cable to a spare port on the router. This bypassed the WiFi connection and we were able to connect to the Internet immediately. Because of this, we knew that our problem was not a virus. On to step 4 to read why.

4. Sometimes a virus or malware can interfere with your computer’s stability. If you’ve downloaded music or a new piece of software from an unfamiliar site, there is a chance that a virus has hijacked your computer. If you do not do a virus scan on a regular basis, and you should, make sure you do one as soon as your computer starts to ‘act’ differently. Here’s a link to a good and reliable online anti-virus scan: Free Online Virus Scan  We’ve used these guys for years when we have reason to distrust our own anti-virus software.
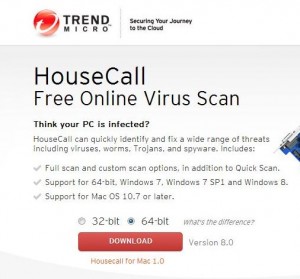
Photo of Trend Micro House Call
This asks you to download a small file with allows Trend Micro to scan your computer online.

5. Windows’ computers have what is called a ‘safe mode’. If you are having problems, try to reboot your computer into this mode and see if you can duplicate the problem there. There are two ways to get into safe mode, the easiest is to tap the F8 key gently a few times just as your computer is restarting, after you see the first letters on your screen.
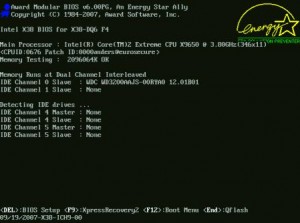
Photo of DOS Screen
Tap your F8 key when you see the first screen like this.

Choose Safe Mode or Safe Mode with Networking (as we did) if you want to check your Internet connection:
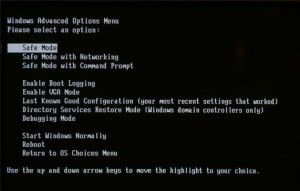
Photo of Safe Mode screen
Use your up and down keys to choose, then hit Enter.

When you are in Safe Mode, everything will look quite different. Manage as best you can to check the problem, free from the many other programs that start when you run your computer. If you find you are having a problem running your anti-virus software or deleting some software, try doing it while you are in safe mode. Some programs defend themselves from deletion but when you run safe mode, they cannot run and cannot stop themselves from being deleted.

Somehow we were able to reconnect to the Internet but we’re not sure why we couldn’t in the first place. Maybe one of these steps solved the problem, who knows? Whenever we encounter a problem that isn’t immediately obvious, we run through these steps one by one until we sort things out. Hopefully, you’ll be able to do the same.

Thanks for reading!


Forget Google Chrome – at least for Twitter


I’ve outlined my problems with Chrome before. I’m sick of the crashing and, for now, I’ve moved back to Internet Explorer which works fine with Twitter. Seesmic Desktop works well, too. If you’re having problems with Google Chrome crashing, try one of these alternatives.

There are quite a few desktop apps for Twitter. Personally, I need one that allows multiple columns. I’ve got all of the people that I follow divided up into lists. I’ve written about how to create lists here: How to create lists on Twitter . Creating a list is much the same as using a blocker for certain people who you might want to follow but don’t want to read each and every tweet. Not that they are spammers but maybe they are friends who tweet incessantly but really have nothing to say. You know the type. Create a separate list for them, maybe name it ‘Time Wasters’, then check it every now and then.

Keep your most important lists on your timeline so you can check them frequently. On Seesmic you can keep five lists open, at least you can on my 23″ monitor, and that’s sufficient for me. Seesmic is available here: https://seesmic.com/seesmic-social/desktop/ I am not using an iPhone or any of the ‘pads’ but Seesmic offers software apps for everything and they’re worth checking out. I’m happy with my Seesmic Desktop, however, and I’ll stick with it for now. It’s not the normal Twitter interface but it’s fine. As I say, if you have your ‘followings’ divided into lists, you’ll be happy with how things look.

Alternatively, if you want to hide tweets in your main timeline, download Slipstream and start to hide some tweets. If you get a string of tweets about some random subject that doesn’t interest you, Slipstream will hide them. Alternatively, Slipstream will hide every tweet from any user you select. Download Slipstream here: http://slipstre.am/ . Right now, Slipstream is only available for Chrome (Booo!) and Safari. I’d suggest Safari, even though it’s an Apple product.

Happy Tweeting! Twitter is lots of fun plus it’s a great tool for keeping up with the world outside your own borders. Take Twitter with a grain of salt, however, since they DO CENSOR tweets when asked to by certain people. During an election, which is when Twitter is a very important tool (or used to be), Twitter will suspend accounts when asked by certain political heavies.

Lastly, the Twitter/Chrome crashing situation could be the result of a tiff between the two giant companies. Google may see Twitter as a threat to its own popularity on the web. What’s next? Facebook? Google has the ability to sabotage any website that it sees as competition. Google has already been accused of this devious practice by both Apple and Microsoft. Obviously, this is a case of the pot calling the kettle black, in both cases, since Apple and Microsoft have long been companies who have used dirty tricks to eliminate competition. It’s the American way, right? To hell with co-operation and mutual respect, let’s destroy anyone who dares to compete with us.

Thanks for reading. Comments are welcome.

What to do when Chrome crashes.


Google’s Chrome browser is getting more popular every year. It’s been my browser of choice since it came out. It’s fast, light and translates every page I throw at it. But it’s not perfect. If it was perfect, it wouldn’t crash, right?

Chrome is constantly updated, according to Google. If you are familiar with it, however, you’ll know that it sometimes freezes and then crashes. A little menu will come up and tell you that Google has crashed, that such and such a page or plugin is not responding. Should Chrome wait for it to get better or do you want to close the program? Believe me, it’s frustrating.

What to do about it? Google doesn’t seem to be able to come up with a solution. Believe me, I’ve tried to find an answer to this online. There are ample forum posts about it but no real answers that I could find. We all know that it has something to do with Flash but Chrome is updated on a continuous basis, isn’t it? Hell, you can’t even upgrade Flash using Chrome because every time you try, Chrome says that you’re using the most up-to-date version already. OK, if that’s the case, why the hell does it crash?

Here’s the solution that worked for me the last few times Chrome has crashed. Step by step, it’s pretty easy. Let’s say that it’s a fix, not a real solution. Google will still crash at some point but this is how you can get it working again for a few months.

1. Close Chrome.

2. Go to your Control Panel then to Programs then to Uninstall a program.

3. Look for Adobe Flash, highlight it and delete it. Make sure all of your browsers are closed. You’ll also have to close MSN, Yahoo and QQ, if you have them open.

4. Reboot your computer.

5. Open Internet Explorer or Firefox or Safari or Opera, any other browser BUT Chrome.

6. Head over to the Adobe site and download Flash. Here is the link: http://get.adobe.com/flashplayer/ 

7. Install the latest version, then close your current browser.

8. Start Chrome and surf away. Your days of frustration are over.

I don’t know why this solution works. It doesn’t make sense at all. Chrome won’t allow you to install Flash on its own but it seems to depend on the Flash version that is installed on your computer, even though it says you are using the most current version.

Whatever the reason, this works. Good luck!

Thanks for reading!

Lost Desktop Folder


I ran into this problem this morning. Somehow I had lost a folder on my desktop. Maybe Windows got confused. Maybe I had moved it off-screen. Maybe it was under another folder. Whatever the reason, I couldn’t get it back Here’s how I solved the problem.  (It’s so simple that you’ll kick yourself for not thinking of it. I know I did!)

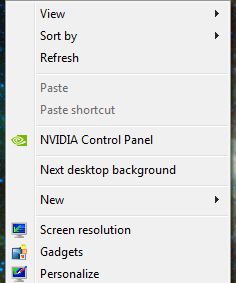
1. Right click your desktop. The following menu appears:

A Selection of Options for Your Desktop
Right click then choose 'Sort By'

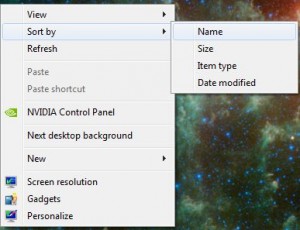
Once you see this menu, choose ‘Sort by’ and this next menu will come up:

Right Click the Desktop to Get This Menu
Choose any arrangement you want. They all work to recover the lost folder.

These are the choices to sort all of the items on your desktop. If you sort by type, everything will be lined up on the left side according to file type with folders at the upper left. Your missing folder will be among them…hopefully.

If the folder still isn’t there but you can see it in Windows Explorer, see if you can find out where it is by choosing ‘open file location’ in the right click menu. Then you can track it down. Good luck!

Thanks for reading.


Enable Your Microphone


If you have disabled your internal microphone on on your netbook or notebook, here’s how you can get it back. This post also shows the value of  Window’s right click menu system. Sometimes we forget how powerful it is.

I was making a video today and tried to use an external microphone instead of the internal one on my netbook. Well, the external one didn’t work but I had disabled the internal one, thinking it was causing some interference. Once I decided to use the internal one again, I had to search for a way to enable it again. Here’s how you do it:

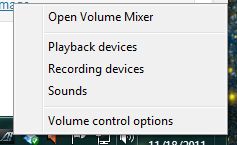
1. Right click the little speaker icon on the lower right of your taskbar. Choose ‘Recording devices’ as you see here:

Choose Recording Devices
Right click the speaker and choose Recording devices.

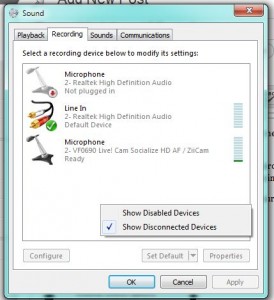
2. Once the recording device dialogue is up, right click anywhere in the blank space to get this menu:

Right click dialogue showing disconnected devices.
Right click in the open space and you'll see how to enable disconnected devices.

3. Once you get to this point, click ‘Show Disabled Devices’ and you will see a list of things that you may have disabled. Simply click ‘enable’ to get them back again.


This is a simple solution but it’s also something to keep in mind when you get lost in Windows. If what you want to see isn’t there in front of you or if you can’t seem to find something, try the right click menu to see what comes up. In this case, a simple right click solved what seemed to be a difficult problem.

Thanks for reading!