Category Archives: Strong Passwords

Stay Safe Online – Part 1

Just this morning we read that 100% of attacks on computers are criminal in nature. What does that mean? Simply that hackers aren’t out just to have fun, they are actively trying to steal your personal information. It’s not only personal computers that are under attack. Read this story about how a major Canadian bank was scammed out of $87,000.00: Bank of Montreal Gets Scammed  Once you read the story, you’ll see how all of this started. The customer’s email account, which had been hacked, was used to initiate the process.

We’ve written posts about how you can protect your email account(s). Here’s a link that shows some of them: Email Password Protection Make sure you read as much as you can about using a strong password as well as how to enable two-step authentication. For that matter, make sure you use multi-level authentication for virtually everything you do online. Most email providers as well as banks, social networks and financial institutions already require this. Make sure you take advantage of it.

Enough preamble, let’s get to a new type of scam that you might fall prey to. This involves Google Maps. Bear with us while we explain how it works:

1. If you run a business, you can put your location and business information right there on the Google map of your city, complete with your street address, your logo and your phone number. This is where the danger is, that phone number.

2. Hackers have found a way to install fake telephone numbers in Google Maps. Let’s say you’re looking for a bank branch in another city. It’s easy to check a bank’s name, just type it in and you’ll immediately see little flags all over the map. This works for anything, restaurants, hardware stores, police stations, etc. Here’s an example of the information you might see:

Photo of Bank Address from Google Map
There’s the bank’s number. Wait, is it a real number or a scammer’s number?


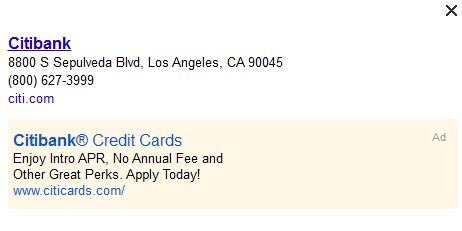
3. Before you call the Citibank number, it might be a good idea to check the number somewhere else, let’s say on Citibank’s real website. Use the map for the location but NOT for anything else. This doesn’t apply only to banks. Here’s a link to the story explains the exploit and how several people thought they were calling the FBI but were really calling a hacker, this time an honest one:

FBI and Secret Service Calls Intercepted by Google Maps Exploit

These are a few things to watch out for when you’re online. In our next post, we’ll get into a bit more depth on these scams and how you can protect yourself from them. Stay tuned. In the meantime, ask questions or comment below or on our Facebook page.  Here is the link to it:Computers Made Simple on Facebook.

Thanks for reading!

________________________________________________

Here’s a link that might help us if you are interested in hosting your own blog with Fatcow Hosting. We’ve signed up to become an affiliate and we make a bit of money if you sign up for hosting via this link: FatCow Hosting Thanks!


The Only Password You’ll Ever Need

Security experts tell us that we should have a different password for every account we use. That’s easier said than done, isn’t it?  If you’re tired of trying to remember obscure passwords for all of your online accounts, here’s a quick and easy way to streamline the process. There are a few ways that you could integrate this into your daily routine but that’s up to you. We’ll give you the basics, you adjust the parameters. Let’s get going:

First: 

Make a reasonably strong initial password. Here’s a link to our post on how to do exactly that: Passwords – How to create a good one. You can actually write the password down, that part won’t matter too much if someone else finds it.

System A: 

2. Let’s say that you’re going to sign in to your Outlook or email account. You would use the password you just created then add a letter that corresponds to the account you’re currently using. If your password is AbC54F (bad example, we know) then you would add an ‘o’ if you were using Outlook or a ‘g’ if you were signing in to Gmail. Whether you add the letter at the start or the end or the middle wouldn’t matter, as long as you remember where it goes, as in: oAbC54F or gAbC54F or AbC54Fo or AbC54Fg. Caps are possible too, of course.

You’re using a different password for each different account, that part satisfies the security experts, plus you’ve got only one thing to remember for each account, aside from the password itself. That one thing, the letter, is staring you right in the face so it’s a bit hard to forget. To make things a bit more complicated, you could add the same letter or the first two letters, one at the start and one at the end, to make your gmail password gAbC54Fm or oAbC54Fu for Outlook.

System B: 

While system A keeps the experts happy, you still have to remember the password as well as the lettering system you’ve set up. System B eliminates that problem but won’t satisfy the security peeps. For any account you use, add a punctuation mark or letter or number to one end of the password. In other words, you would enter the password, such as AbC54F, then put an ! at the start or a ? at the end, something like that. It doesn’t matter what you use, just remember where you put it. If you use the same punctuation mark, number or letter for every account, there’s virtually nothing to remember, except the initial password.

Photo of Mnemonic
Create your main password with mnemonics, then add something to it to keep it secure.

Mnemonics 

Use mnemonics to create the main password as described in our post, the link is at the top of the page. If that password is strong enough, and easy to remember, then you can use it for all of your online accounts using our ‘add something to it’ technique. Better yet, make up your own system using our basic instructions. A word, a year, something that is unique to you but, best of all, something that will be totally secure, even if someone gains access to your main password. Now you can forget obscure combinations of numbers and letters, leaving you more memory room for birthdays and anniversaries. How cool is that?

Thanks for reading. Like us on Facebook and you’ll make us very happy. Here’s the link: Computers Made Simple on Facebook  Thanks!

Encrypting Your Stuff – Create a TrueCrypt container for DropBox Part Two

This is the last post on encryption for a while. Today we’re going to show you how to lock up your DropBox storage folder, both online and on your computer.

(In case you don’t know about DropBox, you should really check it out. We’ve written several posts on this free and very cool service so search our site or head over here and sign up for your free 2 gigs of space. Here’s how DropBox works:  Post 1  Post 2   We’ve also written about how Dropbox can ‘save your bacon’. It really can! Here’s  a link to that post: How DropBox can Save Your Bacon)

Photo of Dropbox
DropBox – Make sure you encrypt your stuff.

In spite of what DropBox says about its encryption and the safety of your files in its Cloud, don’t believe it. At the drop of a hat, DropBox will open up your private files to anyone who asks. Anyone with a badge that is. What’s the problem with that? We’re all for law and order but we don’t think anyone should be able to go through your personal files without you knowing about it. Even if no one in authority has an interest in your stuff, the employees of DropBox can and do sift through your files on a regular basis. Microsoft does this too, this kind of thing is not limited to DropBox. Let’s just say that everyone does the same thing.

Once you’re clear on that, here’s how to keep your information private. You made an encrypted container right? We showed you how to do that in our last post. Here’s the link in case you missed it: Encrypting Your Stuff – Create a TrueCrypt container for DropBox. You should make more than one container. Instead of putting everything in one locked volume, consider making several. Let’s say you make one for passwords, one for personal photos, one for videos, one for financial information, etc. That way, you don’t have to upload a massive folder every time you do some work on the things in that folder. We’ll explain that next.

DropBox keeps your stuff online AND on your computer(s). The beauty of DropBox is that you can access your material from any computer anywhere in the world. Sometimes you will access your online folder using a browser. Other times, when you’re on one of your own computers, you will access your stuff in the folder that is on your hard drive. DropBox automatically syncs that folder every time you go online. If you access your folder in a browser, DropBox syncs any changes that you made with the folder that’s on all or any of your computers the next time you go online. You don’t have to worry about any of this, it’s all done automatically.

All you have to do is make sure that your encrypted containers/volumes/folders are in the DropBox folder on your computer. As soon as you put the encrypted volumes there, DropBox syncs everything automatically, any time there are changes. It really is that simple.

Knowing all of this, you’ll probably agree that this is the best way to hide your personal information online and on your own computer(s). If your house is broken into or if you lose your laptop, anyone can access that information if it’s not encrypted. Don’t wait for that to happen, do it now! Don’t keep the TrueCrypt password on your computers, that’s kind of obvious but we thought we’d mention it.

Photo of Encryption poster
Not just your email. Encrypt everything!

TIP: Use several small containers instead of one large one. That makes syncing much faster. As mentioned above, encrypt a few 10 MB containers and label them accordingly. If you do need a larger container for a video, for example, you probably won’t change it too much so syncing time won’t be an issue.

That’s it for now. If you have questions, comments, suggestions, please let us know.

Thanks for reading! Why not Like us on Facebook? Here’s the link: Computers Made Simple on Facebook 


Encrypting Your Stuff – Create a TrueCrypt container for DropBox

In our last post we talked about containers. If you think about a container as a large box that you put things in, you’ll have the right idea. Today, let’s lock that box up tight using TrueCrypt.

We’ve written about TrueCrypt before but it’s certainly worth another post. First, it’s free and, second, it’s the easiest encryption tool we’ve ever used. Download it here: TrueCrypt

Point A. TrueCrypt can be installed on your computer or you can run it from a folder on your desktop (or anywhere else for that matter). It’s self-contained, in other words, able to run without being installed on your computer.

Tip: You can carry a copy of TrueCrypt around on a flash drive with your container. You would use TrueCrypt to open the container, interact with the contents then lock it up again.

Point B. Basically, you will create a folder, name it, encrypt it and use a password to lock it. TrueCrypt is very simple to use but we’ll run through the steps using screen captures, just so you don’t screw things up. In reality, the only thing you have to worry about is forgetting your password. If you do, everything in the encrypted folder is lost for good. That’s how powerful TrueCrypt is.

Here we go:

1.

Photo of TrueCrypt Container   1
The TrueCrypt opening menu. You want to click on ‘Create Volume’.


2. TrueCrypt has a few options to choose from but we want to do the simplest set-up here.

Photo of TrueCrypt Container   2
Choose the first one, ‘Create an encrypted file container.’


3. Again, stick with the simplest volume (container):

Photo of TrueCrypt Container   3
We just want a Standard TrueCrypt volume here, nothing fancy.

4. The next menu is a bit confusing. Take a look:

Photo of TrueCrypt Container   4
This is the most confusing part. Read our description of this menu.

This menu seems to be asking you to choose a file/container, as if you have already created one. You haven’t created one yet but you will now. Don’t type anything in the space, just click the ‘Select File’ button. When the file menu opens, navigate to your Desktop. You can put the new file anywhere but we find it easier if it’s right in front of us, right there on our desktop. Read the warning! Do not choose an existing file. TrueCrypt will delete it and create a new file using the same name. Repeat, do NOT choose an existing file. Read step 5. 

5. After you have navigated to your desktop, your next job is to type a name  in the slot. You could name your new file Mary, Joe, Sparky, whatever you want. You can simply use a name or a number or an obscure combination of letters and numbers, it doesn’t matter. We would suggest, however, using a name and a file type. Why? We want a file type because someone who is looking for a hidden file would probably not look for a photo or video file, right? That’s why we named our file, ‘summertime.avi’. It’s not really an ‘avi’ file, though. It can’t be opened by any program other than TrueCrypt.

Photo of TrueCrypt Container   5
We chose to use ‘avi’ as the file type but you can use .txt or .docx or .dll, whatever.

5. Once you click Save, TrueCrypt knows that the file it creates will be named, in our case, summertime.avi. Next, TrueCrypt will ask you what kind of encryption algorithm you want to use. Go with the defaults here unless you know what you’re doing.

Photo of TrueCrypt Container   6
Go with the flow, use the default settings here.

6. How big should your container be? Only you know that. For our example, we set it to 1 gigabyte in size.

Photo of TrueCrypt Container   7
Don’t make it too small, use a decent size.

7. Next comes the password. Use a good one. Make sure you don’t forget it. Read the tips that TrueCrypt gives here. You can always change the password later on, no worries.

Photo of TrueCrypt Container   8
A good password is vital.

8. If your password is too short, TrueCrypt warns you about it.

Photo of TrueCrypt Container   9
Danger Will Robinson!

9. Now comes the fun part. You’ll never see this anywhere else. You are now creating the encryption key as you move your mouse over this menu box. Take your time and do what the instructions tell you. Once you’re bored of darting back and forth, click Format and TrueCrypt will create the volume/container for you.

Photo of TrueCrypt menu
Move your mouse up and down, around and around, back and forth.

10. This is what you should see next:

Photo of TrueCrypt Container   10
Success! If you don’t see this, you screwed up somewhere but we think you’ll be fine.

11. OK, you’ve created the container. It’s sitting on your desktop waiting to be used. How do you open it?

Photo of TrueCrypt Container   11
There is our ‘summertime.avi’ file on the desktop.

Well, you won’t open that file with anything but TrueCrypt.

12. Using the same technique as before, navigate to the file on your desktop. What you want to do now is to tell TrueCrypt to ‘mount’ the container you just created. (Container, volume, file, all the same thing.)

Photo of TrueCrypt Container   12
When you get to the file, click Mount to open it.

13. TrueCrypt will ask for your password. Again, don’t forget it.

Photo of TrueCrypt Container   13
Don’t ‘Cache passwords and keyfiles in memory’ OK?

14. Click OK and the file is shown in the TrueCrypt window:


Photo of TrueCrypt Container   14
There is ‘summertime’avi’ waiting to be opened. Double click on it now.

15. You’ve managed to create an encrypted container that is locked with a strong password. Now it’s time to fill it with your stuff:

Photo of TrueCrypt Container   15
Drag and drop files into this folder/container/volume up to the limit of room it has in it.

16. When you have finished adding files, make sure you click Dismount All before  you close TrueCrypt. You mount the volume, enter the password, add or look at the files in it, then close the folder then dismount it in TrueCrypt. Don’t forget the last part.


This is a long post, next time we’ll explain the DropBox part of it. Thanks for sticking with us so far!


Encrypting Your Stuff – Create Very Strong Passwords

There’s no sense in encrypting your personal files and folders if you don’t secure them with a strong password. Today, we’re going to show you how to do just that. You’ll create an easy to remember password that will lock your material tighter than Fort Knox.

1. There are some prerequisites to this course. In order to create this special password, you have to use a number pad, either the one on the right side of your full-size keyboard or the numbers you can access using the FN key on a laptop, for instance. Yes, there are numbers across the top of every keyboard but those are not the ones we want to use here. If you always use a full-size keyboard, make sure the NumLock key is pressed down. If not, figure out how to use the ‘other’ numbers, usually on the top of certain keys, like this:

Photo of Character Map Passwords   1
See the small numbers on top of some keys, even on top of number keys?

On this keyboard, you would press the FN key and the J or K or L key, etc. The normal number keys on the top row are not what you would use, except for 7, 8 and 9 with the FN key.

2. Ok, once you’re clear on that, let’s bring out the Character Map. Click on start, down on the bottom left of your taskbar, then type ‘charmap’ into the slot. Charmap.exe should show up but, if it doesn’t, type charmap.exe and press enter.

Photo of Character Map Passwords   2
It’s up at the top there, but you may have to type the full charmap.exe.


3. Welcome to Character Map! Here’s what you should see when you hit Enter:

Photo of Character Map Passwords   3
This is known as Character Map.

With this handy part of Windows, you can pretty much type any letter in just about any language. Symbols, archaic letters, they’re all here.

4. The default typeface for us is Arial. Your default typeface may be different. Here are some of our choices:

Photo of Character Map Passwords   3
Lots of choices here but make sure you remember which one you choose.

Whichever one you choose to create your password, make sure you remember it. Each selection here has a completely different set of characters. You can make a password out of any of them but you must remember which typeface you chose.

5. Once you make a selection, click on one of the letters/symbols. This is an example:

Photo of Character Map Passwords   5
This is an O, sort of, with two dots on top. See the keystroke on the bottom right?

This letter, according to Character Map is ‘U+OOD6: Latin Capital Letter O with Diaeresis’. Phew! Forget that, it’s not important. What is important are the words on the bottom right corner: Keystroke: Alt+0214.

6. Open Notepad. Use Notepad not Word or Wordpad. Notepad doesn’t mess with letters, it just shows what you type, nothing else. Once Notepad is open, Press the Alt key down and keep it down. On your number pad, type 0124 then let up on the Alt key. Like magic, this Ö appears. Practice in Notepad until you get it right.

Note: Not every letter or symbol has an ‘alt+number’ shortcut. Obviously you would choose ones with a shortcut, otherwise you have to copy and paste the symbol which wouldn’t be as easy. What we want here is to be able to type the symbol/letter without opening Character Map, right?

7. Now it’s time to play a little memory game. You can do this a few ways but here’s a suggestion. Look for a symbol that has a familiar number shortcut. In our example above, the shortcut is Alt+0214. Maybe 0214 are the last four digits of your phone number. Get it? Look for a combination that rings a bell and is something you can never forget; your age, your address, your shoe size, whatever. Once you have that symbol, you’re on your way to a very secure password.

8. The hard part is done. You have a symbol that pretty much locks up your password from anyone who doesn’t know your secret. You could still use something simple for the rest of the password but once you insert that symbol, it is very, very secure.

9. Here’s an example of an unbreakable password:     !pass0214ÖBod

For fun, we’ve put both the typeface we used, Bodoni, and the number you have to use with the Alt key to create the special character, Ö.

These are the basics and we’re sure you can create very strong passwords using this technique. Have fun with this and make sure you comment if you have questions about this.

TIP: Character Map is for reference only. You only need it to find the character you want to use and the numbers that create it with the Alt key. Character Map does not have to be open when you are typing the character.


Thanks for reading!