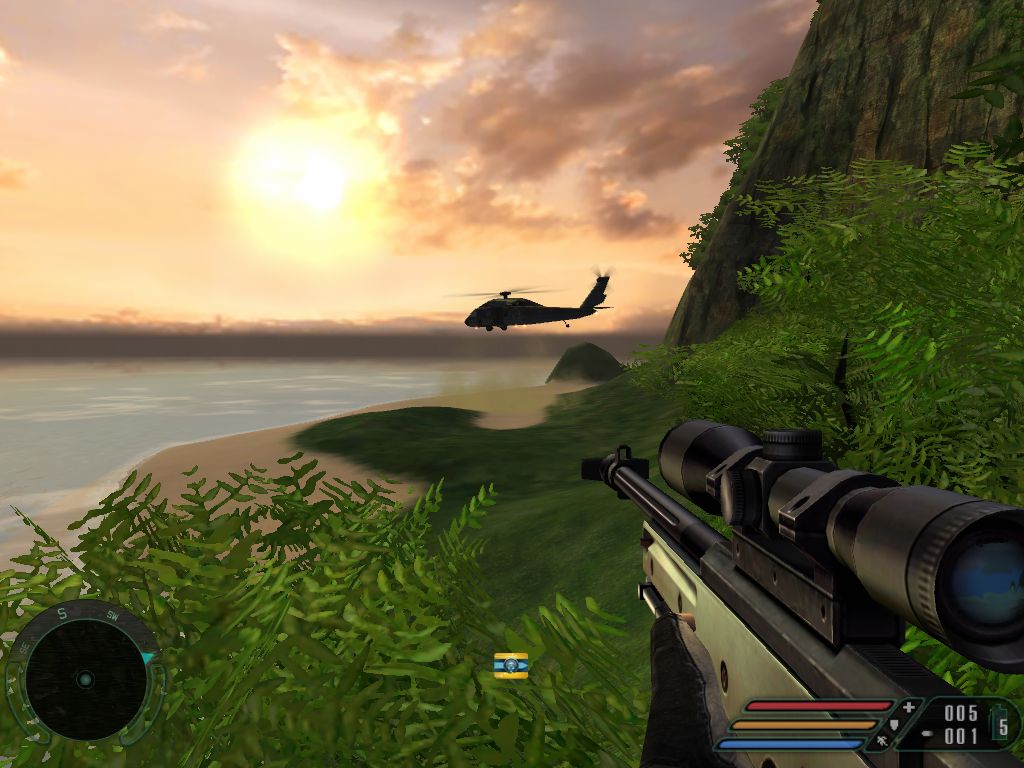
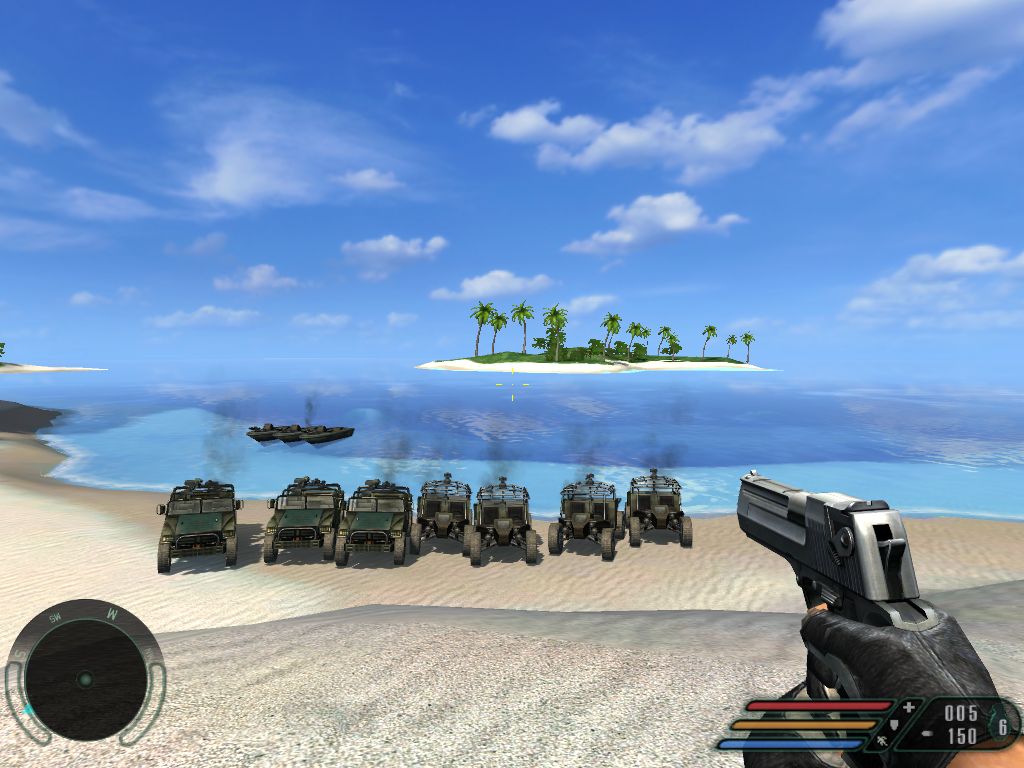
Part of the fun of playing a video game on a PC is sharing in-game photos with friends. Until FRAPS came along, the process was quite complicated. With FRAPS, capturing a photo while playing a game is as easy as a keystroke. FRAPS isn’t new, it’s been around for a few years but you may not have heard of it. Here are some shots from Far Cry, an older game but still one of the favorites around this office:
One of the ghost ‘copters that can’t be destroyed but never attacks.
We like to collect vehicles and boats. These are all one owner vehicles…
Download FRAPS here: FRAPS and install it. Directions are easy to follow, just make sure you start FRAPS before you start the game. You can choose to have the frame rate shown on your game screen, the original purpose of FRAPS, and then choose to record stills or videos. We’ve found FRAPS to be foolproof, simple and a great tool to test out your computer and/or new video card.
TIP: FRAPS saves stills as BMP files, rather large file size. If you’re going to post or share images, open each one up in Irfanview and change them over to JPGs. File size in the JPG format, because it is a compression or ‘lossy’ system, is much smaller.
As you probably already know, Irfanview is one of my favorite free programs. I’ve used it for years and every computer in the house has it. Read past posts about Irfanview here and here and here. Irfanview is fast, fun and works perfectly every time. You can download it and its plugins from Tucows. Get it here: http://www.irfanview.ca/main_download_engl.htm
If you have used Irfanview for a screen capture session, you’ve probably got dozens or hundreds of jpgs that include more of your screen than you need. Irfanview is perfect for captures but sometimes the box you draw around your target is too big. Here’s how you can set Irfanview up to crop those captures in one operation, no matter how many photos you have. How do I know? I’ve used this method before to crop about 2400 photos that I made into a little animated gif. It didn’t go viral but it was fun make.
1. Get all of your jpgs in one folder. Sort them out so that all the photos have the main capture in the same position on the screen. If you moved the window at some point while you were capturing the whole screen, sort those photos out and put them in different folders. You can reorganize them later.
2. Open Notepad or keep a paper and pencil by your hand. You will be writing down a few numbers for each cropping job.
3. Before you actually begin to crop, practice sizing the crop area first. Open one jpg. As with most programs, holding down the left mouse button and dragging the cursor will create a box. Test this out and try to get the correct size, the one that looks best to you. When you have the right box, click anywhere outside the box to unselect the crop.
4. Next, click on the top left corner of the area that you want to crop. Don’t move your mouse, just click once and hold it there. On the top left of the Irfanview window you’ll see XY:(number,number). This is your X -Y reference point. Make a note of those two numbers. This is what you will see:
Look for the XY:(480,561) - your numbers will vary.
5. Next, you’ll want to write down the full size of the crop box that you want. Click in the same spot, or as close as you can to it, then drag the box out and hold the mouse button down until you are able to read the numbers that you need. What you’re looking for is the number of pixels that define your crop box’s height and width. In the photo below, you’ll see what I mean.
See the (646x472 Pixels, 1.369)? You need the first two numbers: 646 and 472
6. Now you have the numbers that describe where the box starts and the numbers that describe the size of the crop box. You’re all set to start your batch cropping. Look for File on the top left, then Batch Conversion/Rename. The following window will open:
Here is where you will do two things. Add the photos to crop and choose your output directory.
7. Set up the menu by checking that ‘Batch conversion’ is ticked. Then, on the top right, select the photos you want to crop. Remember when I said to keep your photos separate? This is why I said that. It’s much simpler to choose ‘Add all’ as opposed to picking through the jpgs one by one. Click ‘Add all’ if you have all the right photos in one folder. Then, in the middle left, choose where you will put the cropped pics. Don’t use the same directory as the originals, just in case you make a mistake with your crop window. You still want the originals until you make sure your numbers are correct. Once you’ve done these steps, click on the ‘Advanced’ button. The following window will come up:
Don't get nervous. This window looks complicated but it's not that bad.
8. Top left, see the Crop section? This is where you’ll fill in the numbers that you wrote down earlier. Make sure ‘Crop’ is checked then type in the X-pos number and the Y-pos number. Below that, write in the width and the height. Below that, make sure that ‘Left top’ is chosen. You can crop in any corner, just make sure you know which corner you have chosen. I always use top left but you can do whatever you want.
9. Make sure that nothing else is checked. On the bottom right, I have ‘Overwrite existing files’ chosen, simply because it’s easier if I make a mistake. I put the cropped photos in a new folder then I check it after the batch if finished. If I have made a mistake, I redo the numbers and run the batch again. I don’t have to open a new folder.
TIP: If you are doing a few batches, uncheck the ‘Overwrite existing files’ just in case you forget to use a new folder. Make sure this is unchecked if you are using the same folder as the originals, too. I’d advise against that, however.
10. Double check everything then choose OK once to close that menu. The batch menu is still open, of course, and you need to press the ‘Start batch’ button. Once you do that, Irfanview whisks its way through the task at hand. Depending on the speed of your computer, this might take a while. Wait until Irfanview is done then check your results. Chances are you’ll make a mistake the first few times but read through this again and you’ll get it right, sooner or later.
2. Hook it up to your VCR as described in the instructions and then to your computer using the supplied USB cable.
3. Follow the instructions to install the capture software.
TIP: Guard the program shortcut with your life! Once you install the software, it’s very hard to find the shortcut if you move it. I’m a geek and found it hard to find. Warning!
4. Start the capture software. You’ll see a screen like this:
This is the menu that you DON'T want to see.
What’s wrong with this image? The green line across the bottom, that’s what. Down on the lower left is an X. If you see this kind of screen, hit the X and reopen the program. Maybe this is just on my computer but I have to restart the program in order to get rid of the green lines on the bottom.
Your screen should look like this:
This is what you should see before you start playing a tape.
Once you can see this screen, you’re ready to go.
5. Pop a tape into your VCR (could be Beta or VHS or camcorder, it doesn’t matter what you use as a source). Start to play it and you’ll see this kind of screen:
The video on the screen with no scan lines on the bottom.
6. Once you can see this kind of image in the window, you’re all set. Use the VCR to control the tape, then record the bits and pieces that you want to save using the One Touch controls. The red button records what’s in the window, including sound if you have the cables set up correctly, and the black button (which turns red after you start recording) stops the capture.
7. In the Settings menu, shown here:
Here's where you adjust the settings.
This is showing the Record tab where you can set the file type (I use DVD for small file size) and save the files in a folder on my desktop. Set your preferences according to your tastes.
8. Once you have the tapes sorted and have saved the files that you want, rename them to keep track of them and then you can archive them to DVDs, etc. I prefer to change the files to either FLV or DIVX in order to keep the files as small as possible. If the video if very important, leave it was a DVD file and write it to a disc.
That’s it! Simple and cheap, without the pain of having to have a TV monitor cluttering up your desk or work area. Not only does this method capture fine quality video (depending on the source, of course), it eliminates the need for a video monitor. Alternatively, you can feed your TV output into this unit and watch and record live TV on your computer.
Thanks for reading! If you have questions or comments, write them below or follow me on Twitter: @_BrianMahoney
There are times when we’d like to capture a video that is on our computer screen, whether it is from a webcam or a streaming video site such as Netlflix. Until I found CamStudio , I was stuck with doing individual screen captures with Irfanview. Here’s a short course on how to use CamStudio.
1. Download and install CamStudio. It’s free and available here: http://camstudio.org/
2. Head over to your Start button and find CamStudio. When you find it, the menu looks like this:
For recording, choose Camstudio-Recorder
3. Choose Camstudio-Recorder. The program will start in a few seconds and you’ll be faced with this menu:
The red button records, the blue button stops the recording.
4. The main menu gives you all the controls you need to use CamStudio. Red for record, blue for stop and so on. Under Region you’ll see this:
I use Region and then drag out my choice in the video window.
5. Choose what area you want to record. If you choose ‘Region’ and click the red record button, you will have to click on the video window of your choice and then drag a rectangle/square shape of what you want to save. This is great for webcam windows but not for Netflix. For Netflix you would choose Select Screen. If you always use CamStudio for a certain size window, set it up in Fixed Region. If you have two monitors and want to record both, choose All Screens.
6. When you click the red button the recording box will flash, showing you that CamStudio is working. When you’re done, click the blue button. Depending on what you’ve chosen in your Options, CamStudio will then render your video and save it.
7. You have a pretty complete set of options in CamStudio. I’m not going to get into all of them here but I’ll give you some tips.
Tip 1: I save all of my captures as ‘avi’ files. The SWF format didn’t work. These saved avi files can be saved to your desktop or a folder in CamStudio. I STRONGLY recommend that you set up a folder on your desktop. The CamStudio folder is very hard to find. I’m an expert computer user and I had a hard time finding the actual files. CamStudio uses a shortcut system and keeps the actual avi files in a separate folder.
Tip 2: If you use dual monitors, play around with the settings. CamStudio works fine with dual monitors but I found that I had to play with the video options as well as which monitor recorded from in order to make it work. It seemed that CamStudio worked best on my main screen (number 1 in Windows screen selection menu). Give it a shot and see what you can sort out. Write it down so you’ll remember what you did.
Tip 3: Choose the option for having CamStudio name the saved file for you and don’t choose to let CamStudio play the video as soon as it has saved it. If you are in the middle of recording something, you don’t want to be bothered with naming or watching the file. Just record what you want now and watch the video later.
That’s it for now. CamStudio is free and works extremely well. There are ample options to choose from so play with them and work out what’s best for you. For free software, it’s a pretty sweet setup.
Thanks for reading! Follow me on Twitter: @_BrianMahoney
a little bit of hi-tech, a little bit of common sense and a lot of fun