Category Archives: Hardware

Google Chromecast – What’s new in version 2?

We gave you some of our first impressions of the new Chromecast in our last post. If you already own the older version of Google’s streaming device, you might be wondering what changes there are in version 2. Here are some:

Photo of Chromecast
Chromecast Versions 1 and 2


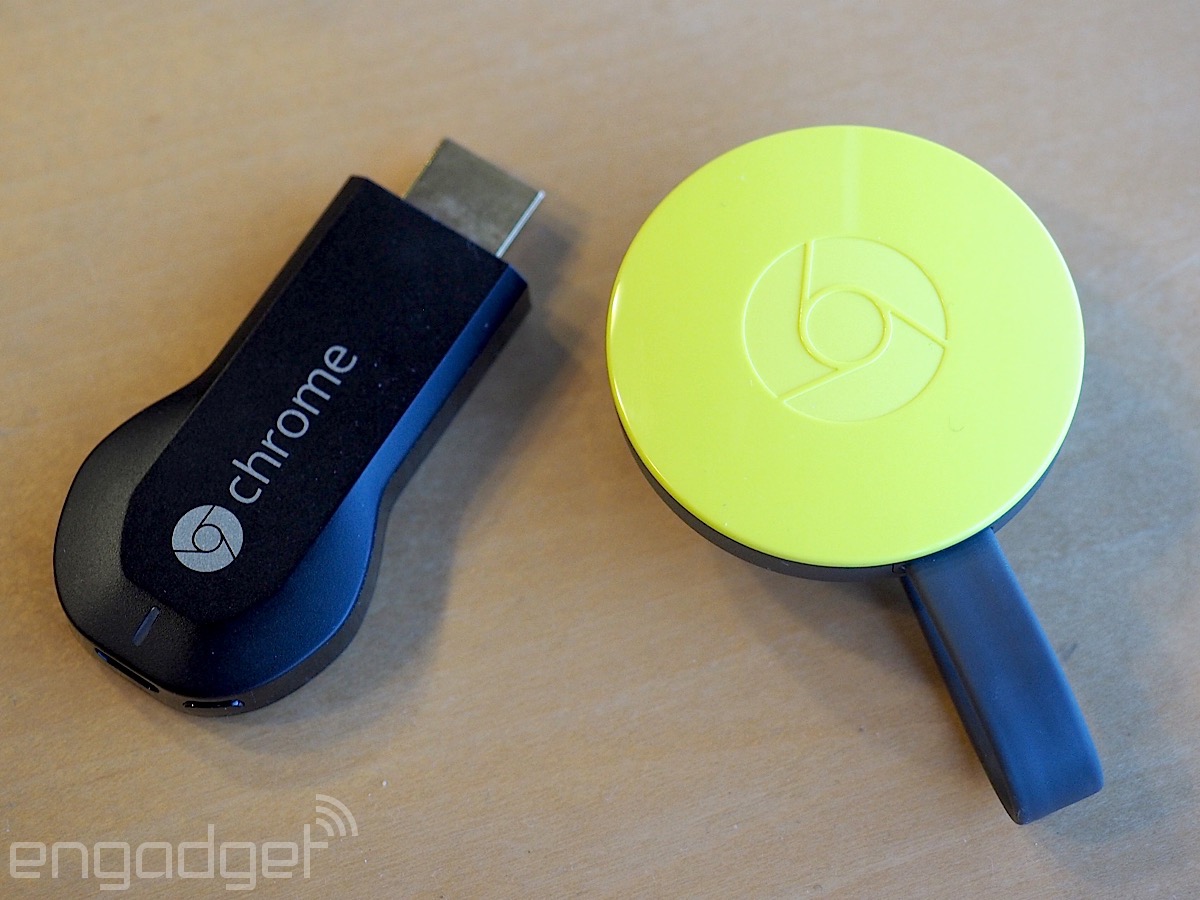
WiFi Protocols: Without getting too technical, the new Chromecast uses significantly faster WiFi protocols than the original. The new device has three antennas inside which automatically switch to your router’s output signal. What does this mean for you? Faster streaming which translates into higher resolution and a lot less buffering. For techie-types, here are the specs directly from Google: “dual band 2.4 and 5GHz support, and support for 802.11ac”.

Less Storage: Less buffering requires smaller storage space, right? The original Chromecast came with 2 gigabytes of flash storage, a fairly substantial amount for a device of this size. Chromecast 2 gives you only 256 megabytes, simply because of the faster WiFi protocols. Less buffering = less storage required.

Tip: What is buffering? : Your buffer is like a gas tank on a car. Chromecast loads as much of the content that you are currently watching as it can then feeds that content out to your HDTV. Both the buffer and your car’s gas tank have a higher capacity than what is currently being used. With the new WiFi bits and pieces, there should be no delay evident, even though the buffer is smaller than in version 1.

Improved Chromecast App: Google has made changes to the Chromecast app  that is already installed in the device. Besides offering more sources for content, the new version pre-loads whatever app you are using on your remote (see previous post for details on what constitutes a remote) , preparing itself to play whatever you choose. Google calls this ‘Fast Play’.

Another feature in the new app that we haven’t tried yet suggests that, quote: “You can mirror any tab from your Chrome browser to your TV, giving you access to even more content from the web”. This should be a lot of fun, if it works. We think it means that Chromecast will play any video content that can be played in any Google Chrome tab without requiring a specific app for the source. Let’s say you’re watching a sports replay or a video on Facebook. If we’re reading Google correctly, you should be able to cast that content up to your HDTV. That alone is worth getting the new version of Chromecast, in our opinion.


Games: Finally, Google is promising some gaming apps, think Angry Birds, that will mirror whatever is on the device you’re using as a remote. We’re not sure how this will work because you’ll be using your fingers to control the game but you’ll be watching it on the big screen. Is this ‘touch gaming’, controlling the slingshot while not looking at what your hand is doing? We’ll see what this is like before we comment further.

There are other differences that are listed here: What’s new with Chromecast and the Chromecast app? (Link to Google Support).

If you’ve had experiences with either version of Chromecast that you’d like to share, comment here. Comments and questions are welcome but  Likes on our Facebook page get immediate attention.  Here’s the link: Computers Made Simple on Facebook .Thanks for reading!


Connecting a Nexus 5 to a Windows PC – Update

We’ve been having a problem lately, mainly since we switched to Windows 10, whenever we try to hook up our Nexus 5 to a PC. Windows sees the Nexus as an Acer ADB device for some reason. Here’s how we fix this:

  1. This procedure is done on your Nexus 5, not on your PC. Start by connecting your phone to your PC using a USB cable.
  2. Go to your Settings, that would be the gear icon on your app screen. After a recent Android system update, we’re on version 6 now, the menu that controls your USB settings has disappeared. This means that you have to do a search for them. Look for the icon of a magnifying glass at the top of your screen.
  3. Type the letters usb in the search space.

    settings for usb
    This is what you see when you search for ‘usb’ on the settings screen. You want to choose Select USB Configuration
  4. Several choices will pop up. The one you want is ‘Select USB Configuration’.  Press that choice.
  5. More than likely the choice you want on the next screen is already chosen. You should see ‘MTP (Media Transfer Protocol) selected. No matter, select it again by simply touching those words.

    MTP Things
    Even if MTP is pre-selected, touch those words again to confirm the choice.
  6. If you’ve followed the steps correctly, a file explorer window should pop up on your screen. It should show your Nexus 5 as a storage device that you can double click on to reveal the contents.

This process should work for you. We’re not sure why Windows 10 defaults to the ADB device choice but doing this fairly simple set of steps should get you up and running quickly. It’s as if you have to remind Windows that the Nexus 5 is an MTP device.

If by chance this doesn’t work for you, try our previous routine. Here is the link:  Nexus 5 to PC


Comments and questions are welcome but  Likes on our Facebook page get immediate attention.  Here’s the link: Computers Made Simple on Facebook .Thanks for reading!

Disable Browser Window Resize

It’s hard to know what to call this post but if you have a modern laptop, you know the problem. Seemingly for no reason, your browser window resizes itself, making the text so small that can’t read it or so large it looks like a first grade reader. Here’s how to stop that, once and for all.

1. You may not know it but there is a bit of software that controls your trackpad. In our case that software is put out by Synaptic. On the lower right corner of your taskbar there should be an icon that looks something like this:

Photo of Touchpad Icon
The icon may not look exactly like this but we’re quite sure you have one on your laptop.

2. If you can’t find it, you’ll have to look in your Control Panel. Once CP is open, look for Hardware and Sound then either Touchpad/Mouse or Device Manager. Find your pad there, right click it and choose Properties.

3. In the Properties window, look for Pinch Zoom. Depending on who made your laptop, the actual wording may vary. Here’s what you might be looking at:

Photo of Disable Pinch Zoom
Disable Pinch Zoom. That’s what you’re looking for, depending on which company made your laptop.

4. Basically, you want to disable zoom, no matter what it’s called on your laptop. Once you do that, click OK and/or Apply and the window will close. No more of that annoying resizing!

Let us know if you have a problem with this or anything else to do with computers, tech, software, Facebook, WeChat…you get the idea.

Comments and questions are welcome but  Likes on our Facebook page get immediate attention.  Here’s the link: Computers Made Simple on Facebook . Thanks for reading!

Tablets vs. Laptops

Some experts say that the PC is dying, if it isn’t already dead. Tablets and touch (as in touchscreens) seem to be taking over the market. Here are our thoughts on all of this.

Our Experience

1. In the past two months, we’ve had two tablets lock up completely on us. One was a Samsung Galaxy II, the other was a Lenovo 10″ tablet. When we say they locked up, they were dead, completely unable to boot or be recognized when hooked up to a computer. We returned both products to where we bought them. We replaced the Lenovo with two Blackberry Playbooks, one 16 GB and one 32 GB, which have, so far, been stalwart devices, ready for anything we direct their way.

Photo of Playbook
A BB Playbook. These are very solid tablets that aren’t, unfortunately, sold anymore.

2. As far as laptops are concerned, we’ve never had to replace one. Batteries get old and stop charging, chargers need to be replaced (Dell chargers are bad for that) but we haven’t had major problems with any of the dozen or laptops around here.

3. Our newest addition, the Nexus 4 that we purchased from Google Play, locked up this morning but we were able to get it working again after plugging it in to its charger. The battery was at 89% but the on/off button wouldn’t work. We’ll see how it goes from here.


DIY Repairs 

Laptops can be repaired fairly easily. Tablets? Not so much. There are ample resources out there for quick fixes on laptops of all kinds. With a tablet, there is nothing that a user can do except return it to the vendor or manufacturer or, if it’s out of warranty, dispose of it. There are no user serviceable parts on a tablet but even a non-tech person would find it fairly easy to replace a hard drive or add more RAM. For this reason alone we would suggest purchasing a laptop instead of a tablet.

Typing and interaction 

Microsoft came to the tablet party much later than anyone else. Their new Surface is marketed as a competitor to the Apple iPad. Since the introduction of the Surface, there have been major price cuts. Now Microsoft is offering cash to Apple owners who turn in their ‘gently used’ iPads on the purchase of new Surface tablets.

Photo of Surface RT
Microsoft seems to be in the dark about tablets and their users.

We’ll deal with PC and Android tablets here since our readers seem to be more PC people than Apple users. Consider how much actual work you’d be able to do on a tablet. Even the simple task of writing an email would be tough if you’re using a tablet. Sure, you could add a keyboard, USB or Bluetooth depending on which tablet you buy, but that’s  extra cost for something all laptops already have. Microsoft’s ads for the Surface show it with a separate, and optional, keypad and a device to make it sit upright. Laptops already have these things as standard equipment, right?

Screen protectors? Laptops don’t need them, tablets do. A whole new industry has evolved around tablets and mobile devices. You might want a cool bag to carry your laptop in but you sure don’t need a sleeve for it. As far as the screen goes, just close the lid and walk away. Many laptops, including a Lenovo we recently purchased, have water-resistant keyboards, too. No extra protection needed.

Portability

We’ve had great luck with our netbooks as far as carrying them around is concerned. A netbook has a hard drive and keyboard, same as a notebook, but doesn’t have an optical (CD/DVD) drive. Tablets, specially the larger ones, are slippery and the screen won’t stand up on its own. We can set our netbook screens at any angle and, when we’re ready to move on, they fold up to half the size they were before. Additionally, tablets are not as light as you might think. The glass screens add a fair bit of weight that a laptop, with a plastic LED/LCD screen does not have.

Photo of Netbook
They are small but not quite this small. Screen size is 10″ on most netbooks.

These are some of our thoughts on laptops versus tablets. Many of you probably use smaller mobile devices such as cell phones or smart phones for your portable computing and social networking but you might be considering something larger. For most of our uses we’d stick to a laptop. As we’ve said before, tablets are toys more than tools, great for photo sharing or social networking but useless (and expensive) for day to day computing. We can get a fully functional laptop for under $300.00, complete with an optical drive and a very large hard drive. Even with the price cuts, Microsoft’s Surface is more expensive.

Thanks for reading!  Like us on Facebook and keep up with our latest posts and tech tips. Here’s the link: Computers Made Simple on Facebook 


Computer Troubleshooting – fixing random problems

We ran into a problem this weekend with one of our laptops. For some reason, still undefined, we could connect to our central router’s WiFi but could not connect to the Internet. We had good signal strength but no go on the Internet connection. When we’re faced with this kind of situation, we try to look at the problem systematically, running through a series of troubleshooting steps to get to the root of the problem.  Even though we didn’t sort out the trouble, here are some of the steps we went through. If you’re in the same situation, you can try to use a few of these DIY (do it yourself) strategies.

1. We tried to use Windows to sort out the connection problem but, as usual, the Windows troubleshooter was useless. It’s nice that Microsoft tries to help but in all of our years of using Windows, we can’t remember when their troubleshooter worked. You’re welcome to try, but our success rate is dismal, to say the least.

2. Rebooting (restarting) a computer or mobile device is the first thing you should do. Save your work, bookmark any important sites you’re on and restart. Signing out won’t work as well as completely shutting down and starting everything up again.

2. In the case of our WiFi problem, we weren’t sure if it was software or hardware related. Our next step was to uninstall the Broadcom WiFi adapter. While this may sound extreme, it’s not. The adapter is a piece of hardware, yes, but we didn’t actually remove it from the laptop. We simply went into our device manager and uninstalled it from there. Next we rebooted the laptop and, of course, Windows found the adapter and reinstalled it. Why did we do this? Sometimes a driver, the thing that makes a piece of hardware work, gets corrupted. Removing a device then rebooting your computer can sometimes bring it back to life. Windows checks the driver and if it’s corrupted or old, finds a new one or asks you to find one for it.

Photo of Disable or uninstall hardware
This is an example of the ‘uninstall’ screen in Control Panel then Device Manager.

3. Since most laptops can use a wired connection as well as WiFi, we took the laptop down the hall and connected it with an Ethernet cable to a spare port on the router. This bypassed the WiFi connection and we were able to connect to the Internet immediately. Because of this, we knew that our problem was not a virus. On to step 4 to read why.

4. Sometimes a virus or malware can interfere with your computer’s stability. If you’ve downloaded music or a new piece of software from an unfamiliar site, there is a chance that a virus has hijacked your computer. If you do not do a virus scan on a regular basis, and you should, make sure you do one as soon as your computer starts to ‘act’ differently. Here’s a link to a good and reliable online anti-virus scan: Free Online Virus Scan  We’ve used these guys for years when we have reason to distrust our own anti-virus software.

Photo of Trend Micro House Call
This asks you to download a small file with allows Trend Micro to scan your computer online.

5. Windows’ computers have what is called a ‘safe mode’. If you are having problems, try to reboot your computer into this mode and see if you can duplicate the problem there. There are two ways to get into safe mode, the easiest is to tap the F8 key gently a few times just as your computer is restarting, after you see the first letters on your screen.

Photo of DOS Screen
Tap your F8 key when you see the first screen like this.

Choose Safe Mode or Safe Mode with Networking (as we did) if you want to check your Internet connection:

Photo of Safe Mode screen
Use your up and down keys to choose, then hit Enter.

When you are in Safe Mode, everything will look quite different. Manage as best you can to check the problem, free from the many other programs that start when you run your computer. If you find you are having a problem running your anti-virus software or deleting some software, try doing it while you are in safe mode. Some programs defend themselves from deletion but when you run safe mode, they cannot run and cannot stop themselves from being deleted.

Somehow we were able to reconnect to the Internet but we’re not sure why we couldn’t in the first place. Maybe one of these steps solved the problem, who knows? Whenever we encounter a problem that isn’t immediately obvious, we run through these steps one by one until we sort things out. Hopefully, you’ll be able to do the same.

Thanks for reading!