Category Archives: Hard Drives

How to Buy a Laptop – Comparing CPUs

In the last few months, we’ve purchased two laptops. Because of our interest in this area, the process was relatively stress-free and, believe it or not, quite fun. For you, this whole strange world of confusing numbers and specifications might be very scary indeed. Over the next few posts we’re going to outline some of the differences you should look for when buying a new laptop. By the time we’re through, we think you will feel a lot more confident when shopping online. Why online? Our experience tells us that the customer service reps in the various stores do not know what they’re talking about. The presence of a salesperson just adds more stress, something you don’t need when you’re spending a few hundred dollars of your hard-earned cash. Shopping online can be done at your leisure, any time of the day or night.

The Basics

Laptops are the portable computers that have a screen that folds down onto the keyboard. That may seem obvious but you will see many other mobile computing devices, tablets for instance. Tablets don’t have a separate keyboard as standard equipment and the simple act of inputting words is much less convenient. For these posts, laptops are our concern. We don’t consider tablets to be real computers, they’re more of a toy, at least as far as getting work done.

Laptop Categories

Right now, laptops come in a few different forms. Not only are there different sizes, there are at least two different types you might see. The difference between these two types has to do with their storage capacity. Google has recently come out with what they call a Chromebook. HP, Samsung and some other manufacturers make these Chromebooks. They differ from all other laptops in two ways. First, they don’t run a standard OS (Operating System). Instead, they use the Google OS, as opposed to Windows or the Apple OS or Linux. Second, the Chromebooks have very small storage capacity. Google figures that most of us are online all the time anyway, so they’ve come up with the idea of storing everything online, in the Cloud, instead of on a hard drive. We just bought a Chromebook but these posts deal with laptops with conventional hard drives. We’ll do a separate post on Chromebooks at a later date.

Laptop Sizes

Small laptops, often called ‘netbooks’, can be as small as ten inches. This is the measurement of the screen, measured diagonally. Netbooks are fun, very portable but difficult to type on and, usually, very slow. Beyond that the sizes range from thirteen inches up to about eighteen inches. If there is a standard size, one that matches portability with usability,  you would likely want to look for a laptop that has a 15.6″ screen. This size usually has a full keyboard, often with a number pad on the right, and large keys, not the ‘chiclet’ kind that you see on a netbook.

Comparing CPUs

We’ll get into some of the other laptop specs later but we’re going to demystify the CPU today. What’s a CPU? Basically, it’s the brain of any computer. If you personify any computing device, the brain controls how fast that device thinks. Remember those ‘Intel Inside’ ads from a few years ago? These ads were telling you that the brain inside that computer was made by Intel. At that time there were other CPU manufacturers but these days there are two main makers, AMD and Intel.

Here’s what we see when we check out laptops on a popular website:

Photo of Comparing Laptop CPUs   1
Two Lenovo laptops, different specs and different CPUs.

Pricing and other specs aside, these two laptops have different CPUs. The top one contains an Intel Pentium 2020M while the lower one has an AMD E1 1200. How on earth is anyone supposed to keep track of these numbers or know what they mean? Most of this is deliberate on the manufacturer’s side. Even if you do manage to remember one type of CPU, the names are always changing. Here’s how you can compare CPU specs very quickly.
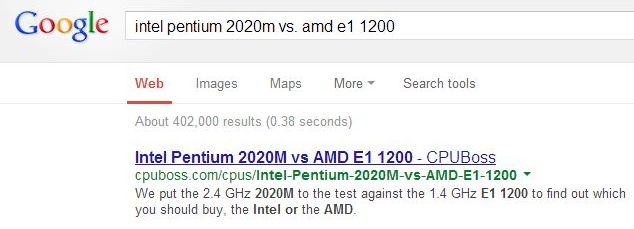
1. Go to google.com

2. In the search slot, type in the first CPU name, e.g. Intel Pentium 2020M, then type in ‘vs. then the name of the second CPU, AMD E1 1200 in this case. This is how it should look:

Photo of Comparing Laptop CPUs  2
No caps needed, just letters and numbers.

3. Take the first link that comes up, cpuboss.com:

Photo of Comparing Laptop CPUs  3
Click the link to find out which CPU is best for you.

We’re not sure how they do it but once you type in two CPU descriptions, a page is created that compares one to the other.

4. This is the result of this comparison:

Photo of Comparing Laptop CPUs  5
We thought the more expensive CPU would be best and we were right.

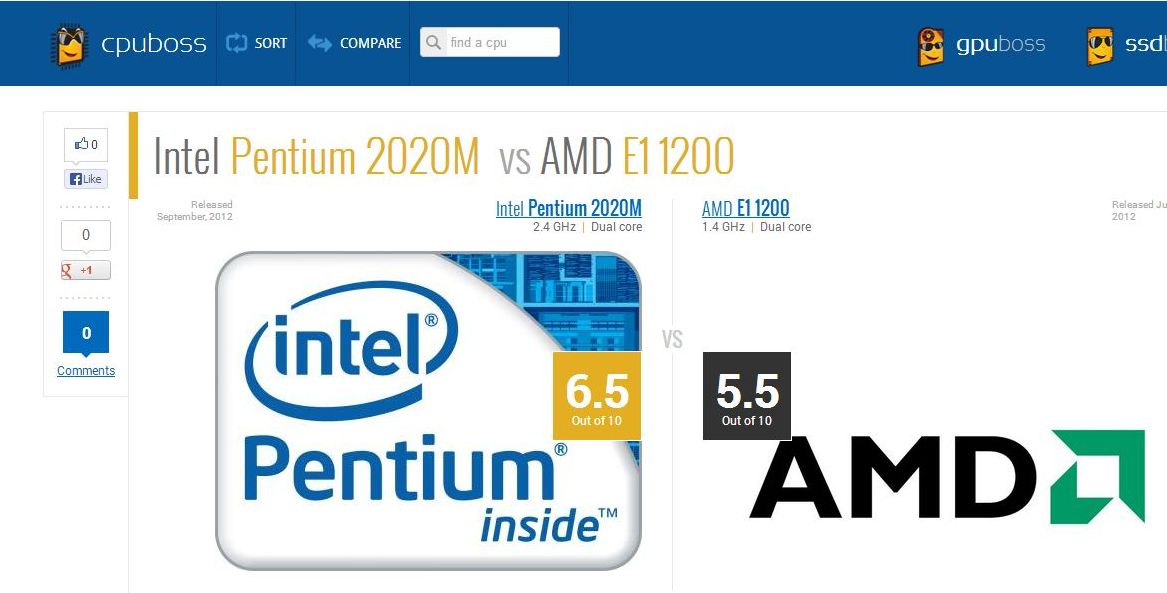
5. For the more discerning searchers, here is how CPUBoss came up with their recommendation:

Photo of Comparing Laptop CPUs  6
Various test results.

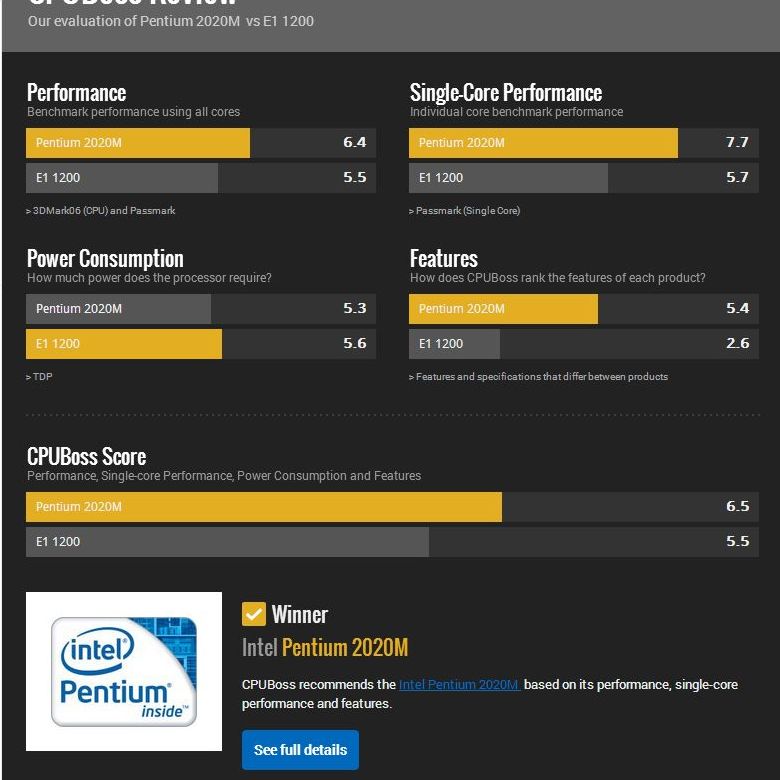
5. OK so CPUBoss thinks the Intel CPU is best. This is based on the results of the various tests they put the chips through. You might find it interesting to scroll down the page, at least in this example, to see one interesting difference between the two CPUs.

Photo of Comparing Laptop CPUs  7
Not a whole lot of reason to choose the AMD…except one.

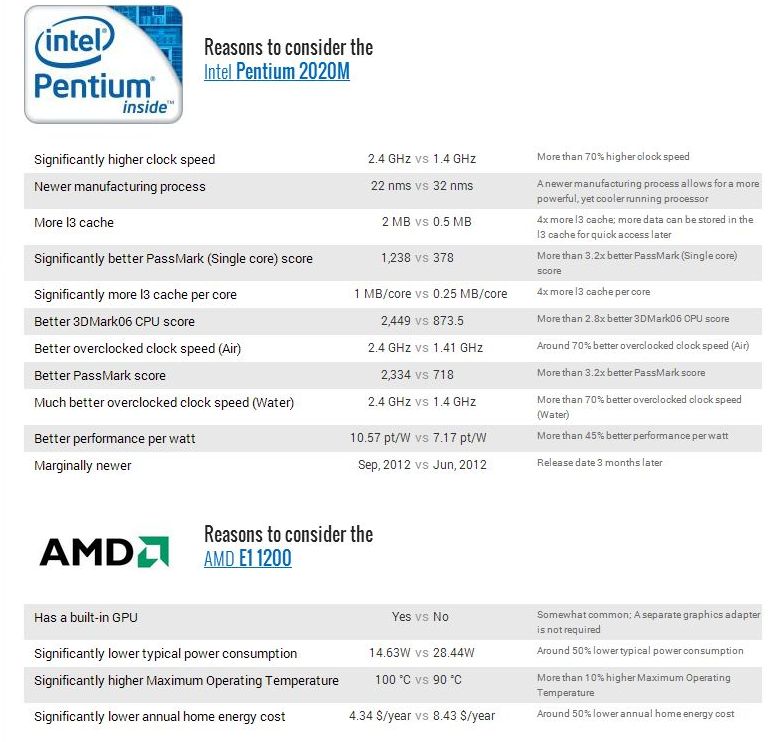
In our example, the Intel is the better choice but the AMD CPU will use about half the energy of the Intel chip. It also has a built-in graphics processor, uses less power but, unfortunately, runs a bit hotter than its competitor. Going back to the original ad, ignoring the other specs again, we see the better CPU is also $120.00 more. Here is where you have to weigh the extra cost against the better performance. The Intel doesn’t seem to be worth the extra money, at least in this case. If other criteria were similar, we’d choose the AMD but in this case, we wouldn’t buy either one. The less expensive laptop doesn’t have enough RAM, only 2 gigs instead of our required minimum of 4, plus both are overpriced.

This exercise shows you how to compare CPUs, taking obscure combinations of numbers and letters and turning them into something a whole lot more meaningful and comparable.

Next, we’re on to the other specs in this same ad. Stay tuned.

Thanks for reading!


Windows Disk Management – Initialize your disk

We added two new hard drives to one of our computers this week. It had two drives already but we wanted to install Windows 8 and decided that a new drive would be a good thing to add. We had a 2 terabyte drive ready to install then we and a 3 terabyte to the collection. That gave us four, one for Windows 7, another for Windows 8, one for Linux Ubuntu (already installed) and the last one as a spare for storing important files.

Before we could partition the drives, we had to initialize them. What does that mean? Contrary to popular belief, it does not mean ‘formatting’. Let’s say someone gives you a book. There is nothing on the outside of the book to tell you what it is. Therefore you have to look inside it to see what it is. You ‘initialize’ the book when you look inside. Now, that book has nothing in it but once you open it, you know it has nothing in it. At this point you recognize that book as a book with nothing in it. This is a rough description, of course. In reality Windows puts its own little notes on the drive so it will know what that drive is. There are two types of notes that Windows uses. Here’s how to figure it all out.

1. Add the new drive to your computer. That part is quite simple but if you have a problem with it, enlist the aid of a techie friend.

2. Start your computer and, once it’s booted up, click on the start button the look for the word Computer. Right click Computer and choose Manage. This is what this all looks like:

Photo of Window's Disk Manager  1
Start then Right Click the word Computer.


2. When Computer (used to be My Computer) opens, look for Disk Management down on the lower left:

Photo of Window's Disk Manager  2
Disk Management is what we want.


3. Windows will take a few moments to think about your request then, when it sees that one or two drives are not initialized, you’ll see this menu:

Photo of Window's Disk Manager  3
MBR or GPT?

4. We installed two drives at the same time. As it turns out, we could use the MBR partition style for one drive but not the other. Remember that one drive was 2 terabytes while the other was 3 T? MBR only works for drives smaller than 2 Terabytes or for partitions smaller than 2T. Since we wanted a full 3 T partition on one drive, which would allow Windows 8 to do what it wanted to the drive on installation, we opted for GPT on the larger drive.

5. We could use GPT on both drives, keep that in mind, so your choice might be just to opt for GPT right from the start. Unless you are using Windows XP, you are quite safe using GPT. No worries.

6. Once you initialize your drive, this is what you’ll see:

Photo of Window's Disk Manager  4
Now the drives are showing their correct size and you can interact with them.

Across the top you’ll see that two of the drives are unformatted but Windows knows what they are and tells you the size, etc. Down in the middle, you can right click and choose what kind of volume you want. Since there are a number of options, we’ll leave that for you to investigate. We might do another post on that later on but, for now, we’ll leave this as it is.

TIP: If you’re starting out with a new computer, a new drive and a new installation of your operating system, that operating system will take care of all of this.

How did we get into this? We tried to install Windows 8.1 on one of the new drives. During the early stages of the installation we saw a message that we’d never seen before, and we’ve installed Windows at least 50 times over the years, maybe more. At that point we thought that if we initialize the disks, Windows would install itself on one of the new drives. We were wrong.

We’ll give Windows 8 a shot next to see if it works but at least we were able to teach you about initialization, right? If you have questions, make a comment below and we’ll answer it as soon as we can. Better yet, like our Facebook page and you can ask us on it. Here’s the link: Computers Made Simple on Facebook. 

Thanks for reading!


What is an RMA?

We go through a fair bit of hardware here at Computers Made Simple. Sometimes that hardware doesn’t work correctly or fails after a period of time. If the item is still under warranty, we have to go through the RMA process. RMA (Return Merchandise Authority) can be confusing. Here’s what we know about it.

Last month, we had a Western Digital (WD) 2 TB hard drive fail. We spent hours and hours trying to recover as many files as we could from it, then decided to get a new drive under warranty from WD. We’ve done many RMAs in the past and every one went smoothly. This one didn’t.

The first step in any RMA process is to contact the manufacturer. This can be done by telephone or email but you can sometimes use a contact form on a website. We used the contact form on the WD website to begin the RMA process. The manufacturer must authorize the return, hence the RMA acronym. Each piece of hardware that comes back to a company must have an RMA number on it. Keep that in mind.

Photo of RMA screen
Everything looks efficient on the WD site…but isn’t.

WD emailed us back, explaining that there were two types of RMAs. We already knew this but here’s the low-down on that. Once the company approves your RMA, you could simply send them the faulty product and they will send you a replacement. You pay the shipping one way and they pay the shipping back to you.

Alternatively, you could use the advanced RMA process. The company will charge you a nominal fee for the replacement product, then ships it to you. Once the replacement arrives, you return the faulty product and the company gives you a credit for the same amount that they charged you in the first place. In our case, WD charged us $150.00 for the drive (we only paid $69.00 for it originally) and gave us 30 days turnaround time to get the faulty drive back to them. Initially, this seemed like the best option. Oh, were we wrong!

WD now says that the 3-5 day turnaround is only good in the United States. As you know, we are in Canada.  We really don’t see what the difference is here because the drive is a replacement drive, it’s not something that we purchased. Since it is being shipped as a replacement, it should sail through Customs. WD also says that we could ship the drive back to them before the new drive arrives. This means that we’ll be out the shipping costs. (As it turns out, we shipped the drive off today and will have to absorb the shipping costs ourselves.)

It is now 15 days since the drive was shipped to us from WD. Remember that we only have 30 days to get the drive back to them, right? We are in Canada, not Timbuktu. We get shipments from the United States almost every week. There is no reason on earth that a drive shipped from the U.S. would take two weeks to arrive at its destination in Canada. WD uses UPS, that might be the problem. If you are ever going to ship something, DO NOT USE UPS. The United States Postal System is far better than UPS, as are Purolator and FedEx.

The process usually is flawless. Sometimes, as in our case, something goes wrong. At that point you have several options. We took to Twitter and shouted about it there. We emailed WD several times as well. So far, 15 days into this, the drive is somewhere between WD and us.

We’ve had good experiences with Dell, with HP/Compaq and with Staples. It’s always good to check online to see what experiences other people have had. Usually tech products work very well but when they don’t, you have to go through the RMA process. Hopefully, your experience will be better than ours.

At this point in time, there are only three or four companies who make traditional, as opposed to solid-state (SSD), drives. They are Toshiba, Seagate and Western Digital with Hitachi showing up at some vendors. Many of our old drives from Samsung, Fujitsu, etc. are still working perfectly. Are WD drives reliable? Usually they are. Right now, the only thing that isn’t reliable is the WD RMA policy! It looks like Hitachi has the best warranty, 5 years. Whatever drive you get, make sure you check the warranty before you buy it.

Photo of NCIX extra coverage offer.
Compare the coverage that NCIX offers. (That’s Esther up at the top.)

Tip: Some vendors, NCIX is one, offer what they call “Express RMA’ as an extra-cost option when purchasing a product. On their hard drives, three years of extra protection costs under $50.00. Some products are worth this extra money, some aren’t. It’s up to you to decide. Because of the problems we’ve had with WD, we’re going to spring for this coverage on our next purchase from NCIX.

Update: According to Western Digital, the drive is held up in Canada Customs. We’re not saying that WD isn’t being truthful but we have been around international shipping since 1976 and only rarely have shipments been ‘held up in Customs’. If indeed the shipment, supposedly a whole skid of drives, is in Customs, we suspect that it’s UPS’s fault, not WD’s.

Thanks for reading! If you’ve had problems with RMAs or Western Digital, please let us know.


How do I back up my computer? Part 2


When it comes to backing up your computer, what exactly are you backing up? Well, pretty much everything that you have added to it. This includes, but is not limited to, documents you’re written, photos you’ve taken as well as anything that you’ve downloaded from the Internet such as videos, photos, audio files, Etc. What you aren’t able to back up are all of the Windows files, the program files nor any of the browsers or apps that you use. There isn’t a way to back these last things up anyway, unless you want to copy your whole drive. Even then, none of the programs would work. You’re backing up your stuff, not Windows or related stuff.

If you have purchased a new computer or laptop/netbook, it most likely didn’t come with any CDs or DVDs. These days, new computers don’t come with these system disks. You have to make them. Windows will prompt you to make new recovery disks and this is something you should do as soon as you can after purchase. If your computer fails, you can restore it to its original condition by using these disks. But, and this is a big but, creating the recovery disks has nothing to do with backing up your computer. When you create recovery disks, you are only backing up the original software that came with your computer, nothing that you have saved or created since you started using it. Remember that.

Where is all of your stuff? Nine times out of ten, everything you want to back up is in the My Documents folder. Windows automatically saves files to different folders in My Documents. Even the downloads from the Internet are saved there. This, however, doesn’t mean that everything is saved there. Some programs save your creations in completely different folders, ones that the program creates on its own. If you have things that are important to you on your computer, make sure you know where they are.

Windows Explorer, that folder on the bottom of your taskbar in Windows 7 or the ‘Explore’ program that comes up when you right click the start button and choose ‘explore’, is your friend. Get used to using it. All of the cool things on your computer can be found using Windows Explorer. Explorer is worth a blog entry on its own, it’s that important. Play around with it and see what you can find. I use it all the time and it’s one of the reasons I stick to Windows. The Mac OS has nothing like Explorer, that I have found anyway, and I get claustrophobia using OS X simply because I can’t find anything!

While we are discussing back ups, go back and read my post on WinDirStat . If you’re wondering where things are on your computer or if you simply want to know what’s taking up the room, read the post and you’ll be educated. WinDirStat is free and perfect for exploring your computer. Once you have the graphic up on your screen, run your cursor over it to see where everything is. As the cursor moves, the location of the file it’s resting on is shown. Some files, the Windows ones for instance, are huge but can’t be touched. Others, usually the blue ones, are your files and can be backed up.

That’s it for today. Tomorrow I’ll write more about actually performing the back up. It’s a step by step job that takes time but, ultimately, will save your bacon should your hard drive fail. Even if you only save precious family photos, it’s worth it, right? Some things that are lost are lost forever. That’s not a good feeling.

Thanks for reading!

Windirstat – What is taking up all the room on my hard drive?


With today’s huge hard drives it’s sometimes tough to know where all that room has gone. You buy a one or two terabyte drive, use it for a while and then you’re suddenly running out of storage space. Here’s a solution for you!

Windirstat (available here for free: http://windirstat.info/) gives you a real picture of what your hard drive looks like, in terms of which files are taking up all the room. Download the program and install it. I’ll wait. When you’re done, come back to see how to use the program.

Back? Ok. Here’s what you do:

1. Start Windirstat. This is the menu you will see:

Choose the Drive
Select the drive.

Select the drive that you want to take a look at. Usually that is your C: drive. In my case I have three to choose from but most computers have only one or two drives.

2. WinDirStat will nibble away at your drive, setting up an image for you. As it does this you’ll see little PacMans zipping back and forth. It’s kind of cute, actually. Once all of the stats have been collected, here is what you’ll see:

A graphic of a hard drive's files and folders.
This is a graphical representation of my hard drive.

3. Once WinDirStat has collected the information it needs, it shows you this graphic of your hard drive. It may look confusing at first but it’s really pretty cool. On the top right you’ll have a legend which tells you what color represents each type of file. On mine, the blue represents MPEG-2 files from my DVR. Each little section of that blue area is an individual file while the whole blue area on the left is a folder. Each color group represents a folder, each smaller highlighted area is an individual file.

4. Looking at this graphic, you’ll be able to see what files and folders are taking up the most room. If you click on each file, WinDirStat immediately shows you what file it is up on the top left section. If there is one particularly huge file, you can then decide if it’s something you want to save or archive or delete.

5. Some areas that WindDirStat will show you are obviously off limits for deletion. Any of the Windows files, for instance, must be left alone. There are two yellow files on the lower right, as an example, which represent two important Windows files; the pagefil.sys and the hiberfil.sys. These are your ‘scratch pad’ files and are about the same size as the amount of RAM in your system. Don’t touch them.

6. Once you’ve spent some time finding the files and folders that are taking up extra space, delete them or archive them to a DVD. Then you can reload WinDirStat and see what the big picture looks like. I keep pretty good track of what’s on my drives but there are always some files that seem to crop up that I could delete. See what you can find on your drive.

Thanks for reading!