
This is the first part of our series that will show you how to stream a video from your computer to your HDTV, using Apple TV. We’re Windows users here at Computers Made Simple but we have found Apple’s TV streaming device, Apple TV, to be one of the top devices out there, designed solely to put out content to HDTVs.
You’ll need some prerequisites for this how-to. Here’s the list:
1. A high-def TV (HDTV) with an open HDMI port.
2. A home network, could be wired or wireless. We prefer wired but a router that uses the N protocol will work just fine. The old G protocol won’t cut it here. G is fine for email and surfing but streaming video requires more bandwidth, something only N can provide.
3. To stream videos using Apple TV, you need a computer, could be a desktop or a laptop. These computers could be PCs or Macs but we’re only talking about PCs here.
4. Handbrake, the free video transcoder. Handbrake is open source. This means that it’s both free, reliable and upgraded on a regular basis. You can get it here: Handbrake . Download it and install it. Make sure you allow it to put a shortcut on your desktop. That way you won’t spend time looking for it in your Start or Program menu.
5. A video. Any video will do here, could be from your digital camera or camcorder, a torrent you’ve downloaded or a video that you’ve saved from Youtube.
6. iTunes. You’ll need an account with iTunes as well as the software itself. If you have any Apple device, whether it’s an iPod or iPhone or one of their music players, you will almost certainly have iTunes already.
TIP: While the Apple TV device is easy to use, it won’t play every type of file. You don’t have to understand file formats or types to stream videos but some basics would help. Here’s an example. Let’s say that most of the world can understand English. In order for an English speaking person to understand Arabic, for instance, the Arabic would have to be translated into another file format , in this case English. That’s what Handbrake does. It takes virtually any video file and translates it into something your Apple TV can understand.
The next little bit of this how-to will save you time and frustration once you get your Apple TV up and running. Since the device will only play certain types of files ( .m4v, .mp4 and .mov formats), you’ll want to make sure your video is one of those kinds. Here’s how to ensure that your video file can be streamed. Here we go:
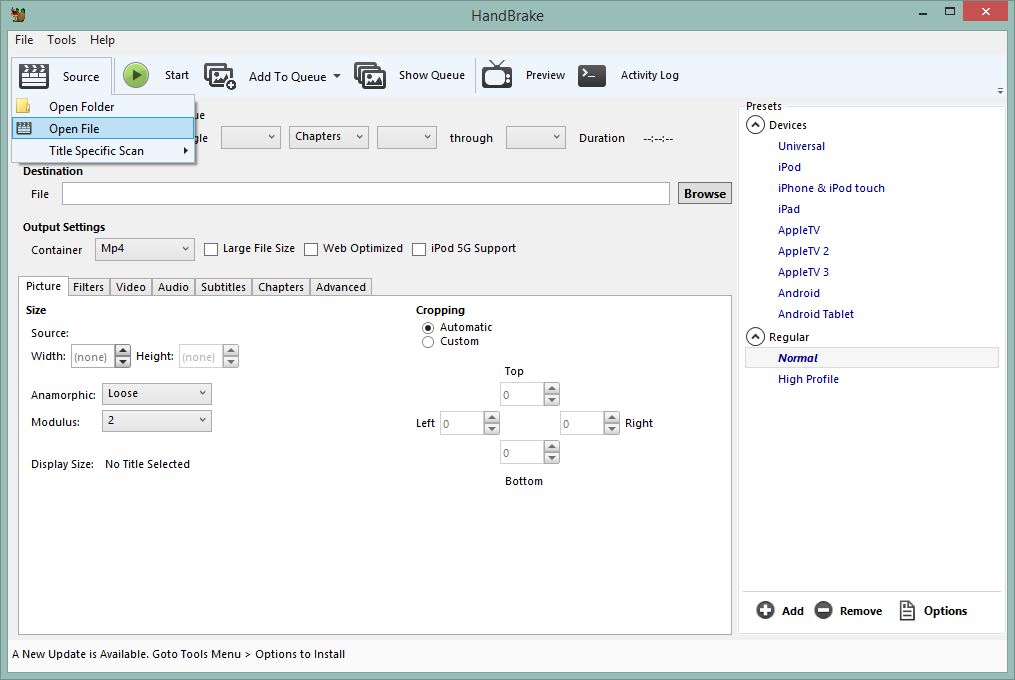
1. Open Handbrake. On the clapper icon on the upper left, choose Add File:
2. We downloaded one season of the Australian TV show, Rake. The videos are in our Downloads folder in Documents. Your location may be different. Here’s the path to our videos:

3. You’ll notice that the files already are identified as ‘MP4’. While they may be MP4s, Apple TV won’t play them. Why? Because there are many different kinds of MP4 files, just about as many as there are accents in the English language. Remember our previous example? Scottish people speak English, right? People in the American South speak English. Do the two versions of English sound the same? No, they don’t. Yes, they are all English and yes, the files are MP4s but Apple TV can’t read that particular type of MP4. That’s where Handbrake comes in.
4. Once you have clicked Open in the previous menu, you’re taken back to Handbrake’s main screen. What you’re looking for here are the words AppleTV3 on the middle right side of that screen.
5. We have an AppleTV 3, you might have something else. Choose whatever it is you have and Handbrake will know what file to type to ranscode your video into in the next step.

6. Press Start and Handbrake will start the transcoding process. One of our files took eleven minutes so, depending on the speed of your computer, you’ll have to wait for a while.
OK, now you’ve got one file ready to stream. That’s all for today. Next time we’ll show you how to get the file from your computer to your HDTV. It’s easy and works like magic.
If you have problems, feel free to ask us for help. Comments and questions are welcome but Likes on our Facebook page get immediate attention. Here’s the link: Computers Made Simple on Facebook .
Thanks for reading!