
Network printers are great, aren’t they? Once they’re hooked up, either by an Ethernet cable or through WiFi, anyone on your network can print. Sounds easy, right? It is, at least until you reboot your router or change your Internet connection. When that happens, life becomes much more complicated. Here’s how to un-complicate things a bit.
1. We recently switched from DSL Internet to cable Internet. That meant we had to purchase a different router. What’s a router? They’re a bit like a traffic light, to be honest. Routers feed out Internet signals to all of the devices attached to it (wired or through WiFI) and route the various requests from those devices to the Internet. This includes routing your ‘I want to print this’ instructions to your network printer.
2. Every device on your network has at least two things in common. Each one has what’s known as a unique MAC address, a series of numbers that identifies that device to the router. On top of that, each device has an unique IP address that the router uses to identify it on the network. We’re concerned with the IP address here.
3. If you can’t talk to your network printer, your network printer can talk to you. How? Somewhere on its menus there is one that prints its basic settings. Each one is different, of course, but your printer almost certainly has a small LCD screen that you would use to adjust its various settings. Look for the button that reads ‘Menu’, press it and scroll your way up or down, left or right till you find ‘Basic Settings’. Press the OK button and the printer should shoot out a single page full of information. Here’s what you’re looking for:
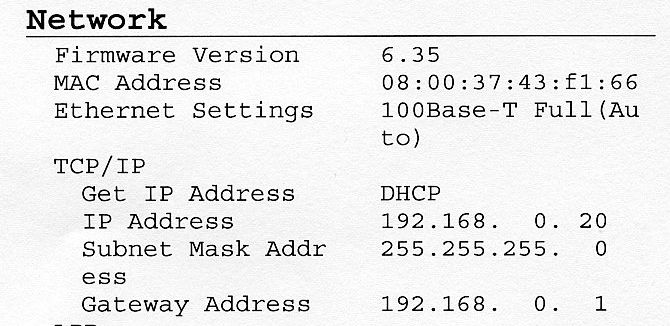
The IP address of our Dell printer is 192.168.0.20. When we switched routers, this number changed, as did our Gateway Address. The printer automatically got it’s IP address from the router but our computers were unable to find it because that number had changed. Now that we have this piece of information, we can link up any computer on the network to our printer.
TIP: Printing the basic settings sheet is the easiest way to find the printer’s IP address. Any network printer that has an LCD screen, and they all should, will also show you the IP address on the screen. In order to do that, find the owner’s manual and check out the steps on how to do it.
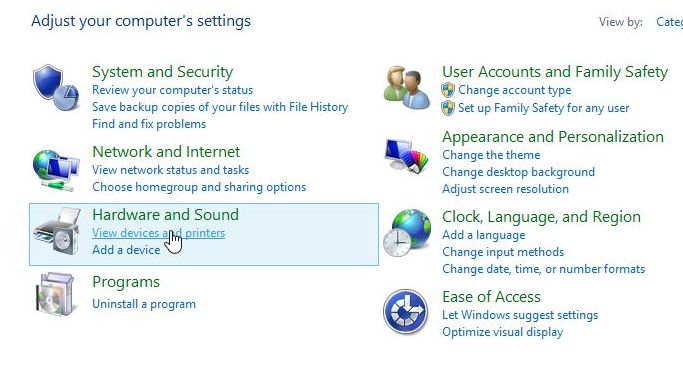
4. No matter which version of Windows you’re using, you must get to the Control Panel. Since the route to it is different from Windows 7 to Windows 8, you’ll have to do different things. Windows 7 lets you press the globe icon to bring up the Start menu, then click Control Panel while Windows 8 forces you to hover your mouse up on the top right of your screen then choose Settings then choose Control Panel. Here’s what you’ll see when you finally end up there:
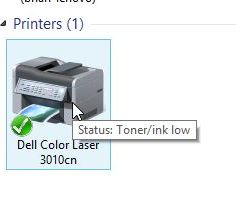
5. On the next page, choose the network printer. It should be the one with the green check mark on it. Like this:
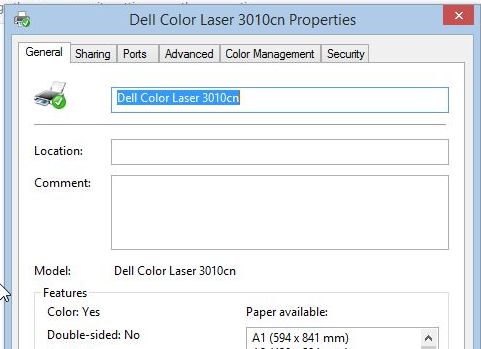
6. This is the next menu that you’ll see:
7. On the next menu, click on the words ‘Configure Port’. You’ll see this next:
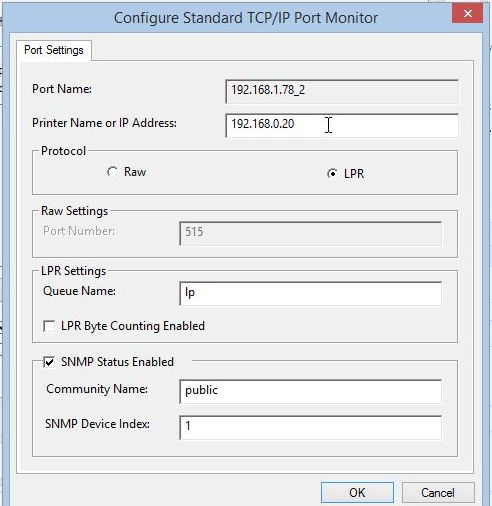
8. You can’t type in the slot that reads ‘Port Name’. Type the number from the settings sheet from the printer in the slot marked ‘Printer Name or IP Address’, making sure you make it exactly the same. An IP address has four sets of numbers separated by a period. Almost all of them start with 192.168. followed by a 1 or a 0 then a single or double digit number. Once you get that done, click OK all the way through to save your changes.
9. What you’ve done is pretty much the same as putting an address on an envelope that you want to pop in the mail. Now your computer knows where to send its print instructions.
This whole thing isn’t nearly as technical as it might sound. You print out a map that the printer provides then change the computer settings according to that map. As long as you do it step by step, you’ll be fine. Additionally, you really can’t screw anything up. The worst thing that might happen is that you won’t be able to print. If you can’t, go back through the steps and do them again. Ask us in a comment or on our Facebook page if you have a problem. Here is the link:Computers Made Simple on Facebook.
Thanks for reading!
___________________________________________
Here’s a link that might help us if you are interested in hosting your own blog with Fatcow Hosting. We’ve signed up to become an affiliate and we make a bit of money if you sign up for hosting via this link: FatCow Hosting Thanks!