When we create a new post here on Computers Made Simple, we use Irfanview for our screen captures. Using this free and incredible software, we can capture multiple screen grabs with a simple keyclick (Ctrl and F11). Here’s how we do it:
1. Obviously you have to download Irfanview and install it. While you’re at it, download the plugin package as well as the main program. We recommend using Tucows for the download. Why? With a few of the other sites listed, you have to use a downloader which, more than likely, installs some kind of malware/adware/toolbar that you don’t need.
Tip: When you are installing free software, or any software for that matter, read each menu carefully. Many apps will want to install a toolbar (don’t!) and will ask to change your home page to their page (don’t!) and also change your preferred search engine (don’t!). Make sure you look for these lines in the menus and uncheck them.
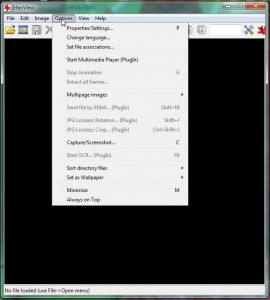
2. Fire up Irfanview. What we’re looking for on the main screen is Options and then Capture/Screenshot. Here’s how it looks in Irfanview:

3. Once you install Irfanview, by the way, you don’t have to find the program to open it. Just double click on any photo on your desktop. We have Irfanview linked to all kinds of image files on our computers. It’s fast and simple, much faster than anything by Adobe.
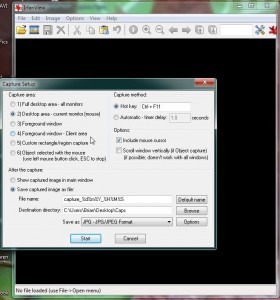
4. Now we’re at the capture screen. It looks like this:

5. There are three main areas of concern in this menu. First, on the top left, choose which part of your dekstop that you want to capture. In our case, we wanted to capture the screen where we were working (we have two monitors). We only had one window open so we didn’t need to check ‘foreground window’ and we didn’t have a big window open with a separate client window (that would be a program such as Photoshop or GIMP). You can also save a specific part of the screen, let’s say the video window of a webcam chat, for instance. Once you identify the area, Irfanview will capture just that section. This saves cropping later on.
6. The next part of the menu, up on the top right, decides what action will start the screen capture. In our case we chose the default ‘Ctrl + F11’ key combination. Any time we wanted to grab a photo of the screen, we hit the Ctrl key and the F11 key at the same time. Irfanview plays a little sound to let you know that the screen capture has worked.
7. You can also set Irfanview up for multiple timed captures. One second is the lowest amount of time for this but you can adjust that upwards to longer intervals.
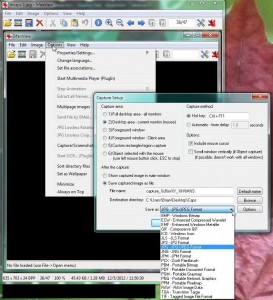
8. Lastly, tell Irfanview what to name the file (default is fine with us), where to save the file (make a folder on your desktop and browse your way to it) and what kind of file you want to end up with. Jpg or Jpeg (same thing) is the norm for this but you might want a another file type. Here’s a list of the types available:

(You’ll note that you are able to use Irfanview to create PDF files from photos. Make note of that. That is one of the handiest file types when you’re dealing with large documents or photos.)
9. Once you have all of the screen captures you need, use Irfanview to crop them, if necessary. Draw a box shape around the area you want, click Ctrl + Y to crop, then Ctrl + S to save the image. Save it under a different name so the original is still there, just in case you made a cropping mistake.
Thanks for reading! Questions and comments are always welcome.
