Windows 8 is available on a demo basis right now. (Spring 2012) Installing the demo version as your main operating system isn’t a great idea, obviously. However you want to do it, make sure you install Windows 8 in a dual boot scenario, either on its own separate drive or on another partition of your main hard drive. If you can spring for an SSD, even better. You don’t have to worry about creating the dual boot option yourself, Windows does that for you.
The problem arises when you want to get rid of Windows 8. The dual boot menu still pops up every time you start up your computer. For me, this meant waiting around for the choice to come up then scrolling down to Windows 7. I couldn’t just push the start button on my computer and head off to make a coffee. Disaster!
After some searching, I came across a cool little program named EasyBCD by NeoSmart Technologies. (NeoSmart sounds like they weren’t smart before but are now, doesn’t it?) Their website is here: http://neosmart.net/ and you can check out some of their other software while you’re at it. EasyBCD is free as long as you are just a home user. If you’re using this commercially, cough up some bucks to buy it.
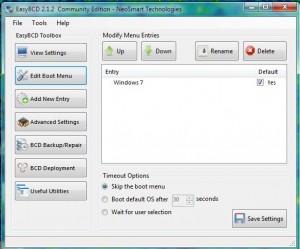
The software comes with ample online documentation but the main thrust of the whole thing is to show you which boot options you have (in my case there were two: Windows 7 and Windows 8). Using a small, efficient menu, EasyBCD displays your current options and allows you to remove the one(s) that you don’t want. The various options are on the left, as you see here:

I wasn’t planning to write a post on EasyBCD so I had already deleted the Windows 8 option. Basically, you do this:
1. Choose View Settings to see what your choices are.
2. Click Edit Boot Menu then highlight Windows 8 and choose Delete.
3. Highlight Windows 7 (or your normal operating system) and make it the default choice. Do that by clicking the box to the left of the word ‘Yes’.
4. Click the Save Settings box on the bottom right.
That’s it! EasyBCD has other uses as well and you can investigate what they are using the Advanced Settings or the BCD Backup/Repair and Useful Utilities. I just used it to delete the dual boot option, however.
TIP: If you screw up your boot menu, you won’t be able to start your computer. That’s kind of obvious, right? If you are at all squeamish about doing stuff like this, ask a techie friend to help you out. I’m just here to tell you about EasyBCD and give you details on what worked for me.
Thanks for reading!
